When you purchase through links on our site, we may earn an affiliate commission. Here’s how it works.
How to Extend WiFi Range With Another Router – Before You Start
Do you want a fast-working WiFi network with a better range? The average WiFi speed was 87.3 Mbps in North America (2021).
However, a single WiFi router is insufficient for larger homes, and you may find some dead zone with no or weak signals.
That’s why you should learn how to extend the WiFi range with another router.
Fortunately, this is a solution to rescue your WiFi from the dying signal trauma. You can simply use a spare router and ensure that you have strong signals in every room of your house.
You still have the option to use a wireless repeater to do this.
This article will explain how to extend the WiFi range with another router for improved WiFi signals across the house.
However, before that, you would want to know why a router when you can simply get a WiFi extender. Let’s check it out!
Second Router Compared to WiFi Extender
Second Router Compared to WiFi Extender
The distinction between second routers and wireless extenders is significant. Secondary routers use the same network as the primary router and extend signals to a larger area.
On the other hand, WiFi extenders build new networks wherever they are placed.
As a result, some people find using WiFi extenders to improve the signal across the house inconvenient.
While they help generate strong connections in a single room, your device will not connect to the leading network once you leave the repeater’s range.
On the other hand, wireless repeaters are unquestionably more accessible and more convenient than cable routers.
How to Extend WiFi Range with Another Router
Let’s see how you can set up a new router to enhance the WiFi range of your first router.
Using A Router App
Router apps can assist in managing more sophisticated setups with repeaters. Compatible routers can be set up as repeaters using the Nighthawk and Asus apps.
It would be best to have a router that has been turned on and is signaling that it is ready to go, but an Ethernet connection is not required.
It’s as simple as recognizing the router and starting the configuration by picking the repeater option.
To utilize the Nighthawk app, select the router you wish to use as a repeater.
Then open the app and wait for it to detect the router once you’re connected, but your app must allow natively switching to a repeater.
Set Up New Access Point
Using another router as a new wireless access point in your home is one approach to extending your wireless connection.
This method is helpful for people who already have Ethernet cables installed in their homes.
If you don’t have any more wiring, you can use various cables to link the new access point to WiFi dead zones.
Here are the methods to successfully connect the second WiFi router.
Find the Primary Router’s IP Address
You’ll need to find the primary router’s IP address before connecting the second one to access the settings page.
#1. Connect a Windows computer or laptop to your existing router.
#2. Type cmd into the search bar to get to the command prompt.
#3. Once opened, type “ipconfig” and hit enter.
#4. Go to the default gateway and copy your primary router’s IP address.
Primary Router’s Configuration Settings
After you’ve got your IP address, go to your browser and put it into the URL address bar.
The setup firmware screen for your router will appear in your browser, where you must log in with your router’s ID and password.
Next, check the default ID and password with your ISP or the device manufacturer’s website.
Primary Router’s Configuration Settings
A basic setup page will prompt on the screen as you log in.
Note the WiFi network name or SSID, the channels, and the security type in wireless settings, which you will require later to set up the second router as an access point.
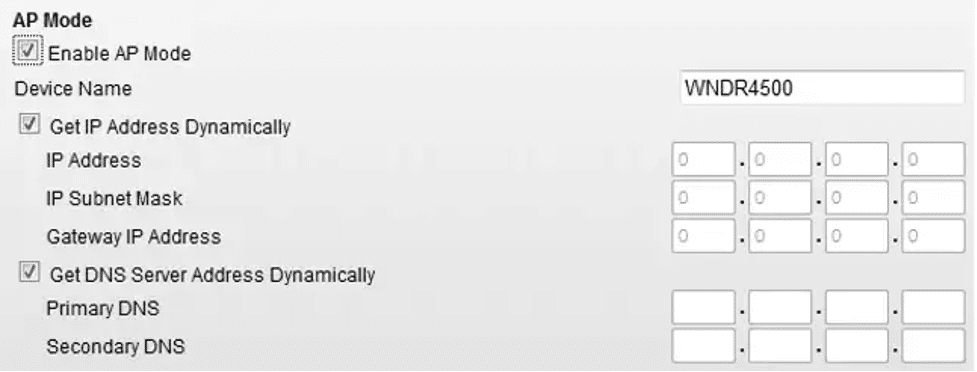
Aside from that, if the firmware has an Access Point Mode option, make sure to switch it on and save the settings.
Depending on the router model, the option may be referred to by a different name.
Reset And Configure The Second Router
Reset And Configure The Second Router
To restore factory settings on your second router, connect it to a power source. Next, check for a reset button on the back of the router.
Then, push the button for at least 30 seconds with a tiny object like a pen or paperclip. As a result, the router will be hard reset, and you will observe that the lights will switch on and off.
Before configuring the router, turn off the primary router quickly.
Next, connect the second router to your laptop or PC with a network cable, then repeat the first step to access the router’s application setup page.
You must use the command prompt to determine its IP address, copy it, and put it into your browser’s URL.
It will then send you to the firmware application’s login page. Go to the Wireless Setting page in the app after logging in and following these steps.
#1. Change the WiFi mode to access point or AP mode.
#2. You may keep the same name as your primary router or create a different SSID (wireless network name). Make sure to select a different channel number in the latter situation.
#3. If your router and AP have the same SSID, keep your AP’s security type and password the same.
#4. You can then turn the firewall off by going to the Security area.
Setup The Second Router
After you’ve changed the settings on your second router, double-check that it’s still compatible with the primary router. As a result, you must disable NAT and assign a fixed IP address to your router.
You may set your router to bridging mode or manually assign a new IP address.
#1. Navigate to the Network or LAN Setup page.
#2. You must now allocate a fixed IP address to your second router outside the DHCP range.
#3. As a result, you must first disable the DHCP (Dynamic Host Communication Protocol) option to prevent it from automatically issuing a new IP address.
#4. Please note this new IP address for future reference.
#5. After making changes to each configuration page, click Save.
#6. After changing the IP, you’ll have to wait a few minutes for the router to reset. Later, you can access it by typing this ID into the browser’s URL.
Connect Both Routers
You need to link the 2 WiFi routers together and test the network using a pair of powerline networking adapters or an extended Ethernet cable network.
Turn both routers on and place the second in a dead zone in your house. Connect various intelligent devices to WiFi routers to test signal strength and connectivity.
Use the Second Router as Wireless Repeater
Extra cables can be ugly if you don’t have Ethernet cable networks installed in your home. Furthermore, they merely increase the cost of increasing your wireless range.
Some routers offer a wireless repeater mode that you can use in these situations.
This solution improves WiFi coverage by rebroadcasting the signals from your main router without using any cables or power adapters at home.
However, you must check if your old or new router supports this feature.
Configuring Wireless Router Settings
For example, Apple, Netgear, Linksys, and Belkin routers support a repeater or bridging option in their settings. In addition, keep a lookout for the WDS (Wireless Distribution System) option.
The following are the basic procedures for setting up your router as a WiFi repeater.
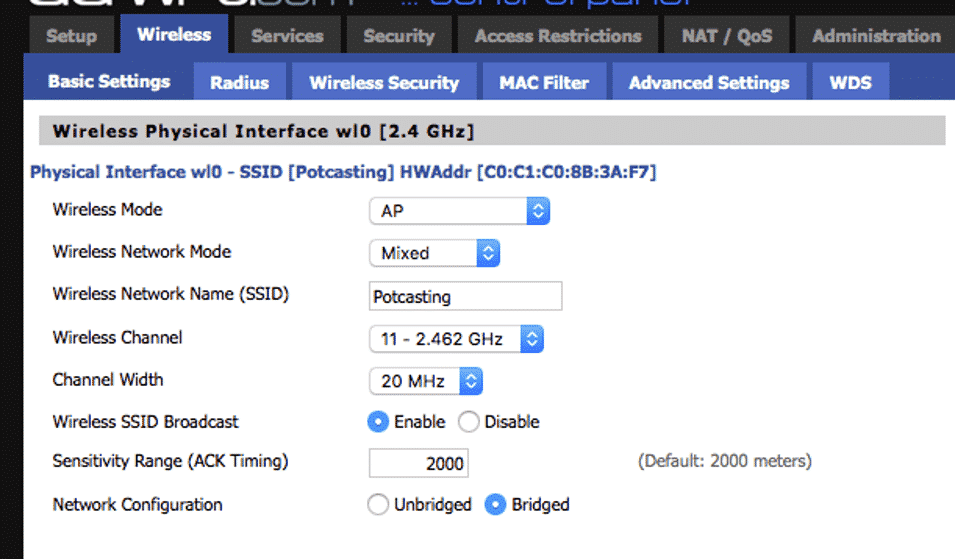
#1. On your router’s application in the browser, go to Wireless Settings and select the Basic Setting option.
#2. In the options, change the Wireless Mode to Repeater.
#3. Maintain the same Wireless Network Mode and SSID as your primary router.
#4. Then, under Virtual Interface, click Add and give your repeater a new SSID.
#5. Save these changes without pressing the Apply button.
How to Extend WiFi Range with Another Router – Configuring Wireless Router Settings
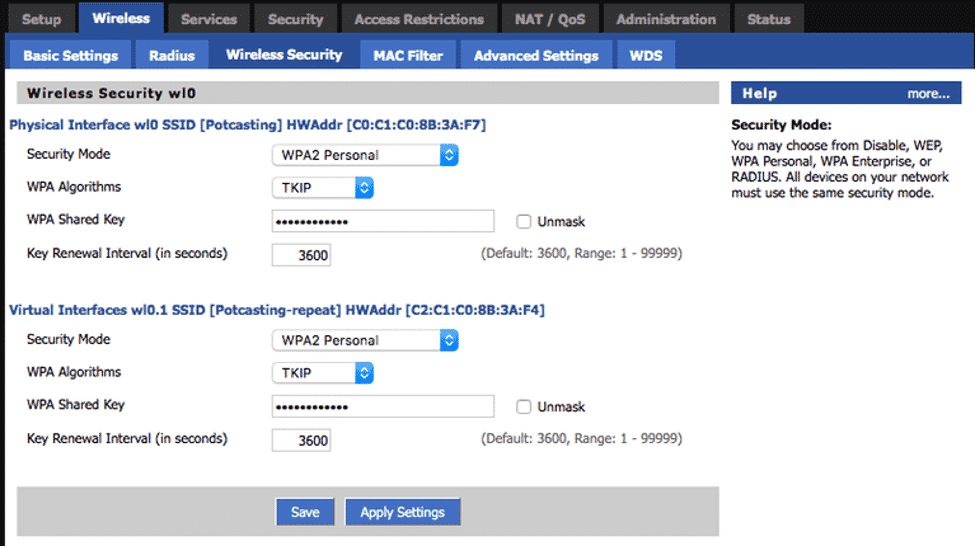
#6. Go to the Wireless Security tab after that.
#7. Under Physical and Virtual Interface, make the same changes as the primary router.
#8. Save your changes and go to the Setup Section.
#9. Find the router IP box in your settings and assign a new fixed IP to your WiFi repeater different from the primary router’s IP.
#10After you’ve finished configuring your repeater, click Apply settings. Your router will automatically restart in a while.
Then, connect a device to your router and test the wireless signal’s strength.
Use Custom Firmware
While dealing with a router with a built-in WDS feature is considerably more accessible, you don’t need a repeater to extend your WiFi signal.
Instead, you can connect it to a third-party software custom firmware to change its settings. DD-WRT, Tomato, and OpenWRT are a few of these programs.
Unfortunately, although there are no complicated instructions for installing these applications, they are challenging.
Furthermore, it would be best to determine whether your router model is compatible with custom firmware and whether you can install a repeater using software such as DD-WRT.
Conclusion
Identifying the optimum areas for the wireless network in large homes might not be easy.
For example, your room or office may be out of range of the router, causing your work to slow down due to a weak WiFi connection.
However, there’s a simple solution to this widespread issue. An additional router to extend the WiFi range can quickly boost your WiFi signals.
I hope it helped you understand how to extend the Wi-Fi range with another router.
See Also
HDMI Splitter for Dual Monitors