When you purchase through links on our site, we may earn an affiliate commission. Here’s how it works.
How to Backup MacBook Pro – Before You Start
Thousands of people choose MacBooks for their elegant design and powerful operating system. However, the apps and files are arguably more important than the device.
Knowing how to back up a MacBook to iCloud or an external hard drive is crucial to ensuring the safety of your files in the event of damage or failure. Recognizing the importance of personal files to its users, Apple equips its devices, including iPhones and MacBooks, with tools designed to facilitate content backup.
Time Machine, an integrated app in macOS, enables users to back up various types of data, such as apps, files, and photos. You’ll need to connect an external HDD to your MacBook to use Time Machine. Additionally, you can back up your MacBook on iCloud, provided you have sufficient space.
This guide will detail the processes for backing up your MacBook using iCloud and Time Machine and how to back up selected files on a MacBook.
The Backup Process: iCloud
Backing up a MacBook to iCloud is straightforward. Follow these steps:
- Click on the Apple logo in the upper-left corner of the screen.

How to Backup MacBook Pro
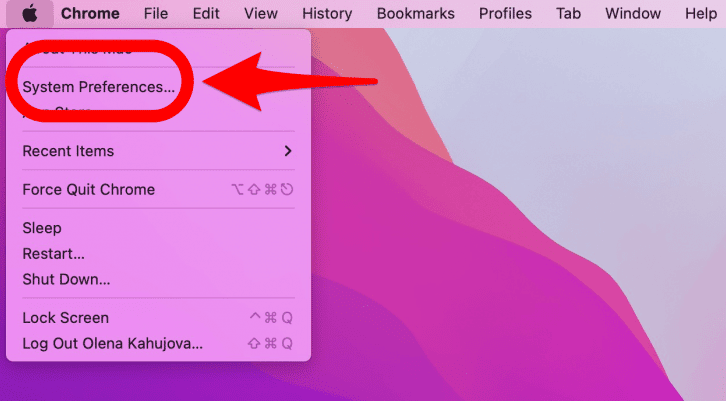
- Select ‘System Preferences.’
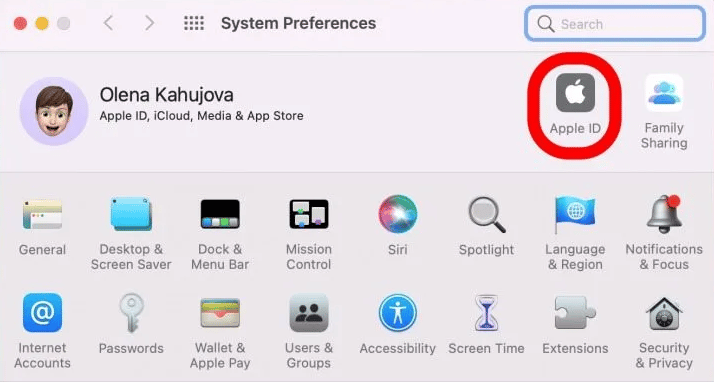
- Choose ‘Apple ID.’
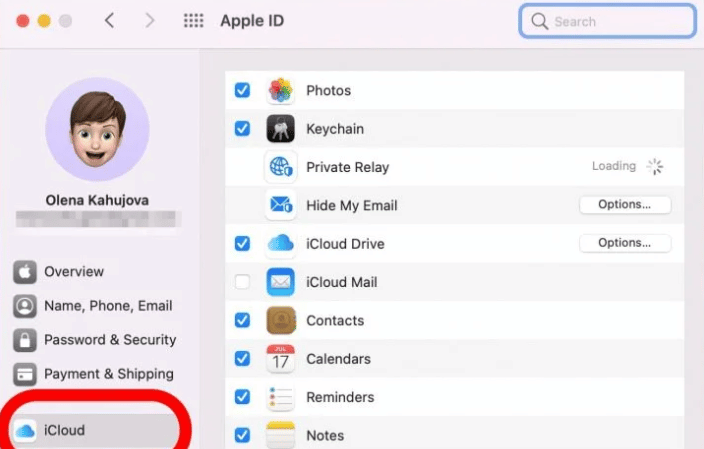
- Click on ‘iCloud’ from the left-hand menu.
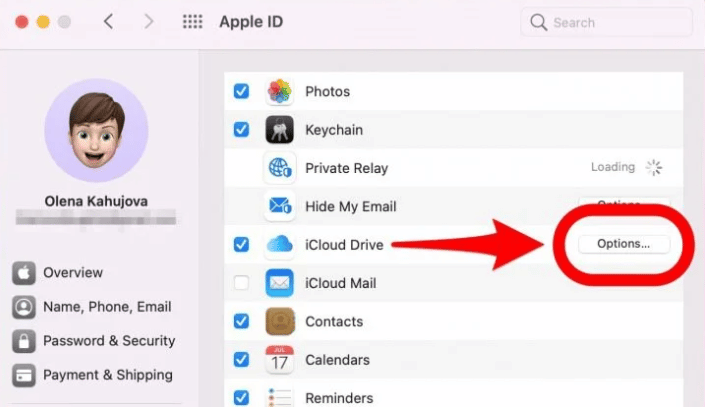
- Ensure ‘iCloud Drive’ is checked.
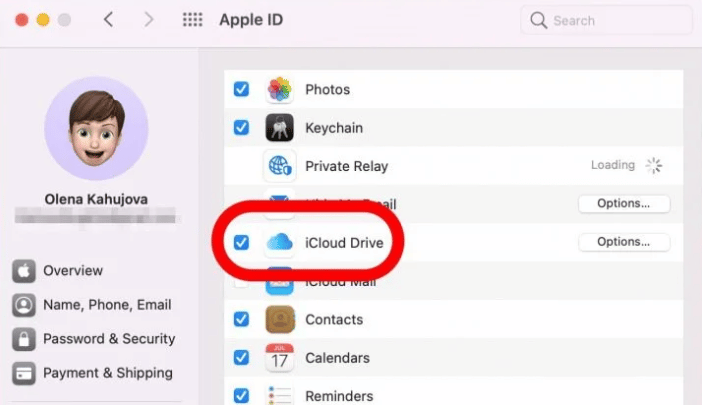
- Select the ‘Options’ button beside ‘iCloud Drive.’
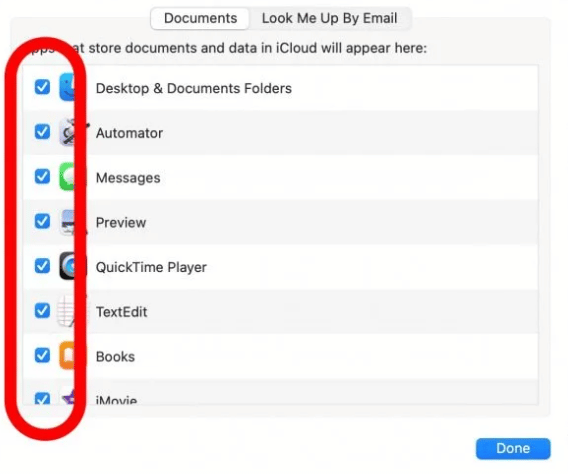
- Check the boxes next to the items you want to back up on iCloud, such as ‘Desktop & Documents Folders’ and ‘Books.’ Click ‘Done’ when finished.
How to Backup MacBook Pro
- Select ‘Optimize Mac Storage’ to save space on your MacBook. However, some files may only be stored in iCloud, not locally. This is important to note if you also use an external hard drive for backup.

- If additional iCloud storage is needed, click ‘Manage.’
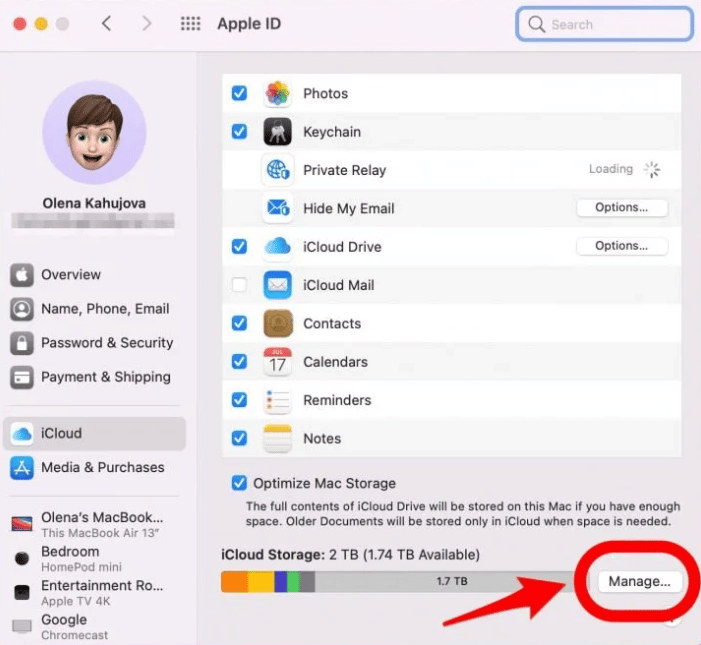
- Select ‘Change Storage Plan’ to purchase more iCloud storage.

How to Backup MacBook Pro
- To access your MacBook’s iCloud Drive, open a ‘Finder Window.’

Upon completion, you can access these files on other Apple devices, such as iPads and other MacBooks, ensuring your data is secure even if something happens to your device.
The Backup Process: Time Machine (Entire Storage)
- Begin by connecting an external hard drive to your MacBook.
- Click on the Apple logo in the upper-left corner of the screen.
- Select ‘System Preferences.’

- Choose the ‘Time Machine’ option.

- Click on ‘Select Backup Disk.’

- Select a drive and choose ‘Use Disk.’

- Enable ‘Back Up Automatically’ for instant device backups.

- To manually initiate a backup if it does not start automatically, enable ‘Show Time Machine in menu bar.’ Then, select the ‘Time Machine’ icon from the menu and click ‘Back Up Now.’

The Backup Process: Time Machine (Select Files)
To back up selected files to an external hard drive using Time Machine, or if the external hard drive lacks space for a full backup, follow these steps:
- Click on the Apple logo in the upper-left corner of the screen.
- Select ‘System Preferences.’

- Choose the ‘Time Machine’ option.
- Select ‘Options’ in the bottom-right corner of your screen.

- Click the Plus (+) button.

- Select the files and folders you wish to excludefrom your backup. You can choose apps, documents, and folders for exclusion. Hold the ‘Command’ button to select multiple items simultaneously.
- Click ‘Exclude.’

- Click ‘Save’ to finalize your selections.

How to Backup MacBook Pro
Note: Beyond iCloud and Time Machine within Apple’s ecosystem, alternative backup solutions like Google Drive, Dropbox, or Microsoft OneDrive can also be utilized to safeguard your MacBook Pro’s data.
Final Thought
In conclusion, you are now equipped with the knowledge to back up a MacBook to iCloud, enabling you to securely store applications, documents, photos, etc. Furthermore, Apple’s native backup utility, Time Machine, offers the flexibility to back up your entire storage drive or select files according to your preferences.
See Also
How to Connect iPhone to MacBook Air
How to Take a Screenshot on a Macbook Pro