When you purchase through links on our site, we may earn an affiliate commission. Here’s how it works.
TP-Link Smart Plug Setup – Getting Started
The TP-Link Smart Plug connects your smart home Wi-Fi network to a wall socket and can be controlled manually via an on or off button on the side. However, the real advantage of having a smart device lies in its ability to be remotely controlled using the Kasa Mobile app for Android or iOS.
Using Amazon’s voice assistant, Alexa, you can leverage the Kasa Skill to establish voice control through devices like the Echo, Echo Dot, or Echo Show.
After unboxing and connecting the plug to an electrical outlet, the next step is to install the Kasa Mobile app on your device. This will enable you to connect the plug to your Wi-Fi and control it via the app or Alexa.
TP-Link Smart Plug Setup Process
Once the smart plug is paired with your Wi-Fi network, follow these steps to connect the TP-Link Smart Plug to Alexa and Echo devices. With verbal commands, this lets you control devices like coffee makers, desk fans, and other smaller appliances.
Here are the steps to set up the TP-Link smart plug:
- Open the Alexa app. Download it from Android or iOS if you don’t already have it. Launching the app will take you to the main screen.
- Go to the bottom right corner and click on ‘Devices.’
- Select the plus (+) sign in the upper right corner of your screen.
- Choose ‘Add Device.’
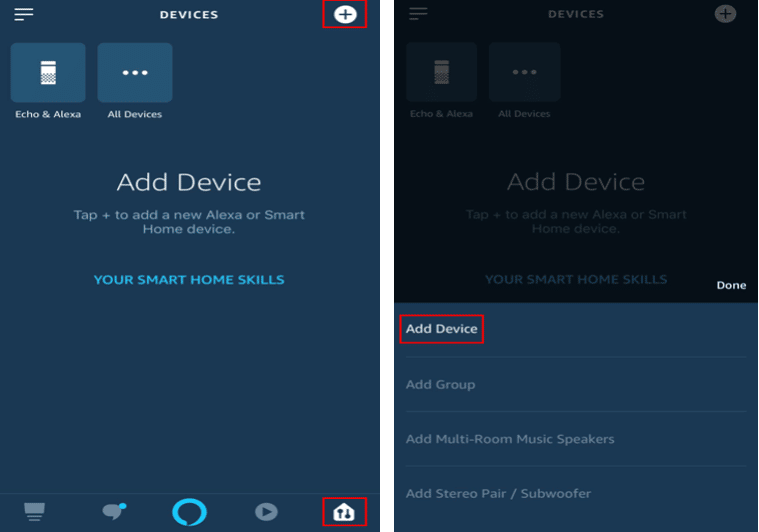
TP-Link Smart Plug Setup
- Pick ‘Plug’ from the list of devices.
- When asked to select the smart plug’s name and brand, choose ‘TP-Link Kasa’ and press ‘Continue.’
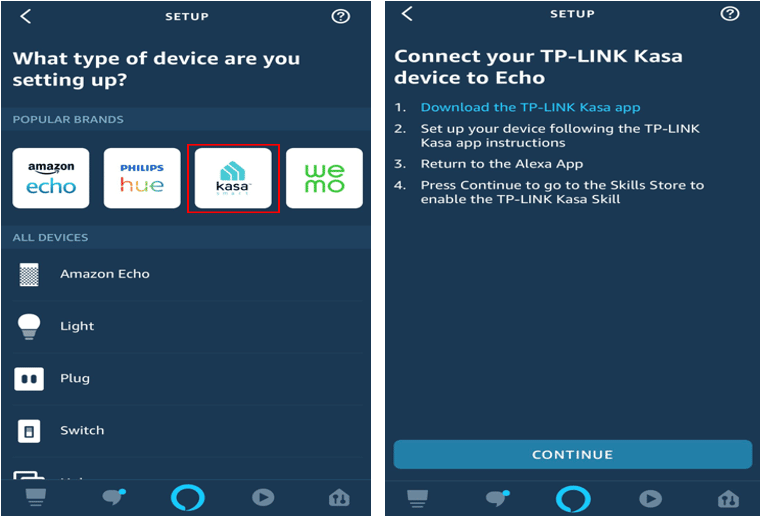
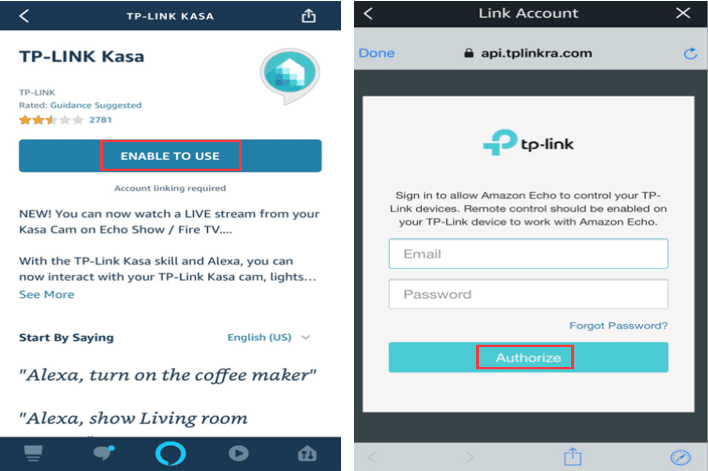
- Redirect to the Kasa Skill and select ‘Enable to Use.’
- You will be prompted to enter your TP-Link account details. Confirm by entering the login ID and passcode you set up with the Kasa App.
- Input the correct Kasa credentials in the Alexa app and click ‘Authorize.’
- After authorization, close the window by clicking ‘Done’ in the upper left corner. The Alexa app will then display a ‘Discover Devices’ dialog box.
- Choose ‘Discover Devices.’
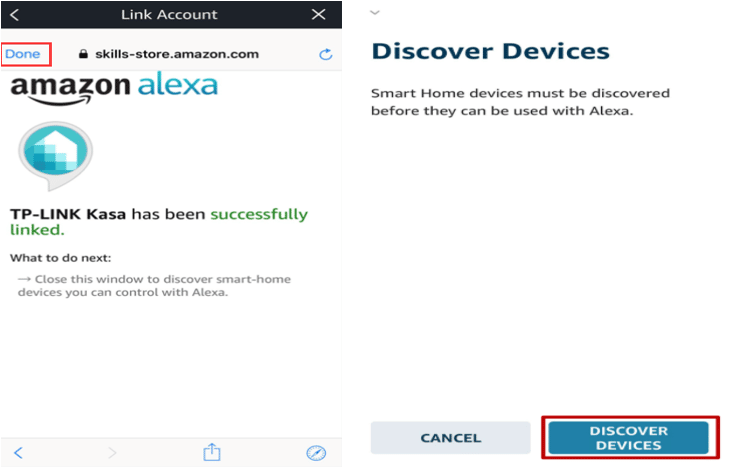
Discover Devices
- You will be added to a group. You can skip this step and click ‘Done.’
- You can now control the smart plug through the Alexa app or use verbal commands with an Amazon Echo device.
- For verbal commands, try saying, ‘Alexa, turn on the bedroom light’ or ‘Alexa, turn off the living room light,’ depending on the label you assigned to your device in the Alexa Smart Home section.
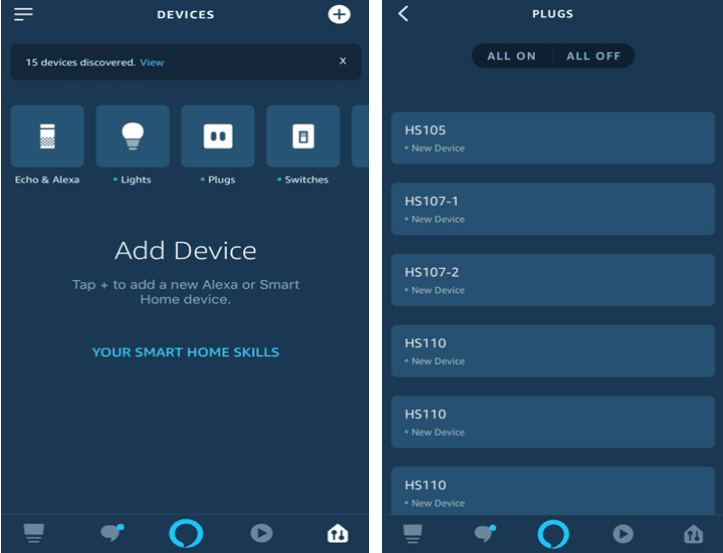
You have now completed the setup process and successfully added the Kasa Smart Plug to Alexa and your Amazon Echo speaker.
Troubleshooting TP-Link Smart Plug Setup
Alexa Doesn’t Recognize The TP-Link Smart Plug
Try unplugging and replugging the smart plug, then rediscover the device in the Alexa app. Also, ensure the device is compatible with the Kasa App.
Alexa Is Showing the TP-Link Smart Plug Is Offline
Connect your smartphone to the TP-Link smart plug via your phone’s settings. Disable any VPN connections that may be active during the setup process. Unplug and replug the smart plug, then repeat the setup steps.
Your TP-Link Smart Plug Can’t Connect to Your Wi-Fi Network
The wireless signal may be too weak; move the plug closer to your Wi-Fi router if it’s less than two bars. Also, ensure the Wi-Fi network you are attempting to connect to is on the 2.4 GHz band.
You Can’t Press ‘Done’ When Setting Up the Smart Plug in the App
Wait approximately 15 seconds, then check the light on the TP-Link smart plug. Don’t restart the setup if the plug shows it’s connected or the light blinks.
You Can’t Rename the Smart Plug
Reconnect to the Plug’s Wi-Fi network and try again. Alternatively, reinstall the Kasa companion app on your smartphone.
Final Thought
We hope this article helped set up your TP-Link smart plug with Alexa. If you encounter any further issues, consider contacting TP-Link’s support team for additional assistance.
See Also
How to Connect Smart Plug to Alexa
How to Connect Alexa to Bluetooth