When you purchase through links on our site, we may earn an affiliate commission. Here’s how it works.
How to Set Up Smart Bulbs with Google Home – Getting Started
Smart lights have become one of the latest features to enhance the Google Home experience. Indeed, you can now manage your smart lights using your voice, mirroring the convenience often showcased in television advertisements.
Utilizing Google Home’s voice assistant allows you to control your lights effortlessly. Connecting your lights to Google Home is straightforward, requiring only the appropriate devices to get started.
Should you seek to integrate new lights from a brand already connected to your Google Home app, Google Assistant can help you locate these devices through your smartphone or any smart speaker in your residence.
This guide outlines simple steps to connect your smart lights to Google Home and introduces some useful voice commands.
The Setup Process
- Install your smart light bulbs and ensure they are turned on.
- Open the Google Home app, available for download from the iOS App Store or Google Play Store if it is not installed.
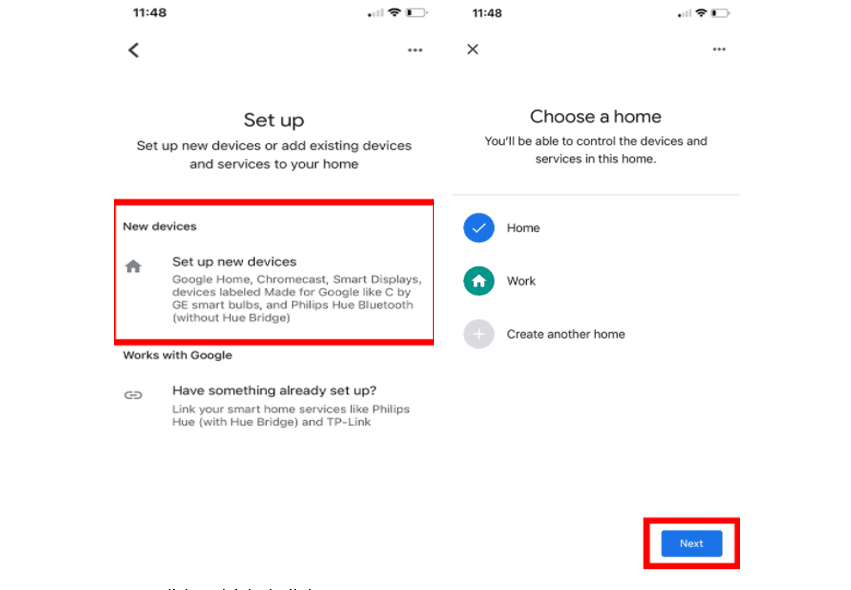
- Tap the Plus (+) icon in the top left corner of the Home app’s main interface.
- Select ‘Set up device’ from the ensuing menu.

How to Set Up Smart Bulbs with Google Home
- Choose ‘Set up new devices’ subsequently.
- Select a home, click ‘Next,’ and Google will search for available smart lights.
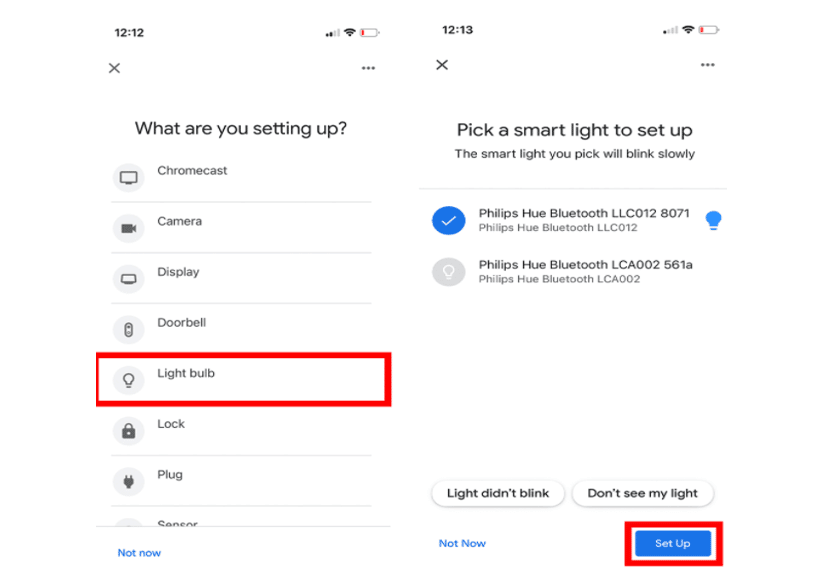
- Select ‘Light bulb’ next.
- Choose a bulb and select ‘Set Up.’ Your light bulb should begin to blink on and off. If this does not occur, choose ‘Light didn’t blink.’
- If your light bulb does not appear, select ‘Don’t see my light.’
- Should you encounter difficulty connecting your bulbs to Google Home, consider relocating your Google smart speaker closer to them. Then, turn off your lights for approximately 10 seconds and verify that your bulbs are not linked to other apps or voice assistants.
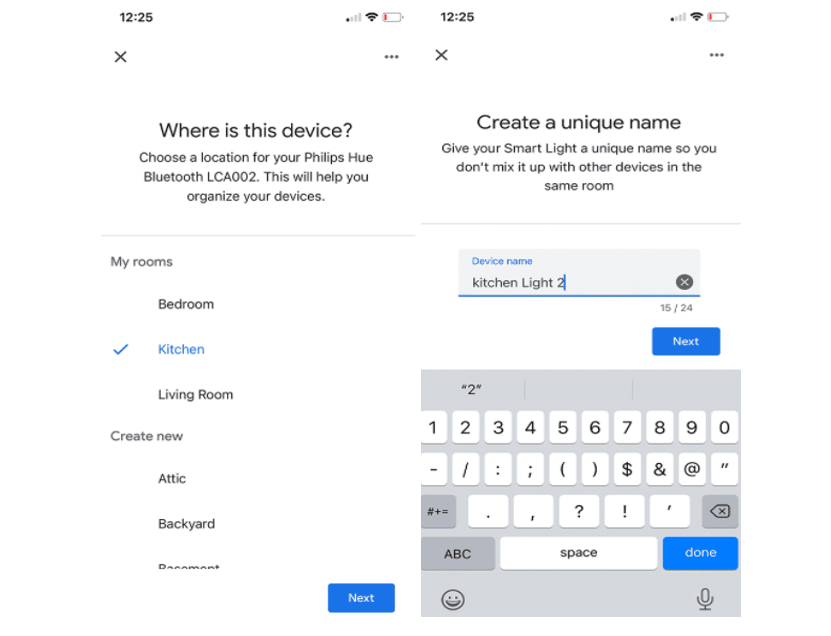
- Select a location for the bulb and click ‘Next.’
- Assign a name to your bulb. Repeat the last few steps for each smart light bulb you wish to add.
How to Set Up Smart Bulbs with Google Home
Organizing Your Smart Lights
Occasionally, Google Home may not prompt you to organize your lights within the app. If this occurs, navigate to the bottom of the Home app’s main screen.
You will find a section titled ‘Linked to you,’ including devices not positioned within the house. The following steps will help rectify this issue, allowing greater management over your devices.
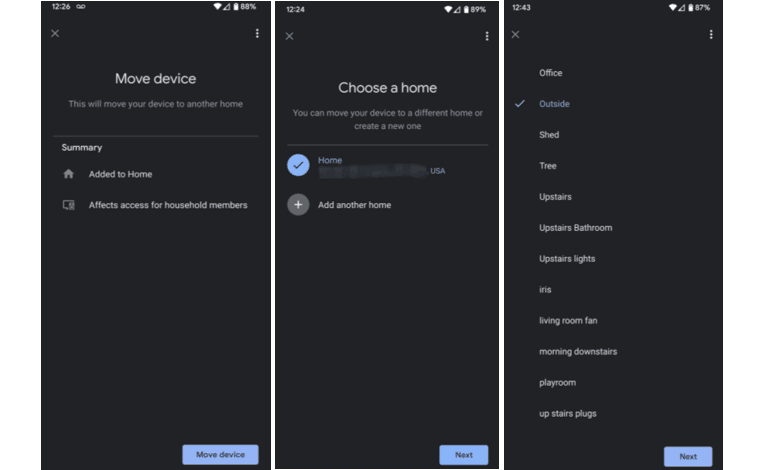
- Tap on the icon of one of the bulbs.
- Choose ‘Add to a Room’ at the bottom of the screen.
- Confirm the home to which you wish to add the bulb and click ‘Next.’
- After reviewing the summary, click the ‘Move device’ button in the bottom right corner.
- Select the room within your home where the smart bulb is located to add a custom room, then click ‘Next.’
Controlling Your Smart Lights
Having successfully linked your smart bulbs with Google Home, controlling them becomes straightforward. Whether you have multiple Google speakers throughout your home, any of them can manage any smart bulb.
You may use your voice or the Google Home app to control your smart bulbs. Voice commands include:
- “Hey, Google, set the living room bulb to blue.”
- “Hey, Google, set the bedroom bulb to white.”
- “OK, Google, set kitchen light brightness to 50.”
- “OK, Google, set the dining room light to warm.”
Alternatively, the Google Home app offers another method to control your smart bulbs without needing to approach the Google Home speaker:
- Open the Home app on your Android or iOS device.
- Select your smart bulb.
- Modify the brightness and toggle the bulbs on or off as desired.
- Tap ‘Color’ to select the desired illumination color for your bulbs.

Note: Should Google Home fail to recognize your smart bulb, try turning it off for about 30 seconds before switching it back on. Additionally, check for updates to the Google Home app on Android or iOS and consider uninstalling and reinstalling the app if necessary.
Final Thought
As illustrated, connecting your smart lights to Google Home is quick and straightforward. By following the setup instructions within the Home app, customizing light arrangements by room, and utilizing voice commands, you will efficiently integrate this smart technology into your home.
See Also