When you purchase through links on our site, we may earn an affiliate commission. Here’s how it works.
How to Connect HomePod to WiFi – Before You Start
The HomePod is Apple’s answer to Amazon’s Echo speaker range. It is a dedicated speaker that integrates with Siri to access Apple Music and HomeKit-enabled smart home devices.
The HomePod features a premium sound system within a 7-inch-tall framework. Its custom audio design delivers high-quality sound throughout the room, even when placed in a corner.
Setting up your HomePod Mini with an iPad, iPhone, or iPod touch connected to your WiFi network automatically transfers the relevant settings to the HomePod Mini.
This means your HomePod will automatically connect to your WiFi network. Before proceeding, make sure your iPhone is connected to the correct WiFi network. Let’s explore how to set up a HomePod and connect it to WiFi.
The Setup Process
- Connect your HomePod to a power outlet. Wait for a chime and a swirling white light to appear on the top of your HomePod.

How to Connect HomePod to WiFi
- Next, place your unlocked iPad, iPhone, or iPod next to the HomePod. Ensure your iOS device has Bluetooth enabled and is connected to a stable WiFi network.
- When ‘Set Up’ appears on your device’s screen, tap it.
- If the ‘Set Up’ page does not appear on your screen, you may have to set up your HomePod manually.
- Select the room where the HomePod is located and click ‘Continue.’
- If you want Siri to have access to your texts, reminders, and notes anytime your iOS device is connected to the same WiFi, click ‘Enable Personal Requests,’ or click ‘Not Now’ if you prefer to maintain privacy. You can change this setting later.
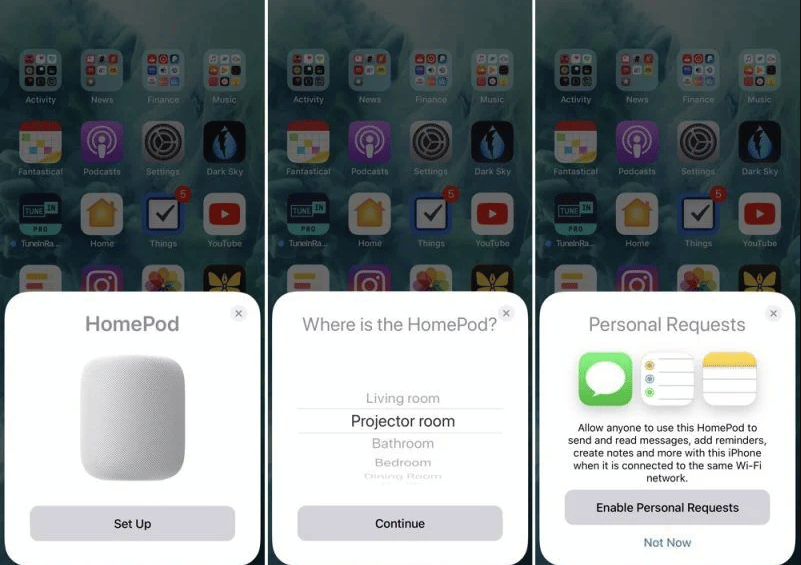
- If you choose ‘Enable Personal Requests,’ a prompt will ask if you want to “Use This Device” to share your location. Click ‘Agree’ or ‘Don’t Enable’ to disable the Personal Requests feature.
- On the ‘Siri on HomePod’ card, click ‘Continue.’
- Click ‘Agree’ to accept Apple’s terms and conditions.
- Click ‘Transfer Settings’ to apply WiFi, iCloud, and other settings from your device to set up your HomePod. You can adjust these settings later in the Apple Home app.

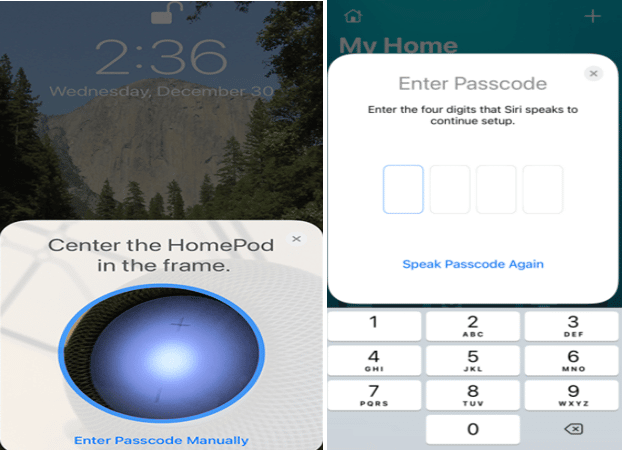
- Center the top of your HomePod within the round frame on your display. A circle will appear on your smartphone’s screen; position the top of your HomePod in the center of this circle until you hear a chime.
- If you cannot use the camera, click ‘Manually Enter Passcode.’ Siri will then voice a four-digit code, which you can enter using the keypad.
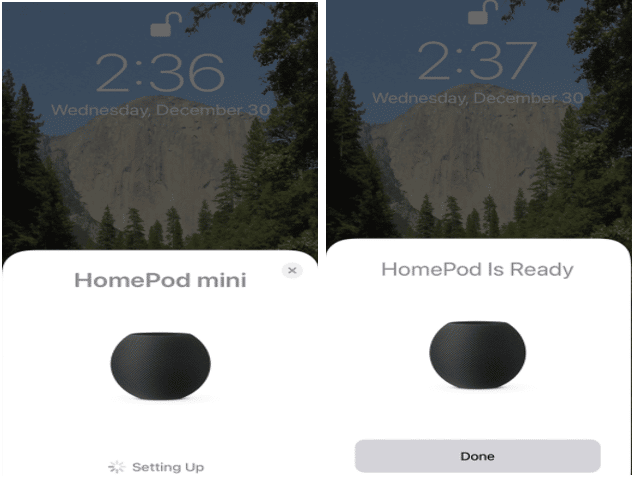
- Be patient as your HomePod is configured; this process may take a few minutes.
- Once the setup is complete, click ‘Done.’ You will know your HomePod is connected to WiFi when Siri greets you. From then on, you can interact with Siri using voice commands without needing your iPad or iPhone..
How to Change WiFi on HomePod
To change the WiFi network your HomePod uses, you’ll need the built-in Home app on your iPad or iPhone. Here’s how to do it:
- Open the Home app on your iPad or iPhone.

- Locate your device in the ‘Homes’ or ‘Rooms’ section. An exclamation mark beside it indicates a WiFi network configuration problem. Long-press on your HomePod to access its settings.
- At the top, you’ll find a detailed explanation of the WiFi network issue. Scroll down for more options.
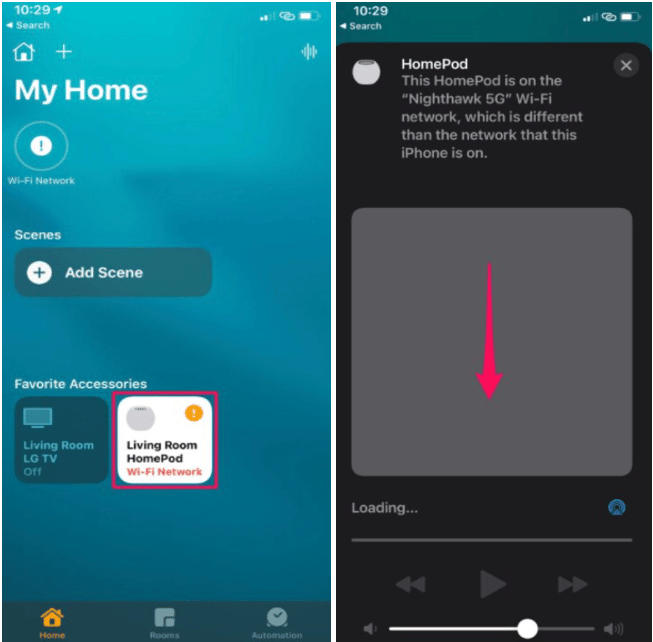
- Your iPhone will display a message indicating it is connected to a different WiFi network. A yellow hyperlink will appear below this message, allowing you to change your HomePod’s network. Click on ‘Move the HomePod to’ and select the new network.
- Wait a few seconds for the HomePod to update its network settings. Once updated, the music playback area will load correctly.
- You have successfully changed your HomePod’s WiFi network.

How to Connect HomePod to WiFi
Note: If you encounter problems connecting the HomePod to WiFi, ensure your speaker and iPhone are on the same network. If you still can’t connect your HomePod to WiFi, consider resetting it.
Final Thought
In summary, connecting the HomePod to WiFi is relatively straightforward. Within a few minutes, you can use Siri and enjoy music playback. The surround sound quality from this relatively small smart speaker is sure to impress.
See Also