Connect With WPS (Fastest Method)
WPS (WiFi Protected Setup) connects your WiFi booster to your router with a button press – no passwords or apps needed. Most extenders and routers made in the last 10 years support WPS.
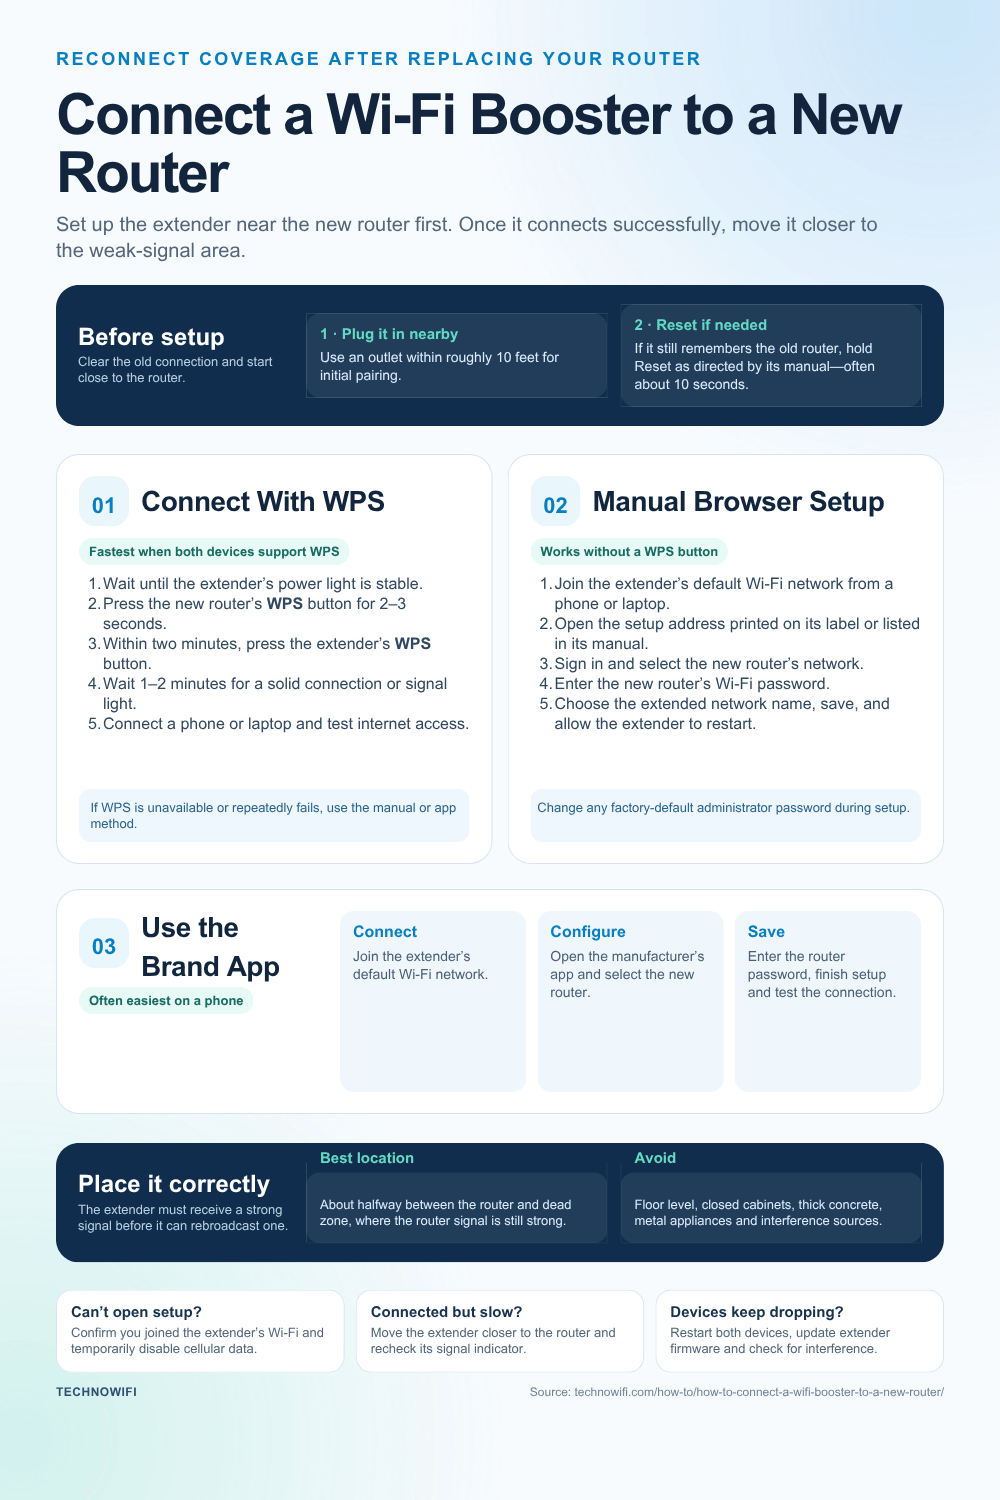
- Plug in the WiFi booster/extender near your router (within 10 feet for initial setup).
- Wait for the power light to turn solid, indicating the booster is ready.
- Press the WPS button on your router. Hold it for 2 to 3 seconds until the WPS light starts flashing.
- Within 2 minutes, press the WPS button on the WiFi booster. Hold it for 2 to 3 seconds.
- Wait 1 to 2 minutes for the devices to connect. The booster’s signal light turns solid when connected.
- Move the booster to its permanent location (halfway between the router and the dead zone).
The WPS button location varies. On routers, it’s usually on the back or side, sometimes labeled “WPS” or showing a double-arrow icon. On extenders, it’s often on the front or side panel.
Connect With Manual Setup
If WPS doesn’t work or your router doesn’t have a WPS button, use the manual method through a web browser.
- Plug in the WiFi booster near your router.
- On your phone or laptop, connect to the booster’s default WiFi network. Check the extender’s label or manual for the default network name (usually something like “TP-Link_Extender” or “NETGEAR_EXT”).
- Open a web browser and go to the extender’s setup page. Common addresses are listed below.
- Log in with the default credentials (often admin/admin or printed on the device label).
- The setup wizard scans for available WiFi networks. Select your router’s network.
- Enter your router’s WiFi password.
- Choose whether to keep the same network name (SSID) or create a new one for the extended network.
- Save the settings. The booster restarts and connects to your router.
- Move the booster to its permanent location.
Setup Page Addresses by Brand
| Brand | Setup URL | Default Login |
|---|---|---|
| TP-Link | tplinkrepeater.net or 192.168.0.254 | admin / admin |
| Netgear | mywifiext.net or 192.168.1.250 | admin / password |
| Linksys | extender.linksys.com or 192.168.1.1 | admin / admin |
| D-Link | dlinkap.local or 192.168.0.50 | admin / (blank) |
| Asus | repeater.asus.com or 192.168.1.1 | admin / admin |
Connect Using the Manufacturer’s App
Most extender brands offer a mobile app that simplifies setup.
- Download the app: TP-Link Tether, Netgear Nighthawk, Linksys, or your brand’s app.
- Plug in the extender and connect your phone to its default WiFi network.
- Open the app. It detects the extender and walks you through setup.
- Select your router’s network, enter the password, and save.
The app method is often easier than the web browser method, especially on phones where typing IP addresses and navigating web-based setup pages can be awkward.
Choose the Best Location
Placement makes or breaks a WiFi booster’s effectiveness.
The ideal spot is roughly halfway between your router and the area with weak signal. The booster needs a strong signal from the router to rebroadcast effectively – if you place it too far from the router, it amplifies a weak signal and you get poor speeds.
Check signal strength after placing the extender. Most extenders have a signal strength LED that shows green (strong), amber (adequate), or red (too far). The manufacturer’s app usually shows signal quality too. If the signal indicator shows weak, move the booster closer to the router.
Avoid placing near: microwaves, cordless phones, baby monitors, thick concrete walls, metal appliances (refrigerators, filing cabinets), or inside closed cabinets. These block or interfere with WiFi signals.
Elevated placement works better than floor level. Put the extender on a shelf or mount it on a wall at waist height or higher.
Same SSID vs. Different SSID
During setup, you choose whether the extender uses the same network name as your router or a different one.
Same SSID: Your devices see one network and theoretically switch between the router and extender automatically. In practice, many devices “stick” to the weaker connection and don’t roam well. This can cause frustrating dead spots where your device holds onto a weak signal from the router instead of switching to the closer extender.
Different SSID (e.g., “MyNetwork_EXT”): You manually connect to whichever network is stronger in each area. Less convenient but gives you full control over which access point your device uses. This approach is more predictable.
If you’re finding that same-SSID roaming doesn’t work well, switch to a different SSID for the extender. For a truly seamless experience across a large home, consider a mesh WiFi system instead of a traditional extender.
Reconnect After Changing Router or Password
If you replace your router or change the WiFi password, the extender loses its connection and needs to be reconfigured.
- Reset the extender to factory defaults (press and hold the reset button for 10 seconds).
- Set it up again using WPS, the web interface, or the app.
- Connect it to the new router’s network with the new password.
There’s no shortcut – changing the router or password always requires re-pairing the extender.
Troubleshooting
WPS won’t connect. Make sure you press the router’s WPS button first, then the extender’s button within 2 minutes. Some routers have WPS disabled by default for security – check your router’s admin panel and enable WPS temporarily for setup. If WPS keeps failing, use the manual method instead.
Connected but slow speeds. The extender may be too far from the router. Move it closer and check the signal LED. WiFi extenders cut your bandwidth roughly in half because they receive and retransmit on the same channel. If you need full speeds, use a mesh WiFi system or run Ethernet to a wireless access point instead.
Can’t access the setup page. Make sure you’re connected to the extender’s WiFi, not your router’s WiFi. Try the IP address instead of the URL (e.g., 192.168.0.254 instead of tplinkrepeater.net). Clear your browser cache or try a different browser. Disable mobile data on your phone so it doesn’t route traffic through cellular instead of WiFi.
Extender drops connection frequently. Update the extender’s firmware through its admin panel or app. Check for interference from nearby electronics. If the extender is on the same channel as your router, it may cause conflicts – set the extender to use a different WiFi channel. Restart both the router and extender.
Devices won’t connect to the extender. Make sure the extender is broadcasting its network. Check that you’re entering the correct password. If you set the extender to use the same SSID as the router, try connecting to the router first, then walking toward the extender to test handoff. Some older devices have trouble with dual-band extenders – try connecting to the 2.4GHz band specifically.
WiFi extender vs. mesh system – which is better?
WiFi extenders are cheaper ($20 to $60) but cut bandwidth in half and often don’t provide seamless roaming. Mesh systems ($150 to $400 for a 2 to 3 pack) provide full-speed coverage with seamless roaming between nodes. For a small dead spot in one room, an extender works fine. For whole-home coverage or multiple dead zones, a mesh system is worth the investment.
Can I use multiple WiFi extenders?
You can, but it’s not recommended. Each extender in a chain halves the available bandwidth again. Two extenders in series give you about 25% of your original speed. If you need coverage across a large area, a mesh WiFi system handles this much better since mesh nodes communicate with each other on a dedicated backhaul channel.
Does the extender need to be the same brand as the router?
No. WiFi extenders work with any router regardless of brand. They connect using standard WiFi protocols. You can use a TP-Link extender with a Netgear router or any other combination. The only exception is brand-specific mesh systems – those require matching nodes from the same product line.
Sources
TP-Link – Set Up Range Extender | Netgear – Extender Setup