It takes about two seconds to lose everything on your iPhone. Photos, messages, contacts, app data, all of it. A botched software update, a cracked screen, a stolen phone, or an unfortunate encounter with a puddle can wipe out years of memories and information in an instant. A backup is the only safety net between a minor setback and a total loss.
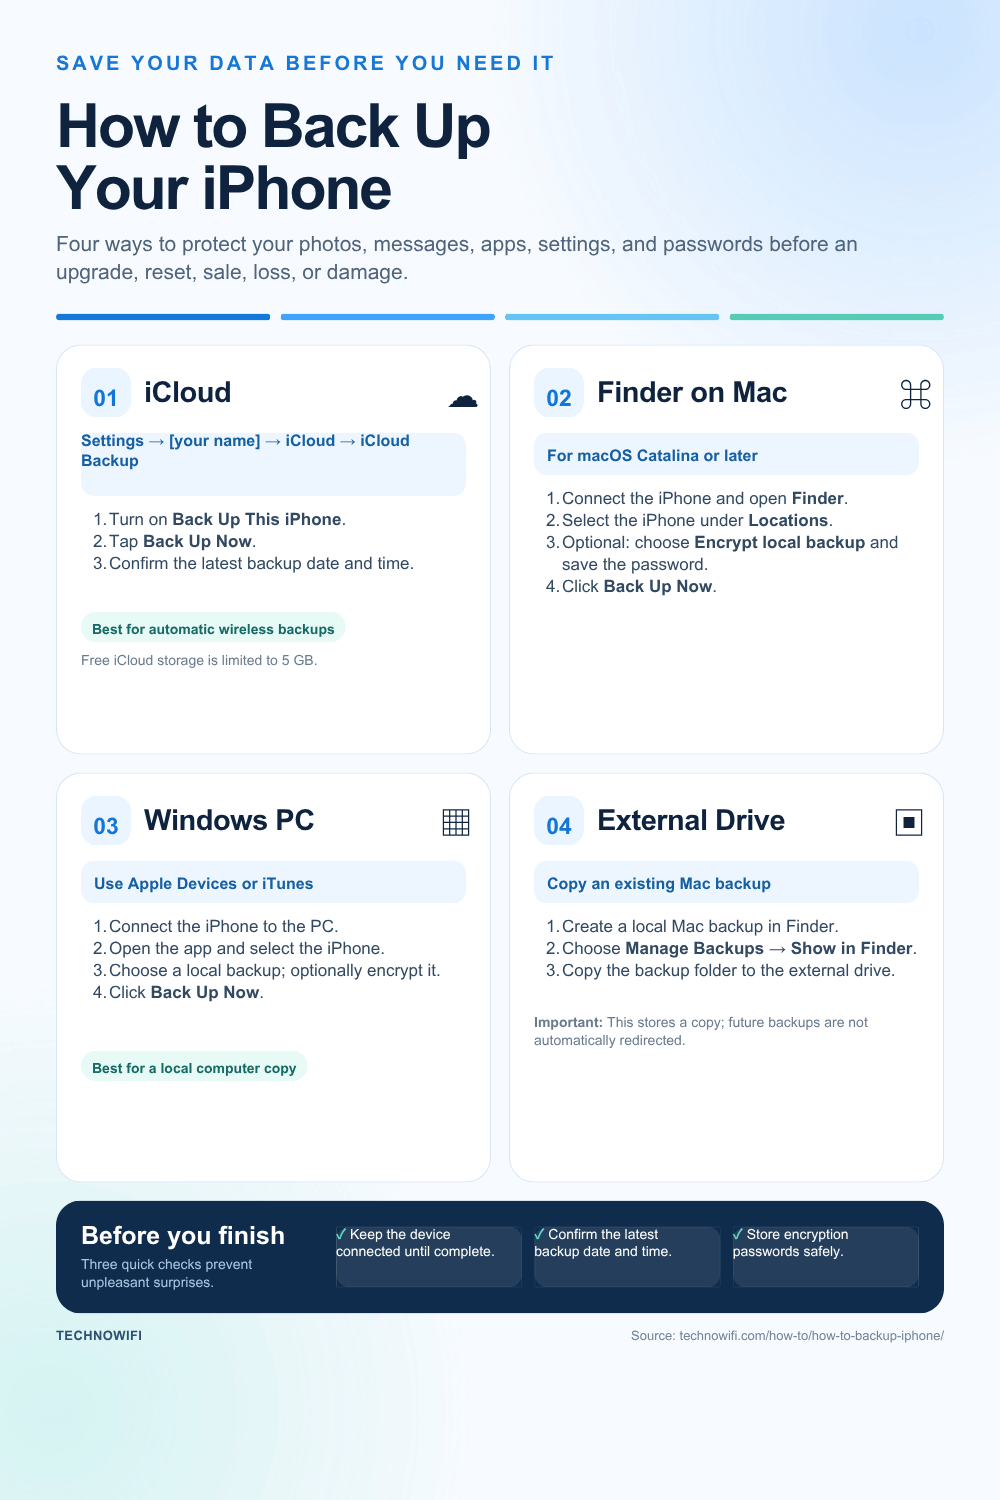
Apple provides two main ways to back up: iCloud (wireless, automatic, stored on Apple’s servers) and a computer backup (wired, manual, stored on your Mac or Windows PC). Each approach has its own strengths, and running both gives you the best protection. This guide covers every backup option available for iPhone in 2026, including iCloud, Mac Finder, Windows PC, and external hard drives.
Why You Should Back Up Your iPhone Regularly
Your iPhone holds more personal data than any other device you own. Years of photos and videos, text conversations, health records, saved passwords, app settings, and financial information all live on one small device that fits in your pocket. Backing up means you can restore all of that to a new or repaired iPhone in minutes.
Regular backups also make upgrading phones painless. Setting up a new iPhone to replace your old one? A recent backup lets you pick up right where you left off. Same apps, same layout, same settings. Without one, you’d have to reinstall every app, re-enter every login, and accept the loss of anything that wasn’t synced to a cloud service.
Software updates are another good reason to keep backups current. While it’s rare, iOS updates can sometimes cause problems. A backup from right before the update gives you a rollback option if things go sideways. Apple actually recommends backing up before every major iOS release.
What Does an iPhone Backup Include
iPhone backups don’t capture everything on your device. Apple splits data into two buckets: stuff that gets backed up and stuff that lives in iCloud or can be re-downloaded. Knowing the difference helps you understand exactly what’s protected.
| Included in backup | NOT included in backup |
|---|---|
| App data and settings | Data already stored in iCloud (Contacts, Calendars, Notes, iCloud Photos) |
| Device settings and preferences | Apple Mail data |
| Home screen layout and app organization | Apple Pay information and cards |
| iMessage, SMS, and MMS history | Face ID or Touch ID settings |
| Photos and videos (if iCloud Photos is off) | iCloud Music Library and Apple Music content |
| Purchase history from Apple services | App Store apps (re-downloaded automatically) |
| Ringtones and custom sounds | Content synced from Finder or iTunes (imported MP3s, videos) |
| Apple Watch backup data | Information already in iCloud Drive |
| Health data (encrypted backups only) | Activity, Health, and Keychain data (requires encrypted backup) |
| HomeKit configuration | Files stored in other cloud services (Google Drive, Dropbox) |
| Visual Voicemail | Settings for Apple services that require sign-in |
One important detail: if you use iCloud Photos, your photos and videos are already in iCloud and won’t get duplicated in your backup. The same applies to Contacts, Calendars, and Notes when iCloud sync is turned on for those categories. That’s why your iCloud backup might look smaller than you’d expect. A lot of your data is already synced separately.
Health data, saved passwords, and Wi-Fi settings only get included in encrypted backups. iCloud backups are encrypted by default. Computer backups through Finder or iTunes require you to manually check the “Encrypt local backup” option.
How to Back Up iPhone to iCloud
Back Up Your iPhoneiCloud backup is the easiest method since it runs automatically in the background. Once you turn it on, your iPhone backs up every day with zero effort on your part. The backup kicks in when three conditions are met: your iPhone is locked, connected to Wi-Fi (or cellular if you allow it), and plugged into power.
- Open the Settings app on your iPhone.
- Tap your name at the top of the screen to get to your Apple ID settings.
- Tap iCloud.
- Tap iCloud Backup.
- Toggle on Back Up This iPhone if it’s not already enabled.
- To start a backup right away, tap Back Up Now.
- Stay connected to Wi-Fi until it finishes. The first backup can take anywhere from a few minutes to over an hour depending on how much data you have.
If you want backups to happen even when you’re off Wi-Fi, there’s an option for that. Go to Settings, tap your name, then iCloud, then iCloud Backup, and toggle on Back Up Over Cellular. Just know that this eats into your mobile data, so it works best on unlimited plans.
iCloud backups are encrypted by default, which means Health data, saved passwords, and Wi-Fi passwords are all included automatically. No extra settings needed.
How to Back Up iPhone to Mac Using Finder
Apple dropped iTunes from the Mac starting with macOS Catalina in 2019. If your Mac runs Catalina (10.15) or later, you manage iPhone backups through Finder instead. The process is simple and stores everything locally on your Mac’s hard drive.
- Connect your iPhone to your Mac with a USB cable. Use a USB-C to Lightning cable for iPhone 14 and older, or a USB-C to USB-C cable for iPhone 15 and newer models.
- Open a Finder window on your Mac.
- In the left sidebar under Locations, click your iPhone’s name. If it’s your first time connecting, tap Trust on your iPhone and enter your passcode.
- In the Finder window, click the General tab if it’s not already selected.
- Under the Backups section, choose Back up all of the data on your iPhone to this Mac.
- Check the box for Encrypt local backup and create a password when asked. This is strongly recommended because encrypted backups include Health data, saved passwords, Wi-Fi settings, call history, and browsing history that unencrypted backups skip.
- Click Back Up Now.
- Wait for the progress bar at the top of the Finder window to finish. Don’t disconnect your iPhone until it’s done.
Computer backups through Finder have no storage limit other than your Mac’s available disk space. If you’ve got 200 GB free on a 500 GB drive, you can store multiple full iPhone backups without paying for any subscription. This makes Finder backups a solid option if you’d rather not pay for iCloud storage.
Backup files are stored at ~/Library/Application Support/MobileSync/Backup/ on your Mac. You normally don’t need to touch this folder, but it’s good to know the location if you want to copy backups to an external drive or check how much space they’re using.
How to Back Up iPhone to Windows PC
On Windows, you have two app choices: the newer Apple Devices app (released in 2024 on the Microsoft Store) and the classic iTunes for Windows. Apple Devices is the recommended pick going forward, but iTunes still works fine and the backup process is almost identical in both.
Using the Apple Devices App
- Download and install Apple Devices from the Microsoft Store if you don’t have it yet.
- Connect your iPhone to your Windows PC with a USB cable.
- Open the Apple Devices app.
- If it’s your first connection, tap Trust on your iPhone and enter your passcode when prompted.
- Click your iPhone in the sidebar.
- Under the General section, select Back up all of the data on your iPhone to this computer.
- Check Encrypt local backup and set a password. This ensures Health data, saved passwords, and other sensitive info gets included.
- Click Back Up Now.
- Keep your iPhone connected until the progress bar finishes.
Using iTunes for Windows
- Download and install iTunes from the Apple website or the Microsoft Store.
- Connect your iPhone to your PC with a USB cable.
- Open iTunes and click the small iPhone icon near the top-left corner of the window.
- If prompted, tap Trust on your iPhone and enter your passcode.
- In the Summary panel, find the Backups section.
- Select This computer as your backup destination.
- Check Encrypt local backup and create a password.
- Click Back Up Now.
- Wait for the backup to finish before disconnecting.
Both apps create identical backup files. The only real difference is the interface. Apple Devices has a cleaner, more modern look, while iTunes bundles media management features alongside device management. If iTunes is already installed and working, no real need to switch. If you’re setting up a fresh PC, go with Apple Devices.
How to Back Up iPhone to an External Hard Drive
Apple doesn’t have a built-in way to back up your iPhone straight to an external hard drive. But you can work around this by creating a backup on your Mac first and then moving or redirecting the backup files to an external drive. This comes in handy when your Mac’s internal storage is tight or you want an off-site copy.
Method 1 – Manually Copy the Backup Folder
- Back up your iPhone to your Mac using Finder (follow the steps in the Finder section above).
- Connect your external hard drive to your Mac.
- Open Finder and press Shift + Command + G to open “Go to Folder.”
- Type ~/Library/Application Support/MobileSync/Backup/ and press Enter.
- You’ll see one or more folders with long alphanumeric names. Each folder is a device backup.
- Copy the entire backup folder to your external hard drive by dragging it while holding the Option key (this copies instead of moving).
- Wait for the copy to complete. Backup folders can range from a few gigabytes to over 50 GB depending on your iPhone’s contents.
This method gives you a snapshot backup on the external drive. The downside is you need to repeat the copy manually every time you make a new backup. For most people, doing this once a month or before major events (trips, iOS updates) gives you plenty of protection.
Method 2 – Redirect Future Backups Using a Symlink
- Back up your iPhone to your Mac first to confirm everything works.
- Connect your external hard drive to your Mac.
- Move the Backup folder from ~/Library/Application Support/MobileSync/ to your external drive.
- Open Terminal on your Mac (Applications > Utilities > Terminal).
- Type the following command, replacing “ExternalDrive” with your drive’s name: ln -s /Volumes/ExternalDrive/Backup/ ~/Library/Application Support/MobileSync/Backup
- Press Enter. This creates a symbolic link that tells your Mac to save all future iPhone backups on the external drive.
- Test by running a new backup in Finder. Verify that the backup files show up on your external drive.
The symlink approach automates future backups to the external drive, but the drive has to be connected every time you back up. If it’s not plugged in when a backup runs, the process will fail. This works best with a desktop Mac where the external drive stays permanently connected.
iCloud Storage Plans and Pricing
Every Apple ID comes with 5 GB of free iCloud storage. That 5 GB is shared across every device signed into the same Apple ID. Your iPhone, iPad, Mac, and Apple Watch all pull from the same pool. For most people, 5 GB fills up fast because iCloud stores not just backups but also photos, Drive files, and app data.
Apple offers iCloud+ subscriptions with more storage. All paid plans also include extras like iCloud Private Relay, Hide My Email, and HomeKit Secure Video support.
| Plan | Storage | Monthly Price (USD) | Best For |
|---|---|---|---|
| Free | 5 GB | $0.00 | Minimal use – contacts, notes, settings only |
| iCloud+ | 50 GB | $0.99 | One iPhone with a moderate photo library |
| iCloud+ | 200 GB | $2.99 | Multiple devices or Family Sharing |
| iCloud+ | 2 TB | $9.99 | Large photo and video libraries, full device backups |
| iCloud+ | 6 TB | $29.99 | Professional use or families with heavy media |
| iCloud+ | 12 TB | $59.99 | Maximum storage for professionals with massive libraries |
To change your iCloud storage plan, go to Settings, tap your name, then iCloud, then Manage Account Storage, then Change Storage Plan. You can upgrade or downgrade anytime. If you downgrade and your stored data exceeds the new plan’s limit, iCloud stops backing up until you free up space or upgrade again.
iCloud Backup vs Computer Backup
Both methods protect your data, but they work differently and each has advantages the other doesn’t. The table below breaks down the key differences so you can decide which fits your situation, or whether running both makes the most sense.
| Feature | iCloud Backup | Computer Backup (Finder/iTunes/Apple Devices) |
|---|---|---|
| Storage location | Apple’s servers (cloud) | Your Mac or PC hard drive |
| Storage limit | 5 GB free, up to 12 TB paid | Limited only by available disk space |
| Automatic backup | Yes – daily when locked, charging, and on Wi-Fi | No – must connect cable and start manually |
| Encryption | Always encrypted | Optional – must enable “Encrypt local backup” |
| Health and Keychain data | Always included | Only with encrypted backup enabled |
| Backup speed | Depends on internet upload speed | Faster – USB connection, no upload needed |
| Requires internet | Yes | No |
| Accessible from anywhere | Yes – restore on any iPhone with your Apple ID | No – must be near the computer with the backup |
| Cost | Free up to 5 GB, subscription for more | Free (no storage fees) |
| Restoring to new iPhone | During setup over Wi-Fi | Connect to computer during setup |
The smartest move is to use both. Let iCloud handle your automatic daily backups so you always have a recent copy in the cloud. Then make a computer backup before major events like installing a new iOS version, switching phones, or traveling internationally. That way you’ve got a cloud backup accessible anywhere and a local backup that doesn’t rely on internet access.
How to Check When Your iPhone Was Last Backed Up
Knowing when your last backup happened tells you if you need a new one. If it’s been three months, a lot of data has piled up since then. Apple makes it easy to check from both iCloud and your computer.
Check iCloud Backup Date
- Open Settings on your iPhone.
- Tap your name at the top.
- Tap iCloud.
- Tap iCloud Backup.
- Below the “Back Up Now” button, you’ll see the date and time of the last successful iCloud backup.
Check Computer Backup Date
- Connect your iPhone to your Mac or PC.
- Open Finder (Mac) or Apple Devices/iTunes (Windows).
- Select your iPhone.
- Under the Backups section, look for “Last backup to this Mac/PC” followed by the date and time.
If the last backup date is more than a week old and you use your iPhone daily, go ahead and run a new backup. Any data created between your last backup and right now, new photos, messages, app progress, isn’t protected until the next backup completes.
How to Restore iPhone From a Backup
Restoring from a backup brings your apps, settings, messages, photos, and other data back to your iPhone. You can restore during the initial setup of a new or erased iPhone, or erase your current phone and start fresh from a backup. The steps are a bit different depending on whether you’re restoring from iCloud or a computer.
Restore From iCloud Backup
- If you’re setting up a brand new iPhone, turn it on and follow the on-screen steps until you reach the Apps & Data screen. If you’re resetting an existing iPhone, go to Settings > General > Transfer or Reset iPhone > Erase All Content and Settings first, then go through setup.
- On the Apps & Data screen, tap Restore from iCloud Backup.
- Sign in with your Apple ID.
- Pick a backup from the list. Check the date and size to make sure it’s the right one.
- Stay connected to Wi-Fi. The restore downloads your backup and re-downloads all your apps from the App Store.
- Keep your iPhone plugged in and on Wi-Fi until the restore finishes. The initial part may wrap up in 15 to 30 minutes, but apps keep downloading in the background for a while after that.
Restore From Computer Backup
- Connect your iPhone to the Mac or PC where the backup is stored.
- Open Finder (Mac) or Apple Devices/iTunes (Windows).
- Select your iPhone when it shows up.
- Click Restore Backup.
- Choose the backup you want from the dropdown. If it’s encrypted, enter the encryption password you set when the backup was created.
- Click Restore and wait. Don’t unplug your iPhone until the progress bar finishes and the phone restarts.
A restored iPhone needs a little time to settle in. After the restore finishes, you may need to re-enter passwords for email accounts, re-authenticate banking and social media apps, and re-enable Face ID or Touch ID. These security-sensitive items aren’t transferred during a restore by design.
Third-Party iPhone Backup Tools
Apple’s built-in backup methods create full backups of your entire device. If you want more control, like backing up just your photos, exporting text messages as readable files, or saving specific app data without making a complete device backup, third-party tools fill that gap.
iMazing is one of the most popular choices. It lets you browse your backup contents, export specific data types (messages, photos, call logs, voicemail), and run incremental backups that only save what changed since the last one. Works on both Mac and Windows.
AnyTrans offers similar selective backup and transfer features with an interface designed to feel like a file manager for your iPhone. You can drag and drop files between your phone and computer, merge data from multiple devices, and schedule automatic backups.
Dr.Fone by Wondershare focuses on data recovery alongside backup features. If you accidentally deleted photos or messages and don’t have a backup, Dr.Fone can sometimes recover them directly from the device.
These tools aren’t replacements for iCloud or Finder backups. Think of them as add-ons that give you flexibility Apple doesn’t offer natively. Use Apple’s methods for your primary full-device backups, and reach for third-party tools when you need selective export or recovery features.
Quick Start – Transferring Data Directly to a New iPhone
Quick Start isn’t technically a backup, but it solves the same problem most people have in mind when they search for backup instructions: getting data from an old iPhone to a new one. Quick Start transfers your data directly between iPhones over a wireless connection, no iCloud or computer needed.
- Turn on your new iPhone and place it near your old one. Both devices need iOS 12.4 or later (any iPhone still getting updates supports this).
- A Quick Start screen pops up on your old iPhone. Tap Continue.
- An animation appears on your new iPhone. Hold your old iPhone over the new one so the animation lines up in the viewfinder.
- Enter your old iPhone’s passcode on the new device when asked.
- Set up Face ID or Touch ID on the new iPhone.
- Choose Transfer from iPhone to move data directly, or Download from iCloud to restore from a cloud backup instead.
- Keep both phones close together, plugged into power, and on the same Wi-Fi network until the transfer wraps up.
Quick Start is great for one-time phone upgrades, but it doesn’t replace regular backups. Once the transfer is done, your data only exists on the new iPhone. If that phone gets lost or damaged before your next backup, everything’s gone. Always set up iCloud Backup or schedule regular computer backups even after using Quick Start.
Frequently Asked Questions
How long does it take to back up an iPhone?
The first iCloud backup usually takes 30 minutes to a few hours depending on your data size and upload speed. After that, daily iCloud backups are incremental, only saving what changed, and typically finish in under 10 minutes. Computer backups via Finder or iTunes are faster since data moves over a USB cable instead of Wi-Fi. A full computer backup usually takes 10 to 30 minutes, and incremental ones finish in under 5.
Can I back up my iPhone without Wi-Fi?
Yes, two ways. For iCloud, enable “Back Up Over Cellular” in Settings > Apple ID > iCloud > iCloud Backup. This uses your mobile data instead of Wi-Fi, so make sure you have an unlimited plan or enough data to spare. For a computer backup, you don’t need internet at all. Just plug your iPhone into your Mac or PC with a USB cable and the entire backup transfers locally.
What happens if I run out of iCloud storage?
Your iPhone stops backing up to iCloud until you free up space or upgrade to a bigger plan. You’ll get notifications warning that backups aren’t completing. Your existing iCloud data (photos, contacts, notes) stays safe and accessible, but nothing new gets added. To fix it, delete old backups, clear out iCloud Drive files, turn off iCloud Photos to reduce usage, or upgrade your iCloud+ plan.
Does an iPhone backup save my apps?
The backup saves your app data and settings but not the apps themselves. When you restore, your iPhone automatically re-downloads apps from the App Store using your Apple ID. You need internet for this. If an app was removed from the App Store since you last downloaded it, it won’t come back. Your app data, things like game progress, login preferences, and saved content, is included in the backup and loads once the app finishes downloading.
Should I encrypt my iPhone backup?
Yes. Encryption adds data that unencrypted backups leave out, including saved passwords, Wi-Fi credentials, Health app data, call history, and browsing history. iCloud backups are always encrypted, so this really applies to computer backups through Finder or iTunes. When you turn on encryption, you set a password for the backup. Write it down and store it somewhere safe. If you forget it, there’s no way to access that encrypted backup.
Can I back up multiple iPhones to the same computer?
Yes. Each iPhone creates its own separate backup folder on your computer. When you connect a different iPhone and click Back Up Now, Finder or iTunes creates a new backup tied to that device’s unique ID. The backups don’t conflict with each other. Just make sure your computer has enough free disk space for multiple backups. A single iPhone backup can range from 5 GB to over 60 GB depending on the device’s contents.
- How to Connect iPhone to MacBook Air
- How to Transfer Data From PS4 to PS5
- How to Reset MacBook Pro
- How to Unlock MacBook Pro Without Password