When you purchase through links on our site, we may earn an affiliate commission. Here’s how it works.
Connecting Google Home to WiFi
Google Home, alongside Amazon Echo, ranks as one of the leading smart home devices on the market.
Powered by Google Assistant, Google Home can manage your routines and control other Google Assistant-compatible smart devices.
However, for Google Home to perform these tasks, it must be connected to a stable WiFi network. Without WiFi, Google Home cannot execute commands or control other smart devices.
If you are unsure how to connect your Google Home to WiFi, whether for the first time or to switch networks, this guide is here to assist.
Connect Google Home to WiFi for The First Time
Connecting a new Google Home device to WiFi is necessary during the initial setup.
If you have previously connected a Google Home device to WiFi, the new one might attempt to connect to WiFi automatically without additional setup.
To connect to WiFi for the first time:
- Begin by downloading the Home app on your Android or iOS smartphone.
- Launch the Home app.
- Select or enter the Google account with which you wish to set up your device.
- When prompted, enable Bluetooth on your Android or iOS smartphone.
- The app should discover your Google Home speaker. Click ‘Next.’

How to Connect Google Home to WiFi
- If the speaker emits a sound, click ‘Yes’ to confirm.
- Choose the device’s location, such as the bedroom or living room.

- Name your Google Home speaker uniquely.
- Select your WiFi network from the list of available networks and click ‘Next.’

- Enter the WiFi password and click ‘Connect.’
- A successful connection message will appear on your screen.
After connecting your Google Home speaker to WiFi, you can proceed with other configurations or choose to do so later.
Connect Google Home to Another WiFi Network
If you wish to connect your already set-up Google Home to a different WiFi network or the same network with a new password, follow these steps:
- Launch the Google Home app.
- Click on the plus (+) sign in the upper-left corner of your screen.
- Select ‘Setup Device.’
- Find the device you want to connect to another network and click on its menu button.
- Choose ‘Settings’ in the popup that appears.

- Scroll to ‘Device Settings’ and select ‘WiFi.’
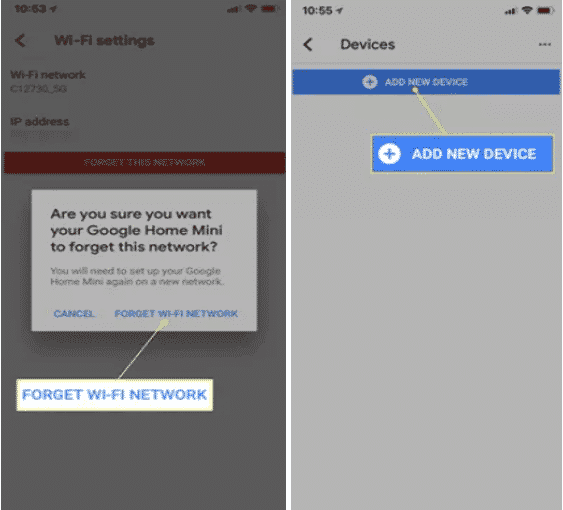
- If it’s already connected to a WiFi network, select ‘Forget This Network.’

- Confirm by selecting ‘Forget This Network.’
- On the home screen, select the ‘Device’ button again.
- Click on ‘Add New Device.’

- Go to your smartphone’s WiFi settings and connect to the Google Home hotspot from the list of networks.
- Return to the app; if the speaker makes a sound, click ‘Yes.’
- Choose the device’s location, such as the bedroom or living room.

How to Connect Google Home to WiFi
- Name your Google Home device uniquely.
- Select your desired WiFi network from the list and click ‘Next.’

- Enter the WiFi password and click ‘Connect.’
- A successful connection message will appear on your screen.
Troubleshooting Connection Problems

How to Connect Google Home to WiFi
Move Google Home Closer to Your WiFi Gateway
Ideally, your Google Home speaker should function as long as it is connected to WiFi. However, performance may improve if it is closer to your WiFi gateway.
Power Cycle Google Home
A soft reset might resolve connection issues. Disconnect your Google Home from power for several minutes, then reconnect it.
Factory Reset Google Home
If troubleshooting does not resolve the issue, consider a factory reset as a last resort. Remember, you must set up your Google Home speaker from scratch.
Final Thought
The steps provided above should assist you in connecting Google Home to WiFi, whether for the first time or to a new network.
The troubleshooting steps outlined may prove helpful if you encounter difficulties during the process.
See Also