When you purchase through links on our site, we may earn an affiliate commission. Here’s how it works.
How To Adjust Canon M50 Video Settings in 5 Steps?
Canon m50 is the most efficient camera to produce outstanding videos. It’s packed with a lot of features and is comparatively cheaper than several other models in the market.
A touch screen that can be flipped out, high bitrate and easy codec, focus peaking, customized buttons, magnifying and scanning using Dpad – these are some of the features that you will be able to find in Canon m50.
So, while you are up for an amazing video shoot, you can get it through quite perfectly while playing with a few of the Canon m50 video settings.
5 Steps to Adjust Canon M50 Video Settings
Step 1. Getting started with initial settings
Canon M50 Video Settings – initial settings
The first step to adjusting the Canon m50 video settings is getting through with all the settings. It won’t be visible to you at first. This is because, by default, the beginner settings are set as ‘ON’ on Canon m50.
You have to select the menu and then click on the Display settings. After that, you have to choose the option for menu display and choose a standard to switch on the DSLR classic Canon Menu.
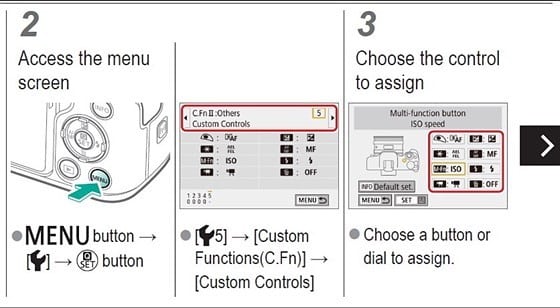
Step 2. Adjusting the Shutter Button

Canon M50 Video Settings – adjusting shutter button
You have to use the shutter button and use it as a recording button. Setting the shutter button to the recording button when you are shooting in video mode makes the whole process easy.
This helps to avoid the in-built small record button, which can be problematic. To turn the shutter button into the record button, you have to go to the menu and turn on the camera.
Click on ‘5’ and then choose the Btn function. You have to fully press the shutter button to start and stop recording the video.
Step 3. Controlling the Aperture
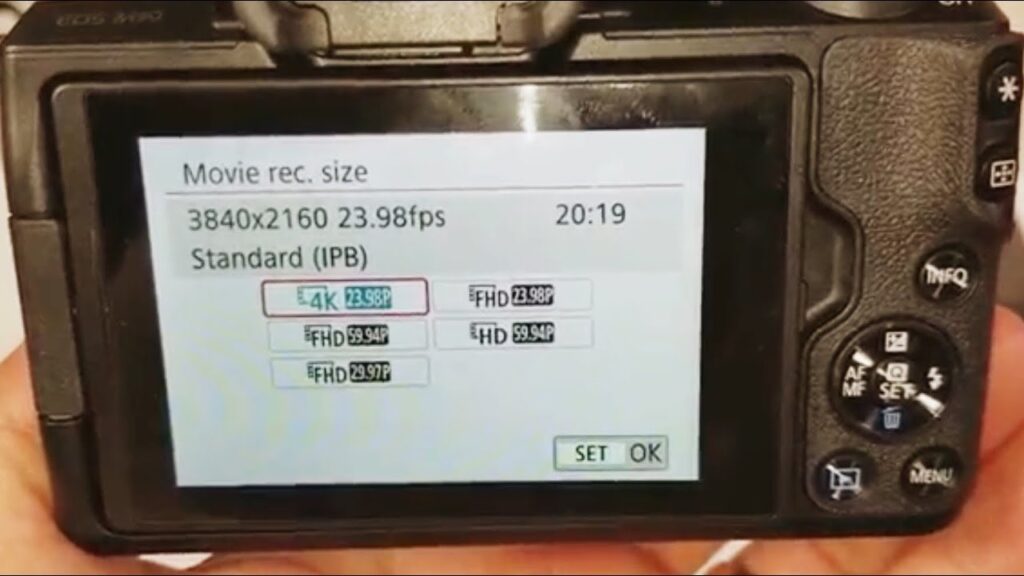
Canon M50 Video Settings – aperture
For a video to be shot effectively, you need to have control over the aperture. You can do so by controlling the front dial.
The front dial usually helps you to control the shutter speed while you are using the video mode. But you can change it to control the aperture instead.
You have to press on the Dpad or Exposure button to toggle in between the controls of the front dial. Make sure that you turn on the video mode first. This will help you to record videos in 4k resolution.
Step 4. Enabling focus peaking
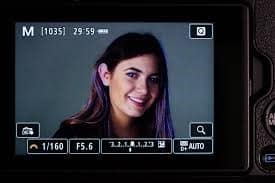
Canon M50 Video Settings – enable focus peaking
Even though the screen on Canon m50 is crisp and shows even the minute details, you can tweak it a little bit for canon m50 video settings.
To use focus peaking, you have to click on the option for the menu. After that, you have to choose the Camera option. Click on the ‘5’ option after that and choose the settings for MF.
You have the option to choose the level of peaking from high to low. You can even decide to choose the color options from red, blue, and yellow.
Step 5. Stabilization and IS settings

Canon M50 Video Settings – stabilization and IS settings
Canon m50 has an in-built stabilizer. The stabilizer is completely electronic. This indicates that the sensor will not get shifted. Instead, your video will be slightly cropped.
You can turn this feature on and off to adjust your Canon M50 video settings. Whether you need to turn it on or off depends on your tripod.
Once you want to turn off the inbuilt stabilizer, you first need to open the menu. From there, choose the option for the camera and then choose ‘5’. You will be able to see an option for IS settings.
Click on the option for digital IS and disable it. While the IS crops only a small portion of video when enable mode is on, it crops out a significant portion in enhanced mode.
You have to keep it in mind to prevent the video from deteriorating.
You just need to follow these above-mentioned steps and you can easily capture a good video in 4k resolution. In case you wanted to experiment with filmmaking, this is your golden chance.