Getting the Canon Rebel T7 Ready for Portraits
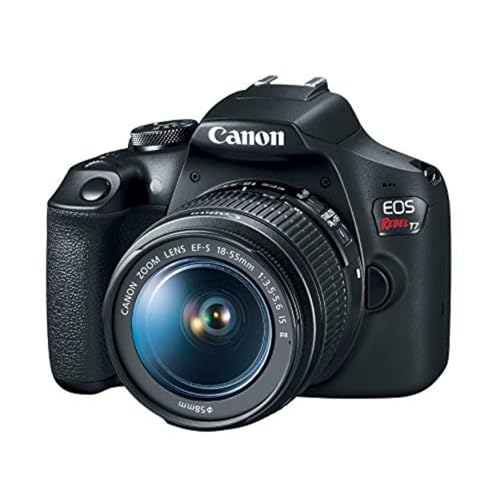
The Canon Rebel T7 (also known as the EOS 2000D or 1500D in some markets) is an entry-level DSLR with a 24.1-megapixel APS-C sensor, 9-point autofocus system, 3 fps burst shooting, and 1080p video at 30 fps. It’s a straightforward camera without a lot of bells and whistles, but for portrait photography, that simplicity can work in your favor. A good portrait depends more on light, lens choice, and composition than on having 50 autofocus points or 20 fps burst speed.
This guide covers the settings, techniques, and gear choices that help the Canon EOS Rebel T7 produce strong portrait results.
The Best Shooting Mode for Portraits
Aperture Priority (Av)
Av mode is where most portrait shooters live, and it’s the recommended starting point on the T7. You set the aperture, and the camera picks the right shutter speed to match. For portraits, aperture is the most important setting because it controls depth of field, which is how much of the image is sharp versus how blurred the background gets.
Need flash help? See our Canon T7 flash guide.
A wide aperture like f/1.8 or f/2.8 produces a shallow depth of field. The subject’s face stays sharp while the background melts into a smooth, creamy blur. That background blur (called bokeh) naturally draws the viewer’s eye to the person in the photo. A narrower aperture like f/5.6 or f/8 keeps more of the scene in focus, which works well for environmental portraits where the location matters as much as the person.
Autofocus on the T7
The T7 has 9 AF points. The center point is a cross-type sensor, which means it detects contrast in both horizontal and vertical directions. That makes it the most accurate and reliable of the nine points. For portraits, use single-point AF mode and keep the center point selected. Place it over your subject’s nearest eye, half-press the shutter to lock focus, then recompose if needed before taking the shot.
Use One-Shot AF for still subjects. The camera locks focus on the half-press and holds it. This is the right choice for posed portraits where neither you nor the subject is moving much. If you’re shooting someone walking toward you or a child who won’t stay still, switch to AI Servo for continuous tracking.
ISO Settings
Outdoors
In daylight or open shade, ISO 100 to 400 is all you need. Lower ISO means cleaner images with no visible noise. Shoot at ISO 100 whenever you can.
Indoors
Indoors without flash, you’ll likely need ISO 800 to 1600, depending on window light and room lighting. The T7 handles ISO 800 well. At 1600, some noise starts to appear, especially in shadow areas. Going above 3200 introduces noticeable grain. If you’re shooting indoors and struggling with high ISO, move your subject closer to a window for natural light. Even one large window provides plenty of illumination for a well-exposed portrait at lower ISO values.
Metering for Portraits
Evaluative metering reads the entire frame and averages the exposure. It works well for evenly lit scenes. For portraits where the subject’s face should drive the exposure, switch to Center-weighted Average metering. This prioritizes the middle of the frame, which is usually where the face is.
If your subject has a significantly lighter or darker skin tone than the background, use exposure compensation to adjust. A bright background behind a darker subject may underexpose the face. Dial in +0.3 to +0.7 exposure compensation to brighten the subject. A dark background behind a lighter subject might overexpose the face; dial in -0.3 to -0.7 to pull it back.
White Balance
For outdoor portraits in natural light, the Daylight or Shade preset produces warm, flattering skin tones. Auto White Balance (AWB) works well in most situations and is a safe default. Indoors, Tungsten or Fluorescent presets correct the color casts from artificial lights. Since you should be shooting RAW (more on that below), you can always adjust white balance in editing with no quality loss, so don’t stress over getting it perfect in camera.
Picture Style
The T7 has built-in Picture Styles that affect how JPEGs look. For portraits, try the Portrait picture style. It produces softer skin tones with slightly reduced sharpness compared to the Standard style. If you’re shooting RAW, Picture Style only affects the preview on the LCD and has no permanent impact on the file. But setting it to Portrait gives you a better preview of how the final image will look.
Lens Choice: The 50mm f/1.8 STM
The kit 18-55mm lens that comes with the T7 can take decent portraits at the 55mm end, but its maximum aperture of f/5.6 at that focal length limits your background blur. The Canon EF 50mm f/1.8 STM is the single best upgrade for portrait shooters. On the T7’s APS-C sensor, it gives you an 80mm-equivalent field of view, which is a classic portrait focal length. At f/1.8, the depth of field is very shallow, the background blur is smooth and beautiful, and the lens lets in enough light to shoot indoors without cranking ISO to uncomfortable levels.
The 50mm f/1.8 STM costs about a hundred dollars and makes a bigger difference in portrait quality than any other single purchase. If you’re serious about portraits, it should be your first lens after the kit zoom.
Lighting Tips
Natural Light
The best natural light for portraits is open shade or window light. Direct midday sun creates harsh shadows under the eyes and nose, and makes people squint. Move your subject into the shade of a building, a tree, or an awning, and the light becomes soft and even. For indoor portraits, position the subject facing a large window. The window acts like a giant softbox, wrapping the face in flattering directional light.
Golden Hour
The hour after sunrise and the hour before sunset produce warm, low-angle light that’s perfect for portraits. The shadows are gentle, and the warm color temperature makes skin look great. If you can schedule outdoor portrait sessions during golden hour, your results will improve with no extra gear needed.
Flash
The T7 has a built-in pop-up flash that works in a pinch as fill light for harsh shadows. For better results, an affordable external Speedlite bounced off a ceiling or wall produces much softer, more natural-looking light. Direct on-camera flash tends to flatten the face and create an unflattering look.
Composition and Posing Basics
Place your subject’s eyes on the upper third line of the frame using the rule of thirds. Turn on the grid overlay in the T7’s viewfinder or live view settings to help with placement. Have your subject angle their body slightly rather than facing the camera straight on. A slight turn creates a more dynamic, slimming look. Direct them to tilt their chin down just a touch and push their forehead slightly toward the camera. This sounds strange but makes a noticeable improvement in how the jawline and eyes look in photos.
Background Selection
A cluttered background distracts from the subject. Look for simple, clean backgrounds: a solid-colored wall, an out-of-focus tree line, an open field. The wider your aperture, the more the background blurs out, so if you’re stuck with a busy location, open up to f/1.8 or f/2.8 and put distance between the subject and the background. The further the background is from the subject, the blurrier it becomes at any given aperture.
Shoot RAW
Go into the menu and set image quality to RAW, or RAW+JPEG if you want a quick preview file. RAW files give you full control in editing software to adjust exposure, white balance, shadow detail, and color without losing image quality. Portrait retouching often involves skin tone adjustments and exposure corrections, and RAW makes those edits non-destructive and precise.
Putting It All Together
For exposure control on the T6, check our Canon T6 exposure compensation guide.
Considering a Canon mirrorless body? Our Canon mirrorless camera roundup compares every current model.
Set the T7 to Av mode at f/1.8 with the 50mm lens, ISO 100 to 400 outdoors (800 to 1600 indoors), center-point AF on the nearest eye, evaluative or center-weighted metering, and RAW file format. Position the subject in open shade or window light, keep the background clean and distant, and shoot. That combination produces strong, professional-looking portraits from an entry-level camera.