When you purchase through links on our site, we may earn an affiliate commission. Here’s how it works.
Setting Up Netgear Wifi Router – Overview
Wireless internet routers offer a hassle-free way of connecting tablets, TVs, laptops, smart home systems, appliances, and computers to the internet without wires.
You can effortlessly connect your home or office to the internet with a wireless startup kit.
Netgear is a renowned brand for reliable wifi routers and is known for producing high-performance wireless routers in its product line.
Netgear products are compatible with various types of internet connections, including Ethernet and Wi-Fi, and also offer products that support LTE and powerline networking.
The brand focuses on delivering reliability to its clients, including empowering users to set up their Netgear connection independently
Various methods can be used to set up a Netgear wifi router. If you lack a desktop computer, you can set up the network from your laptop, smartphone, or tablet
You can use any of the methods below from these devices.
Installing a Netgear router using a wireless device
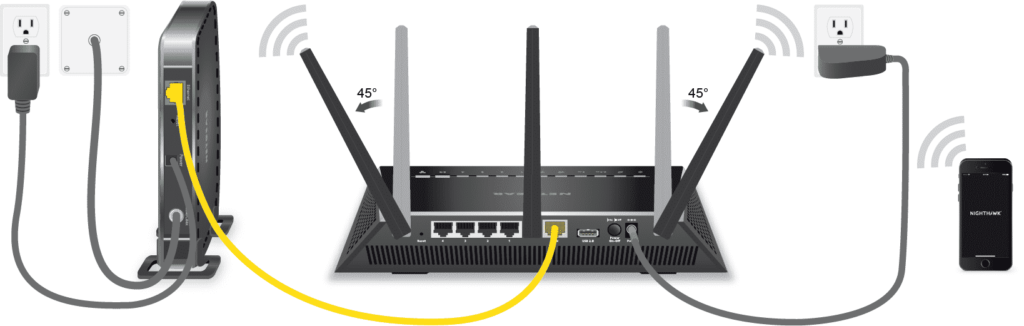
To begin installing a Netgear router with a wireless device, first connect an Ethernet cable from your modem to the internet port on your Netgear router. Switch on the modem and wait for a connection to be established.
The Internet LED should turn solid white (or green on older models) when the connection is established.
Power the Netgear router and wait for the connection process to complete, indicated by a stabilized LED light on the router.
Check the bottom or back of the router for the preset settings.
Go to the wifi connection manager on your wireless device to set up the router.
Locate the network name of the router. Click on the network and type in the password on the router when prompted.
Open an internet browser and look for the Netgear Genie setup page to appear.
If it does not automatically appear, you can type http://www.routerlogin.com (or) http://www.routerlogin.net to access the network. Login with the default username ‘admin’ and password ‘password’ (case sensitive) or check your router’s label for specific credentials.
The Netgear Genie will take you through the configuration settings to install the Netgear router.
Installing Netgear router cable connection using a smart wizard
Connect the modem to the port on the Netgear router and a computer through the LAN ports. Power off the router, modem, and computer and power them back on. Wait for the booting process to complete.
Go to a web browser and enter the IP address http://192.168.0.1 or https://192.168.1.1. To install a Netgear router with a cable connection using the Smart Wizard, log into the router interface using the default username ‘admin’ and the default password ‘password’.
If default credentials don’t work, press the reset button for 10 seconds to restore factory settings, or check your router’s label for the correct login information.
Activate the setup wizard screen by clicking on the use wizard option. Follow the prompts to allow the wizard to find the internet connection.
Click on ‘Next’ to allow the wizard to save the settings.
Avoid altering the default settings unless you possess unique DNS information from your ISP, which needs configuration.
Click on router status to check if there is a connection to the internet. Check to ensure the correct IP address is indicated in the IP address field.

How to Setup a Netgear Wifi Router
Using the Netgear Genie to Configure a Netgear DSL Modem Router
Connect the DSL port on the Netgear router to your phone line using a DSL filter/splitter, which should be provided with your router.
Connect the computer to the DSL modem from the LAN ports using an Ethernet cable, connect the router to a power socket, and wait for booting to complete.
Open a browser to access the Netgear Genie setup.
If it does not automatically appear, you can type in http://192.168.0.1 or http://www.routerlogin.net in the address bar to access the Genie setup interface. On the window, when prompted, click on yes to allow the genie to help.
Click on the option next at the bottom of the page to go to the following configuration step. Select your country from the list and click on next.
The wizard will automatically detect the type of connection.
Most modern DSL connections use PPPoE, while PPPoA is legacy. Your ISP will specify which protocol to use and require login details provided by your ISP to connect to the internet.
Your ISP will provide login details to enable access to the service. Type in the username and password, then click next.
The router will automatically apply these settings. You can check if you can access the Internet by selecting the ‘take me to the Internet’ option.
Should these configuration settings fail, contact your internet service provider (ISP) to check if you have the correct login details.
Try again using the new credentials to complete the setup process.
Setting up a Netgear Wi-Fi router is straightforward when following the correct steps and having the appropriate login credentials. You can always reach out to company support for further assistance.
See Also