When you purchase through links on our site, we may earn an affiliate commission. Here’s how it works.
How to Setup Dual Monitor – Getting Started
Implementing a dual monitor setup is relatively easy, and the entire process only needs a handful of connections and settings adjustments to complete. A dual monitor setup helps with workflow by making it easy to transition between several tasks.
Therefore, getting another display for your computer will help you be organized and productive. For instance, you might like to launch many programs on your PC; having all these apps open on one display will quickly clutter it.
However, when you have two or more displays, you can surf the web on one display while you edit a video or watch a movie on the other. For whatever work you have, dual monitors come in handy by streamlining your workflow.
No more toggling through multiple open tabs. You can drag some programs and browser tabs across the monitors to use them quickly. So, let’s look at setting up dual monitors, including what to check for before beginning the setup.
Check Your Hardware and Connection Ports Before Beginning Dual Monitor Setup
1. Your PC’s Hardware Supports Dual Monitors
First, you must confirm that your PC’s hardware supports dual monitors. To verify your PC’s dual monitor capability, check your graphics card’s or integrated graphics specifications. This can often be found in the device’s documentation or by accessing the device manager on your PC. An online search with your graphics card model followed by ‘dual monitor support’ can provide specific details.
Enter the name of your graphics card in the search bar of any browser on your computer, followed by ‘multi-display’ or ‘multi-monitor.’ Many integrated graphics solutions, such as Intel UHD Graphics, can support multiple displays. The exact number of supported displays can vary based on the specific model and generation of the graphics solution. Check your processor’s or computer’s specifications for detailed multi-monitor support.
2. The Display Connection Ports on Your Computer
Most PC graphics cards have at least two video-out ports on the back that allow you to connect several monitors. On the other hand, most laptops have either a DisplayPort, HDMI port, or Thunderbolt (USB-C) port. Some of the ports you’ll find on computers and laptops are:
DisplayPort
DisplayPort is a digital display interface with a distinctive shape found on many computing devices, including desktops, laptops, and monitors. It is increasingly preferred for dual monitor setups due to its high bandwidth capabilities. It’s designed to replace older standards like VGA and DVI, making it a more versatile option for modern dual monitor setups. Some laptops have a Mini-DisplayPort, which is the same shape as the regular DisplayPort, only smaller.
There are a couple of versions of the DisplayPort, and they include:
- DisplayPort 1.2: supports 4K (2160p) at 60 fps.
- DisplayPort 1.3: supports 4K (2160p) at 120 fps.
- DisplayPort 1.4: supports HDR and 8K (7680×4320) at 60 fps.
- DisplayPort 2.0: supports HDR and 16K (6480p) at 60 fps.
DVI Port
A white DVI port has 24 pins and four additional ones to the right. Similar to VGA ports, they usually have screw holes on the side to fasten the DVI cable. DVI ports are outdated; you’ll find them on older PCs and monitors.
Despite being less common in new dual monitor setups, DVI ports offer better resolution support than VGA ports, which can support Full HD (1080p). DVI-D (Digital) connections can support resolutions up to 2560×1600, accommodating 1080p and sometimes higher resolutions, though typically not 4K. There is a high chance that you won’t find a display with a DVI port, so if your PC has one, buy a DVI-to-HDMI adapter.
HDMI Port
An HDMI port is a small and thin rectangular-shaped output with lower corners that are rounded inwards. Some thin laptops are fitted with mini-HDMI or micro-HDMI ports. The HDMI port is the standard port on most newer displays. You’ll also find it on most PCs and TVs because it supports HDR (high dynamic range) and 4K.
There are a couple of versions of the HDMI Port, and they include:
- HDMI 1.4: supports Full HD (1080p) at 120 fps or 4K (2160p) at 30 fps.
- HDMI 2.0: supports 4K (2160p) at 60 fps.
- HDMI 2.1: supports 4K (2160p) at 120 fps and other higher resolutions.
Thunderbolt 3/USB Type C Port
A USB Type-C or USB-C port is a small, reversible, pill-shaped connection that is increasingly becoming a standard for dual monitor setups due to its versatility. A Thunderbolt 3 port, which uses the same physical form as USB-C, is distinguished by a lightning bolt icon next to it
USB-C ports, especially those that support DisplayPort Alt Mode, can support resolutions of up to 4K (2160p) at 60 fps. Thunderbolt 3 ports, which use the same connector as USB-C, can support 4K displays at higher refresh rates and even dual 4K displays, making them highly suitable for dual monitor setups.
While they have the bandwidth for highly high resolutions like 8K, the support for 8K and beyond depends on the specific device and monitor capabilities. However, it’s important to note that not all monitors include Thunderbolt 3 or USB-C connectivity options. If your PC has a Thunderbolt 3 or USB-C port and your monitor doesn’t, you can use a Thunderbolt-HDMI or USB-C to HDMI adapter for your dual monitor setup.
VGA Port
A VGA port is usually blue and rectangular with 15 holes. VGA ports have screw holes used to fasten the VGA cables. VGA ports, being an older standard, are typically found on legacy desktops and laptops, with many modern monitors lacking VGA connectivity.
If your computer or monitor only has a VGA port and you need to connect to a device with HDMI, you can use a VGA to HDMI adapter. Keep in mind, though, that VGA is an analog signal and HDMI is digital, so the adapter needs to convert the signal.
Check The Connection Ports On Your Second Monitor
Your second monitor should have at least one of the ports above. If the ports on your monitor differ from those on your desktop or laptop, you must buy an adapter that matches the ports on your PC to proceed with the setup.
The Setup
Now that you’ve confirmed the ports on your PC and monitor, it’s time to connect the monitor to your PC. To do this, connect one end of the cable you’re using, for instance, HDMI, to the monitor and the other to the PC dual monitor setup. If you’re using an adapter, connect it to the device missing the required ports. Next, connect your monitor to a power outlet.
Then, turn on the monitor by pressing the power button. Ensure the monitor is on and not on standby to receive a signal from your desktop or laptop’s main display. Now, you can tweak the settings on your Windows, Mac, or Ubuntu Linux PC for optimal dual monitor use.
Windows OS
- Click the ‘Start‘ button.
- Next, click on the ‘Settings‘ icon. It’s the gear-shaped icon on the bottom-left side of the ‘Start‘ menu. This prompt will open the ‘Settings‘ menu.
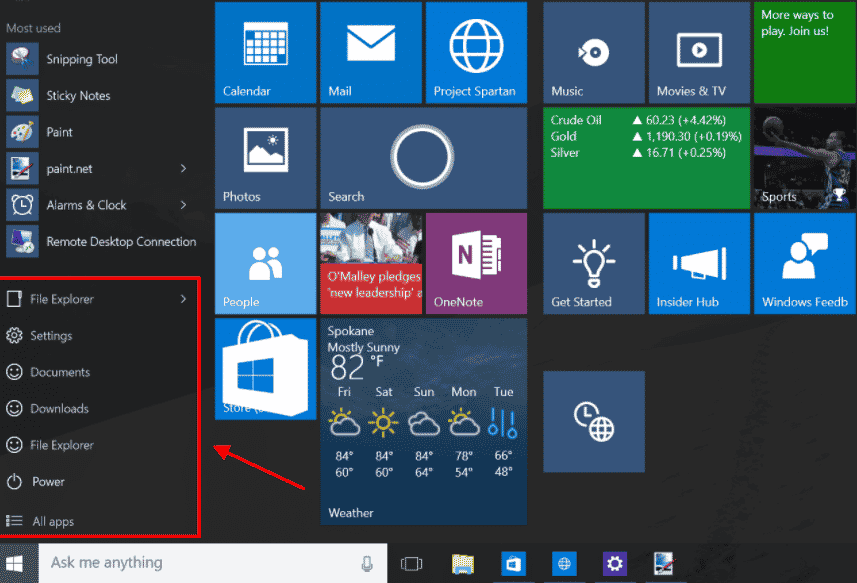
- On the ‘Settings‘ home screen, click on ‘System.’
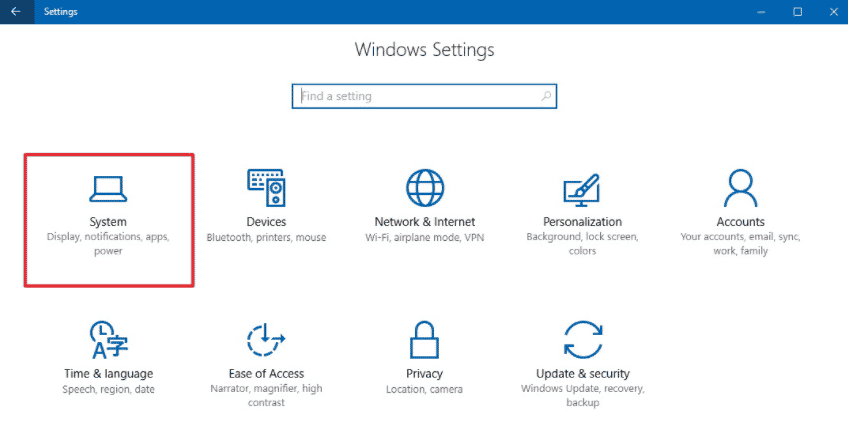
- On the next screen, click on ‘Display.’ It’s the first option on the left side.
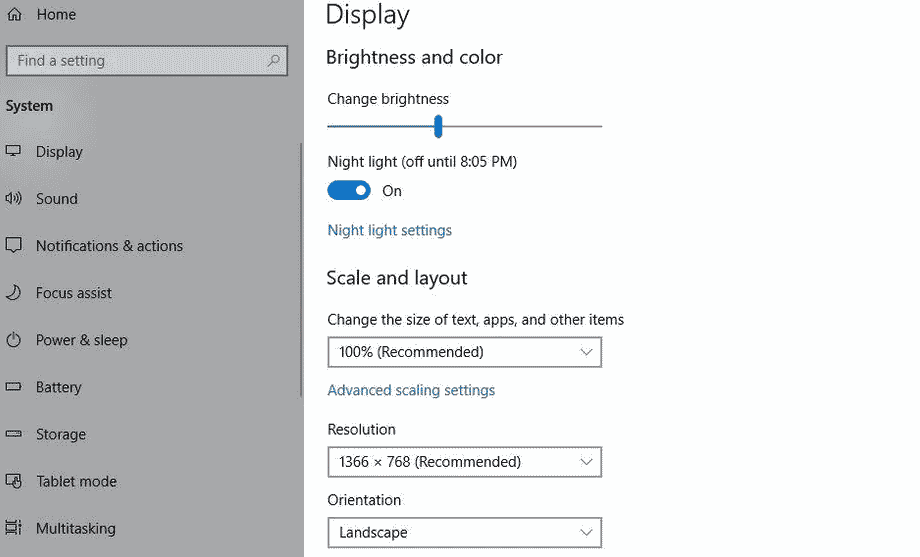
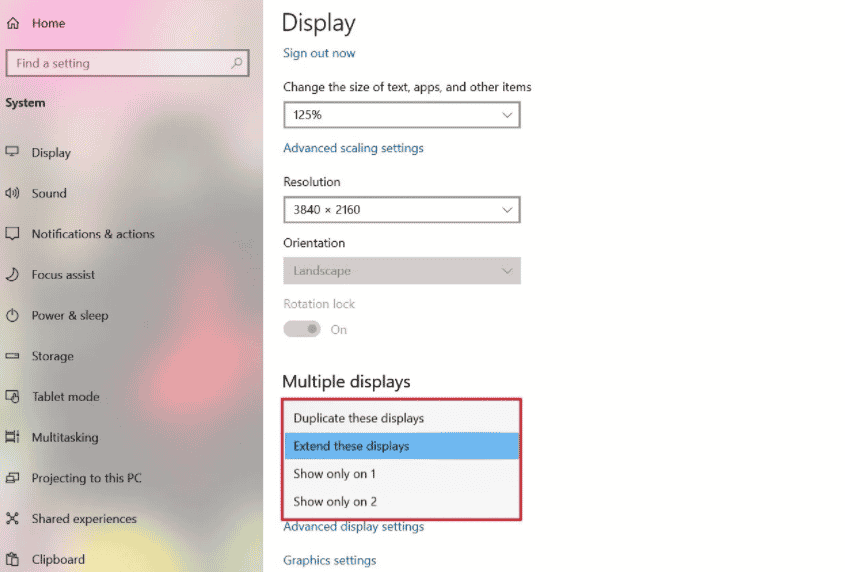
- Next, scroll down to ‘Multiple Displays‘ and click on it.
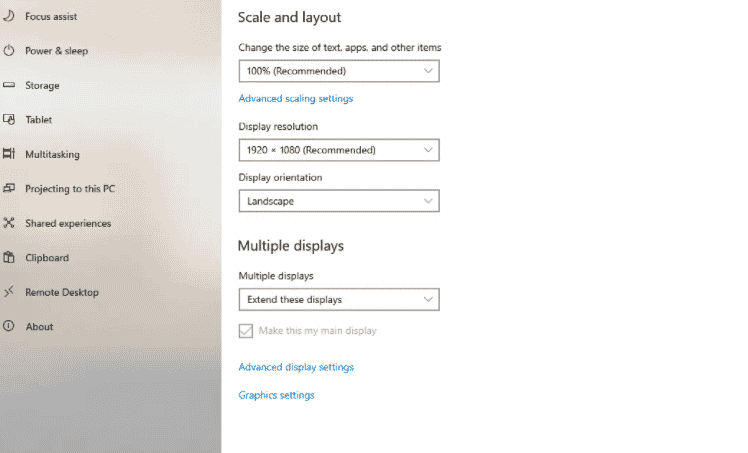
- A drop-down menu will appear. Click on the ‘Extend these displays‘ to use the second display as an extension of your desktop or laptop’s display.
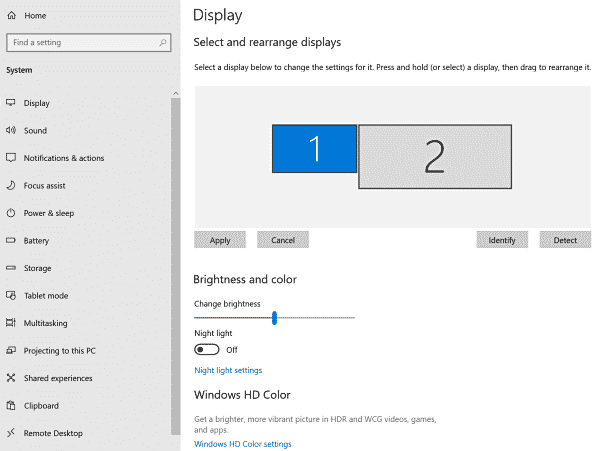
- Scroll up to the ‘Display‘ menu to reorganize your displays. If both your displays are correctly connected, you’ll see two boxes at the top with numbers inside. If you don’t see the two boxes, click the ‘Detect‘ button below.
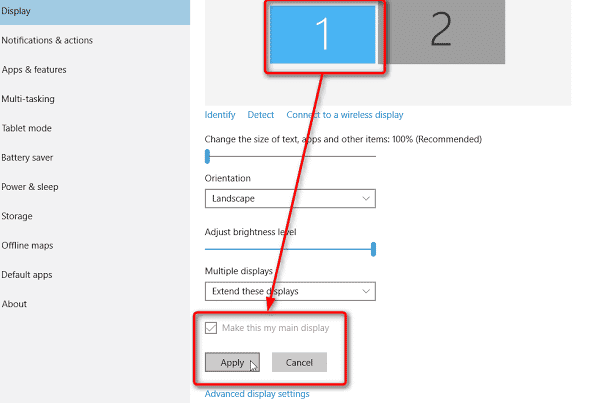
- Next, click on ‘Identify‘ to see the display represented by each box. Drag the boxes to reorganize them and match your actual physical setup. This is a crucial step because it will ensure that your cursor moves properly between the two displays.
- Then click ‘Apply‘ to implement the changes you’ve just made. This button is below the ‘Multiple Displays‘ drop-down menu.
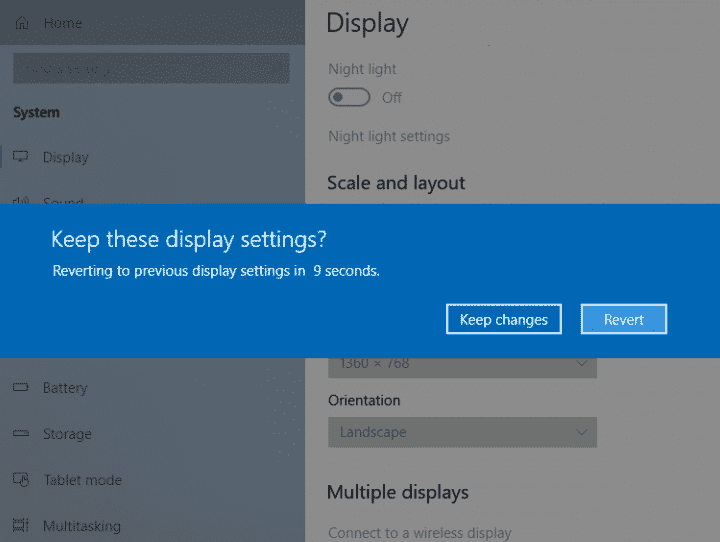
- Finally, click ‘Keep changes‘ when prompted. Doing so will approve the settings you’ve modified. If you have chosen ‘Extend these displays‘ from the drop-down menu, you’ll now see your PC’s main screen split between its native display and the second display.
Mac OS
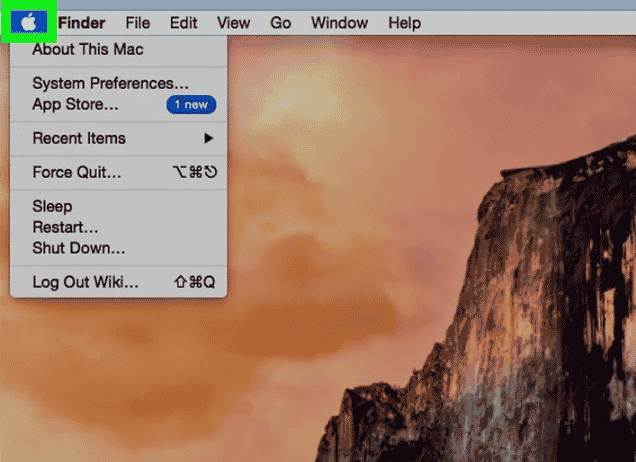
- Click the Apple Logo in the upper left corner of your PC’s display.
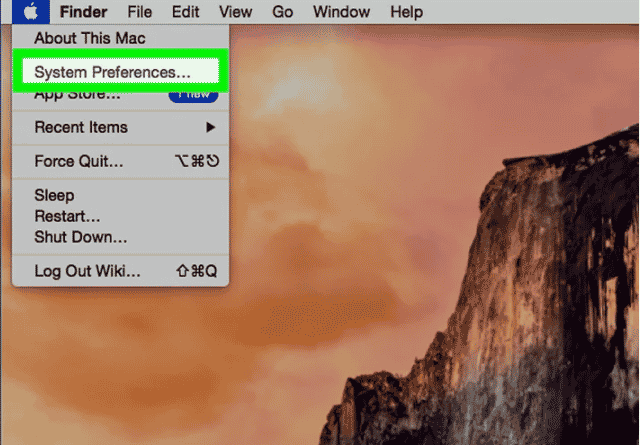
- A drop-down menu will appear. Click on ‘System Preferences.’ This option is located at the top of the drop-down menu.
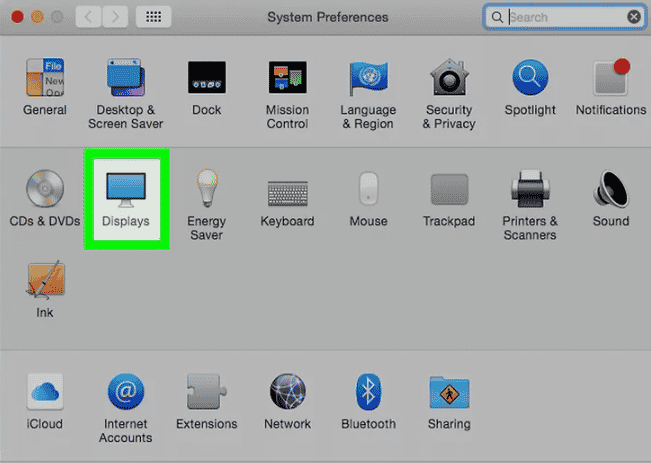
- Next, click the ‘Displays‘ icon. This icon is shaped like a computer display, and it’s on the top-left side of the ‘System Preferences‘ menu.
- Click on the ‘Arrangement‘ tab at the top of the next window.
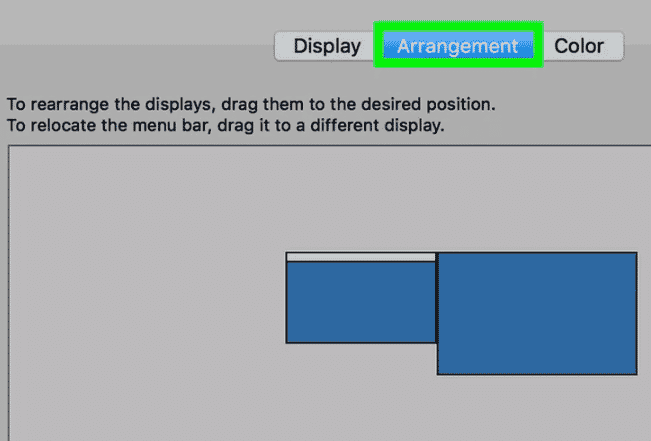
- Ensure you uncheck the box next to ‘Mirror Displays‘ to extend your PC’s main screen to the second display. If you’d like the same content on both displays, ensure the ‘Mirror Displays‘ box is checked.
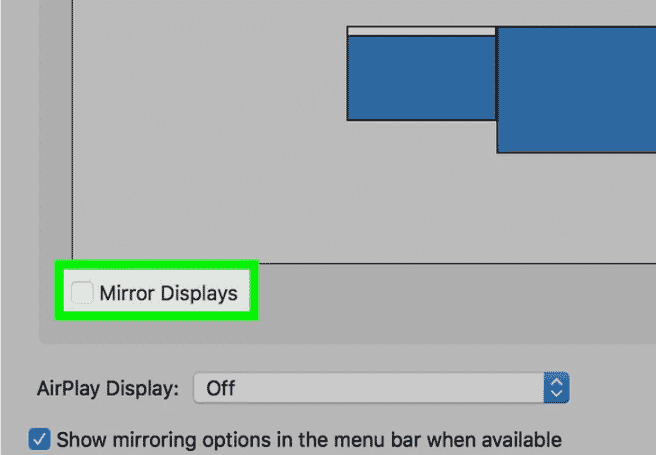
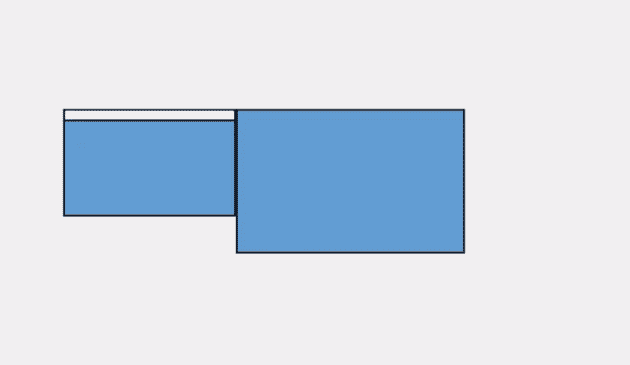
- If you want to use the second display as your primary display, click and drag the white case at the top of one of the blue displays onto the second display.
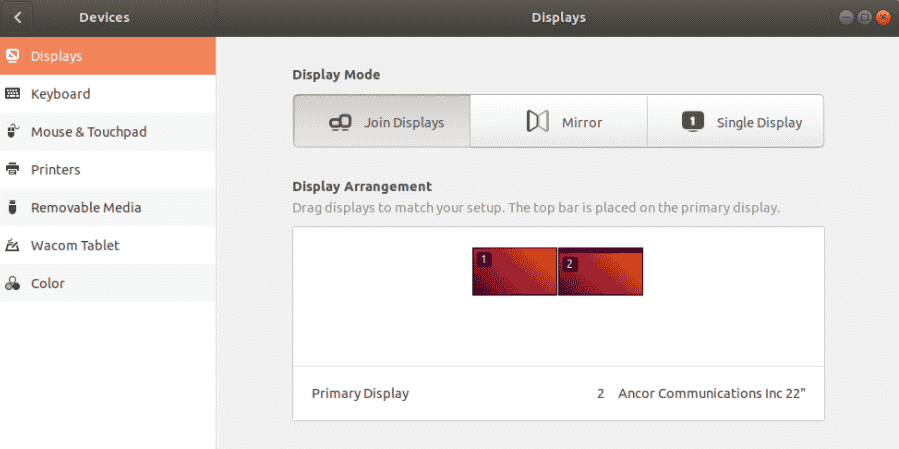
Ubuntu Linux
- Start by clicking on ‘Activities.’ This tab is in the top-left corner of your screen.
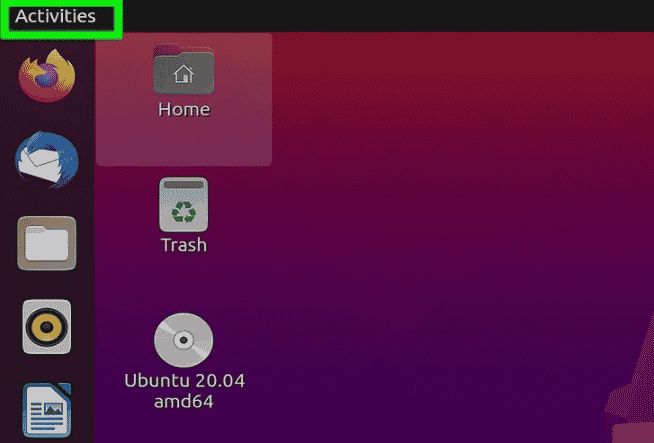
- This will show a search bar that you can use to search for apps on your PC. Enter ‘Displays‘ in the search bar. This will show all settings and apps related to ‘Displays.’ If you’re using the settings menu, you can click on the icon that looks like a magnifying glass in the top-left corner of your screen to show the search bar.
- Next, click on ‘Displays.’ This option has an icon that looks like a PC monitor. If you’re using the settings menu. Click on ‘Devices,’ then click on ‘Displays.’

How to Setup Dual Monitor
- Then it would be best to position the displays as you’ve set them up on your desk. To do this, click and drag the displays on your PC’s screen and move them to the correct position. Each display panel has a number. The corresponding number will appear at the upper left corner of each display when the ‘Displays‘ tab is open.
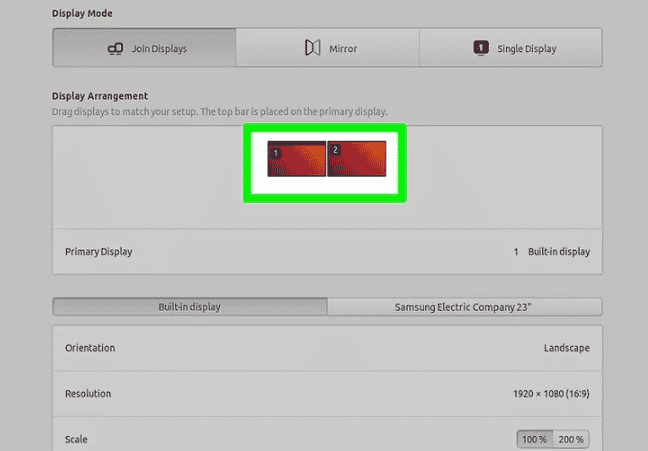
- Next, click on the display you want to use as your primary or main display. The main display is the one that has the ‘Activities‘ overview and the top bar. So click on whichever display you want to use as your primary.
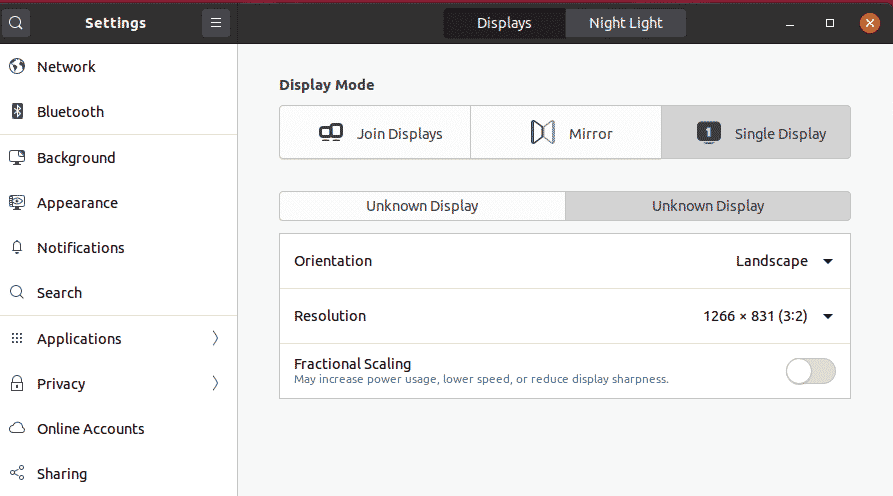
- Choose the orientation, refresh rate, and resolution. If you’d like to adjust these three aspects, click on Orientation, Refresh Rate, or Resolution and pick an option.
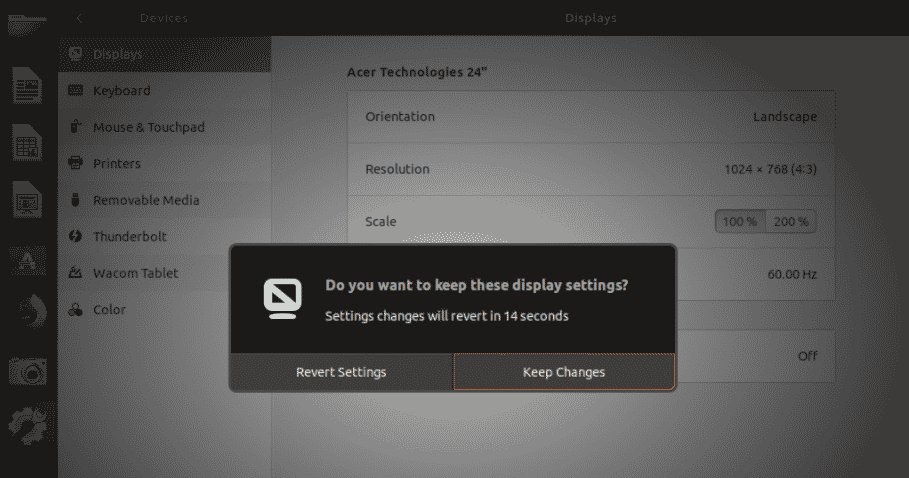
- Click on ‘Apply.’ This is the blue icon in the top-right corner of your screen. Clicking this icon will apply the changes you’ve made.

- You must approve that you want to apply the new settings within 20 seconds, or you’ll revert to the old settings. To do this, click on ‘Keep Changes.’ If you’d like to revert to the old settings, wait for the 20 seconds to lapse or click ‘Revert Settings.’
How to Enhance Your Dual Monitor Experience
Modify The Taskbar
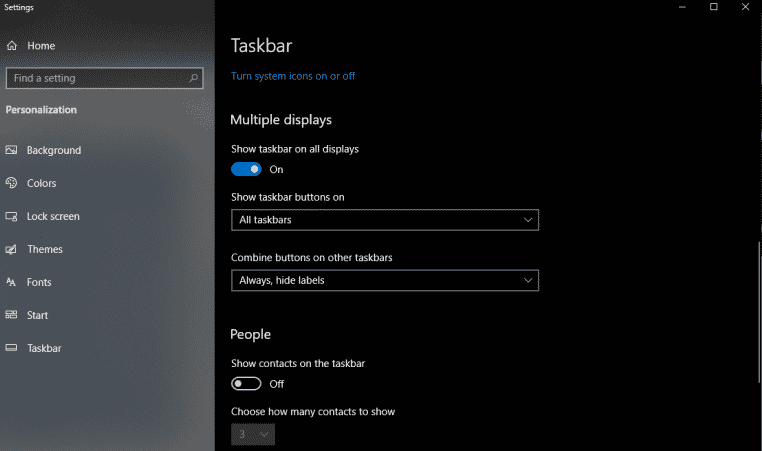
By default, your operating system will extend the taskbar to both displays in a dual monitor setup, which can be helpful for accessibility and multitasking. However, you have the flexibility to customize this to suit your dual monitor workflow better. To adjust, right-click on the taskbar and select ‘Taskbar Settings.’ Within this menu, you’ll discover several options to fine-tune your experience, but for dual monitor setups, focus on scrolling down to ‘Multiple Displays’ to modify your taskbar’s behavior.
The first switch will delete the taskbar from your second display. This is a good option because it puts all your shortcuts in one place. But, if you want the taskbar extended across both displays, you can choose where you want the individual icons to appear.
Change Your Wallpaper

How to Setup Dual Monitor
While an elaborate wallpaper won’t increase your productivity, it’s one of the best parts of having a dual monitor setup. Once you’ve settled on a wallpaper or a group of wallpapers you want to appear on both screens, right-click any space on your screen.
Then click on ‘Personalize.’ Browse the folder where your wallpaper or wallpapers are located and click on ‘Span’ so that the wallpaper can appear on both of your displays.
Match Your Monitors
If you’re using two displays of different resolutions, such as one being Full HD (1080p) and the other 4K (2160p), several adjustments may be required for optimal interoperability.
To address this, navigate to ‘Settings’ and select the ‘Display’ tab. Scroll down to ‘Scale and Layout’ to adjust the resolution of each display and its scaling. So, if you have a Full HD panel and a 4K panel, you can set each display to native resolution and increase the scaling on the high-res display so that images and writings appear the same size on both displays.
Note: You can increase productivity from your dual monitor setup by installing applications such as DisplayFusion. This app makes it easy to modify some settings in dual monitor mode, such as brightness, custom keyboard shortcuts, wallpaper, etc.
Final Thought
To summarize, you can add a second display to your PC regardless of your operating system. While you may encounter minor challenges, following the outlined steps should enable you to set up your dual monitor configuration efficiently
See Also