When you purchase through links on our site, we may earn an affiliate commission. Here’s how it works.
How to Screen Record on Chromebook – Overview
Google is rolling out a native screen recording feature to all Chromebooks. This new feature will allow you to capture footage of your PC’s screen without needing external hardware.
Screen recording is a handy feature for various reasons. For instance, you can use it to demonstrate a workflow in a presentation or to teach someone how to use a certain app.
With the native Chromebook screen recorder, you can record what’s happening on your whole screen or just a part of it. Additionally, you can use it to record your voice alongside the video.
Google says the new native screen recorder will be useful for all users and that they added the feature primarily for educational purposes. Now, teachers can use Chromebooks to prepare presentations, and students can use them to record lectures. With that said, let’s look at a couple of ways to screen record on Chromebook and how to troubleshoot common issues.
How Can You Natively Screen Record on Chromebook?
It’s now very easy to screen record on a Chromebook since Google has rolled out Chrome OS 89 to everyone. Before Chrome OS 89, Chromebook owners had to rely on third-party apps and extensions to record their screens; now, the feature is natively built-in.
The process of screen recording on Chromebook is as follows:
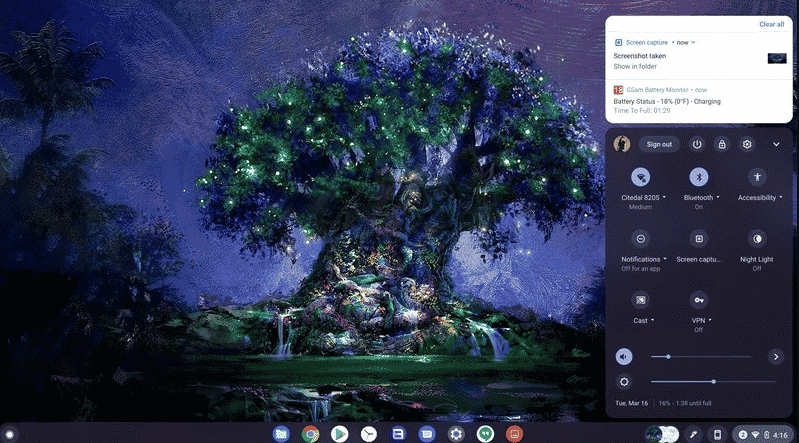
- Click on the ‘Time‘ button in the lower-right corner of your screen.
- Click on ‘Screen Capture‘ in the quick settings. You can also press Ctrl + Alt + Overview.
- Next, click the toggle next to ‘Camera‘ on the left-hand side of the screen record bar.
- To capture the entire screen, click the plain rectangle next to the camera toggle.
- Wait about three seconds and then click anywhere on the screen to start recording.
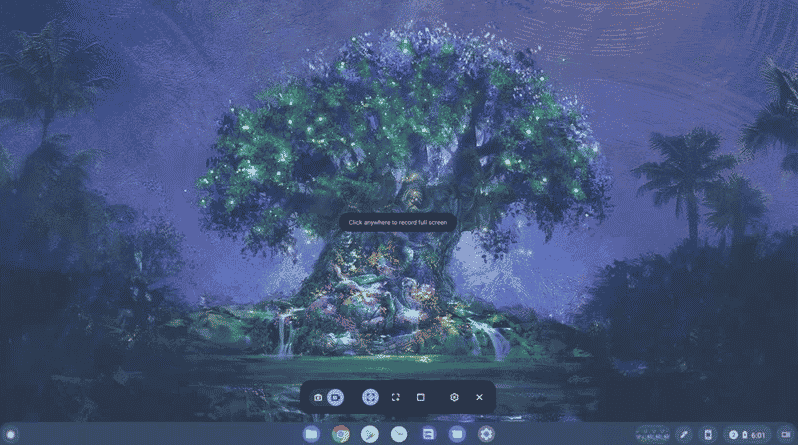
- To stop recording, click on the red stop icon in the dock.

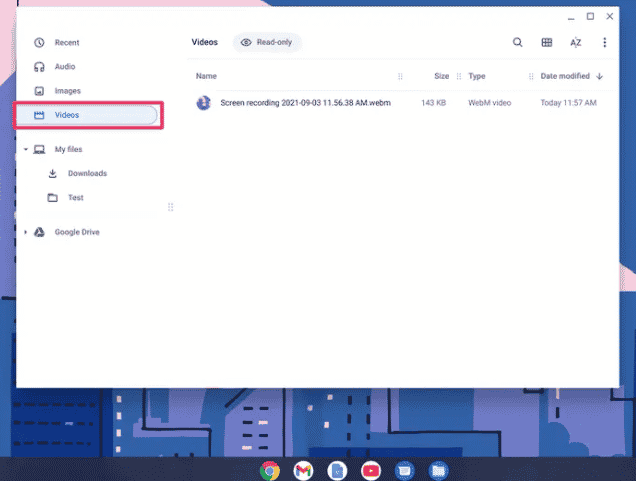
- A pop-up will appear, confirming the recording is saved in the ‘Downloads‘ folder. Moreover, you will get a quick action to delete the recording if you started it by mistake.
How Can You Screen Record on a Chromebook without Audio?
Before you press the record button, click the ‘Settings‘ icon on the snipping tool and toggle the button next to the microphone. The snipping tool will save the changes so you don’t have to deactivate the microphone manually for future recordings.
To record without audio, repeat the above steps and toggle the button next to the microphone to turn it off.
Troubleshooting Chromebook Screen Recording Issues
You may encounter several issues or difficulties when recording a screen record on a Chromebook. In this section, let’s look at some of these issues and their potential solutions.
Can’t Find Chromebook Screen Recording Tool
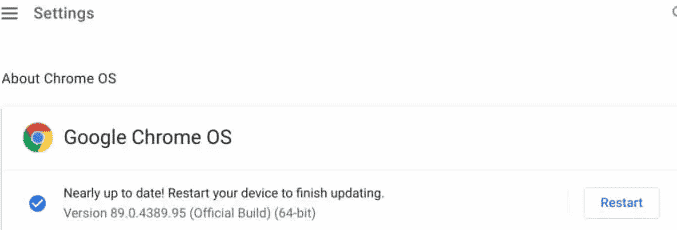
As mentioned, Google added the screen recording feature in Chrome OS 89. If you can’t access the screen recording tool via the status bar or keyboard shortcuts, ensure that your Chromebook runs the latest version of Chrome OS: Chrome OS 89.
To check for updates, follow these steps:
-
- Go to ‘Settings.’
- Click on ‘About Chrome OS.’
- Click on ‘Check for Updates.’ If there are any pending updates, restart your device.
Chromebook Not Recording Audio during Screen Record
So, you’ve clicked on the ‘Record Microphone’ option, but your screen recordings still don’t have sound. What could be the issue? The screen recording tool might fail to record sound if the microphone is muted. Before recording, check the audio setting and confirm that the audio input is activated.
Open the status bar and click the bullet icon next to the volume slider.
In the ‘Input’ area, move the microphone slider to the right side to increase the volume of your computer’s built-in microphone.
If you’ve connected an external audio device to your Chromebook, you’ll also find the device’s mic in this section. If the problem persists after increasing the audio input volume, restart your Chromebook and try again.

How to Screen Record on Chromebook
Chromebook Not Saving Screen Recordings
Chrome OS saves screen recordings in your ‘Downloads’ folder by default. If you can’t find the recordings in your ‘Downloads’ folder, your computer might be low on storage.
To fix this issue:
-
-
- Go to ‘Settings,’ then ‘Device,’ and finally ‘Storage Management‘ to check storage status.
- Try to free up some space, record the screen again, and see if the video has been saved.
-

Note: The native Chromebook screen recorder is excellent; however, it records your screen in WEBM format. If you want to share the recording, you’ll need to convert it to popular video formats such as MP4 and MKV. You can do so using an online video converter.
Final Thoughts
To sum it up, now you know how to screen record on a Chromebook. This feature should suffice if you only need to do basic recording. However, if you need more features and options, consider an app such as Screencastify. The steps may vary depending on the specific Chromebook model and version of Chrome OS. It is recommended that you consult the official Chromebook support documentation.
See Also
How to Copy and Paste on a Chromebook