When you purchase through links on our site, we may earn an affiliate commission. Here’s how it works.
Canon G7X Mark III portrait photography
Regardless if you are doing it for a friend, a paid client, or a model, portrait photography got its own share of challenges to tackle through. Now, being a photographer, you must also understand that portrait photography is quite different from wildlife photography or landscape photography. Hence, you really have to adjust your camera settings in order to match up to the portrait photography requirements.
On the other side, carrying a high-end Canon camera with flip screen like Canon G7X Mark III with you can certainly get the job half done for you. Now let’s take a look at Canon G7X Mark III portrait photography settings.
Recommended settings for Canon G7X mark iii portrait photography
Step 1. Selecting the right shooting mode

canon g7x mark iii portrait – shooting mode
When it comes to selecting the right shooting mode, it totally depends on the kind of portrait shoot you are going for. So, in case you are shooting the Canon G7X mark iii portrait photography with a tripod, going with the manual mode is highly recommended. Now when we talk about using the Manual mode, it is highly effective in capturing HDR bracketed shots, night photography shots, and shots with long exposures.
Similarly, if you are shooting a portrait without a tripod, opting for aperture priority mode is the right idea. This works perfectly in capturing shots where the subject is walking around or traveling.
Step 2. Adjusting the ISO
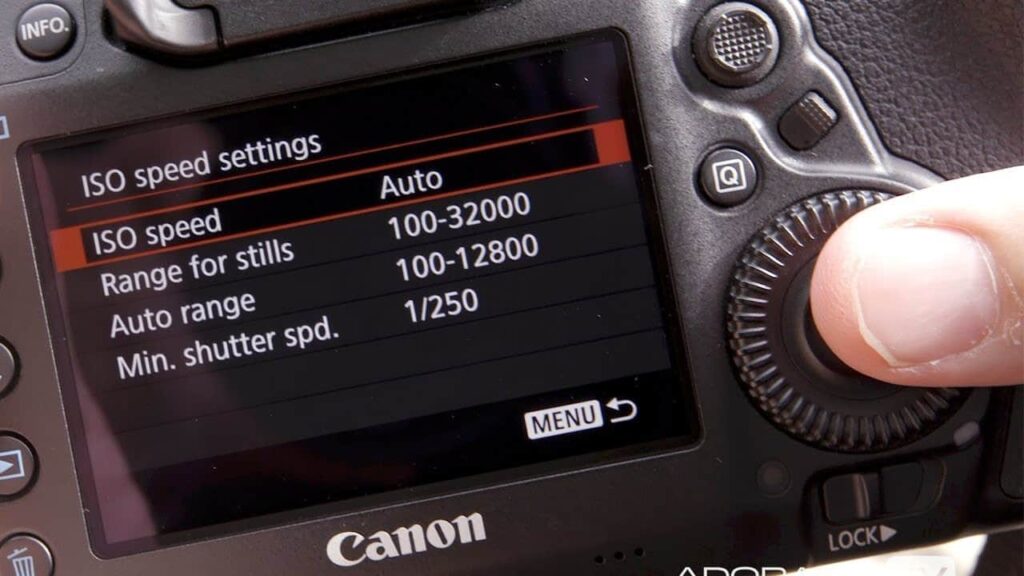
canon g7x mark iii portrait – ISO
No matter whether you are an amateur photographer or a professional one, you always expect your Canon G7X mark iii portrait photography to be perfect. Now, this is where keeping the ISO to the lowest is a pre-requisite while shooting portraits as it keeps all the unwanted noise away from your captured shots.
Hence, keeping the ISO between ISO 100 and ISO 400 is highly recommended. That said, you also need to keep a track of the shutter speed. Moreover, the ISO highly depends on the lighting conditions within the surroundings.
So if you are shooting in a low lit area or under the shade, don’t hesitate to increase the ISO to 800 or even 1600, depending upon your requirements.
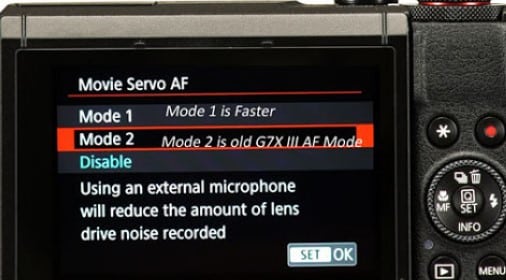
Step 3. Choosing the right focus mode
canon g7x mark iii portrait – focus mode
Now here comes another key aspect of the Canon G7X mark iii portrait photography. While shooting a portrait, you have to ensure using a single point focus and not the other way round. Also, while choosing the right focus settings, always go with Single shot(AF-S) instead of continuous(AF-C) mode.
This is due to the fact that during a portrait shoot, the focus has to be locked to the subject and the tracking focus settings are only feasible for moving subjects. Once done, you will be able to lock the focus to your subject and it would stay the same during the whole portrait shoot.
Step 4. Set the drive mode to ‘Single’
canon g7x mark iii portrait – single
Portrait photography doesn’t require you to capture a number of photos at the same time and only demands to capture the single perfect shot at the right time. Hence, you don’t need to use the burst mode that shoots 4-8 frames per second at one go and often results in weird photos with awkward expressions.
Keeping the drive mode to single would help you in getting that perfect shot instantly. While doing so, do ensure that you have some good light on the subject and press the shutter right when you see a perfect expression.
Step 5. Adjusting the aperture
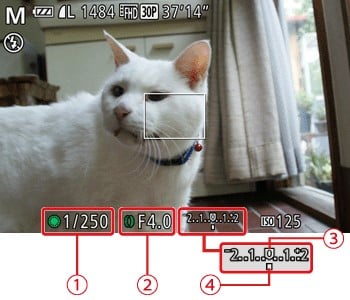
canon g7x mark iii portrait – aperture
Even though most of the professional photography experts recommend using an aperture value of f/5.6, you can tweak them as per your style or requirements. So, if it’s about shooting the single person portraits, keeping the aperture between f/2 and f/4 is highly recommended.
Even though it would require you to use a high-quality lens, it would blur the background while providing a perfect touch to the subject in focus.
On the other side, if you are about to shoot the portraits with more than one person as the subject, try using a smaller aperture between f/5.6 and f/8 while keeping everyone in sharp focus. While you do that, do ensure to keep the subjects closer enough and an aperture value of f/5.6 would then make you capture the perfect shot.
Step 6. Get the right lens
Getting a high-quality lens for Canon G7X mark iii portrait photography is a pre-requisite. Moreover, if you want to flatter your subject during the shoot, using a short telephoto lens (85 to 100mm) is a good idea.
Besides letting you compressing the perspective, a telephoto lens would also help you to out-focus the background without distorting the subject’s face. You can also use a wide-angle lens but that would distort the subject while making it look misshaped and oddly proportioned.