Getting Started with Your Breville Espresso Machine
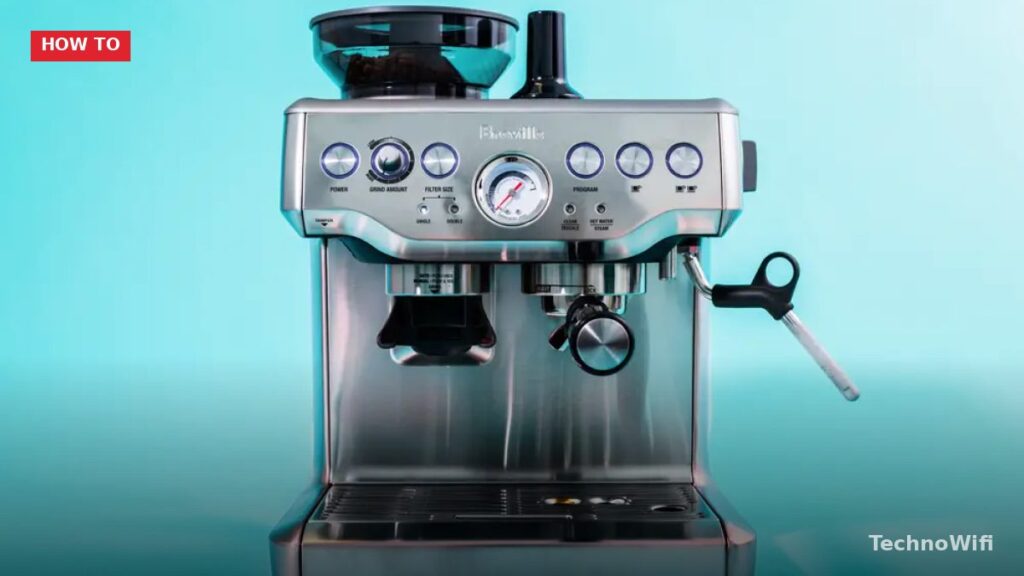
Breville is one of the most popular brands among home espresso enthusiasts, and for good reason. Their machines range from beginner-friendly models to advanced setups for experienced baristas. The Barista Express remains one of the best-selling home espresso machines in 2026, and it is the primary model we reference in this guide.
Since most Breville espresso machines share similar controls and features, these instructions apply broadly across the lineup. Whether you own a Barista Express, Barista Pro, Barista Touch, or Infuser, the fundamental steps are the same. Let’s walk through the full process from unboxing to your first latte.
Step 1: Assemble and Prepare the Machine
Start by following the setup instructions in your manual. This typically involves cleaning all removable parts, installing the water filter in the tank, and running a flush cycle to clear any manufacturing residue from the internal plumbing.
Check the water level in the tank before every use, even before turning the machine on. Running the pump without enough water can damage internal components over time.
When you power up the machine for the first time, you may hear a bumping or knocking noise. This is normal. The pump is priming itself and pushing water through the system. Let the machine warm up for 10 to 15 minutes so the boiler, group head, and portafilter all reach the proper temperature. This warm-up time makes a noticeable difference in shot quality.
Step 2: Load the Hopper with Beans
Open the bean hopper on top of the machine and add whole coffee beans. The exact amount does not matter much at this stage. Just make sure you have enough beans loaded so the grinder does not run empty mid-dose. Use freshly roasted beans for the best flavor, ideally roasted within the last two to three weeks. Pre-ground coffee is not recommended because it loses flavor rapidly after grinding.
Step 3: Set the Grind Size
Breville recommends starting at grind size 5 as a baseline. This is the number on the dial located on the side of the hopper (or the top, depending on your model). You probably will not need to adjust this setting dramatically. Small changes, one or two notches in either direction, can make a big difference in extraction.
If your espresso runs too fast and tastes sour or watery, move to a finer grind (lower number). If it runs too slowly and tastes bitter or harsh, go coarser (higher number). Finding the right grind for your specific beans takes a few attempts, which is completely normal.
Step 4: Set the Grind Amount
The grind amount dial controls how long the grinder runs, which determines how much ground coffee ends up in the portafilter. Set it to the 3 o’clock position as your starting point. You will fine-tune this based on the weight of coffee you get.
For a double shot, you want between 15 and 18 grams of ground coffee in the portafilter basket. If your first dose comes out heavier than 18 grams, turn the grind amount dial slightly toward less. If it is under 15 grams, increase it. A small kitchen scale makes this calibration process much faster and more consistent.
Step 5: Grind into the Portafilter
Insert the portafilter into the grinding cradle and press it in quickly, then release. This activates the grinder, which will run for the duration you set in the previous step. The ground coffee drops directly into the portafilter basket.
Weigh the portafilter before and after grinding to confirm the dose. This step matters more than you might think. Consistency in dose weight is one of the biggest factors in getting repeatable espresso shots.
Step 6: Tamp the Coffee
Take the tamper (included with most Breville machines) and press down on the ground coffee in the portafilter. The goal is a flat, even surface with firm pressure. You do not need to press as hard as possible. Apply steady pressure until the coffee stops compressing, then give the tamper a slight twist before lifting it out.
An uneven tamp causes channeling, where water finds the path of least resistance through the coffee puck and produces an uneven extraction. Take a moment to check that the surface is level before moving on.
Step 7: Clean the Portafilter Rim and Flush the Group Head
Before locking the portafilter into the machine, wipe any stray grounds off the rim and ears of the portafilter. Loose grounds prevent a proper seal and can cause leaks during brewing.
Press the 1-cup button briefly to flush a small amount of water through the group head. This clears any old coffee residue from the previous shot and preheats your cup if you place it under the spout during the flush. It is a small step that makes a real difference in taste.
Step 8: Pull the Shot
Lock the portafilter into the group head by inserting it and turning it to the right until it feels snug. Place your cup underneath the spouts. Press the 2-cup button for a double shot (or the 1-cup button for a single).
Watch the extraction. A well-dialed shot should start flowing after about 5 to 8 seconds of pre-infusion and produce roughly 2 ounces of espresso in 25 to 30 seconds total. The stream should look like warm honey, starting dark and gradually lightening.
If the shot runs too fast (under 20 seconds), your grind is too coarse, or your dose is too low. If it runs too slowly (over 35 seconds), the grind is too fine or the dose is too high. Adjust one variable at a time until you hit the sweet spot.
Step 9: Steam and Froth Milk (for Lattes and Cappuccinos)
If you want a latte, cappuccino, or flat white, the next step is steaming milk. Fill a stainless steel milk pitcher to the bottom of the spout (roughly one-third full for cappuccino foam, half full for latte microfoam).
Before inserting the steam wand into the milk, purge it briefly by turning on the steam for a second or two. This releases any condensation trapped in the wand and ensures you get dry steam from the start.
Submerge the tip of the steam wand just below the surface of the milk and turn on the steam. Keep the wand tip near the surface to introduce air and create foam. Once the milk reaches the volume of foam you want, sink the wand deeper and continue steaming until the pitcher feels hot to the touch (around 150 to 160 degrees Fahrenheit). Swirl the pitcher to integrate the foam, then pour into your espresso.
Wipe the steam wand with a damp cloth immediately after use. Dried milk residue is difficult to remove and can clog the wand over time.
Tips for Better Espresso
Use Fresh Beans
Coffee beans start losing flavor within days of roasting. For the best espresso, use beans roasted within the past two to three weeks. Whole beans stay fresh longer than pre-ground coffee, so always grind just before brewing.
Keep the Machine Clean
Run the cleaning cycle when your Breville prompts you. Backflush with the included cleaning tablets regularly. Descale the machine every one to three months depending on your water hardness. Clean the shower screen and portafilter basket periodically to prevent old coffee oils from building up and affecting flavor.
Use Filtered Water
Water makes up over 90% of your espresso. Tap water with high mineral content or strong chlorine taste will affect the flavor of your shots. Use the Breville water filter, or fill the tank with filtered water from a pitcher filter.
Dial In with Small Adjustments
When your shots are not tasting right, change one variable at a time. Adjust the grind size by one notch, or the dose by one gram, and pull another shot. Changing multiple things at once makes it impossible to know which adjustment helped.