When you purchase through links on our site, we may earn an affiliate commission. Here’s how it works.
Connection Options for the Canon 5D Mark III
The Canon 5D Mark III is a full-frame DSLR that was built for professionals, but its connectivity options reflect the era it came from. Released in 2012, it includes a Mini-USB port for direct computer connection. There’s no built-in Wi-Fi, no Bluetooth, and no NFC. If you want wireless file transfer, you’ll need Canon’s optional WFT-E7A wireless adapter, which attaches to the bottom of the camera.
For most people, the simplest approach is either a USB cable or a card reader. Both work reliably on Windows and Mac without any complicated setup.
Connecting via Mini-USB Cable
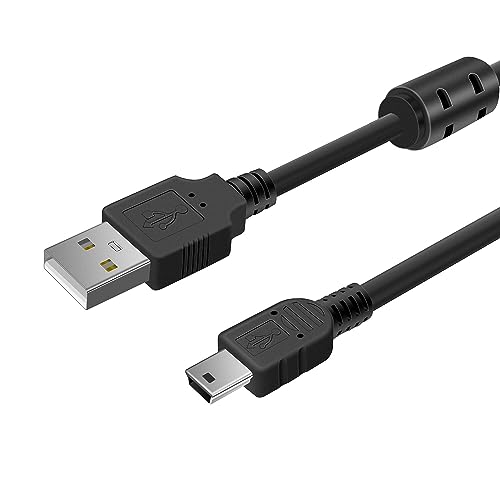
The 5D Mark III uses a Mini-USB Type B connector (the small trapezoidal plug, not Micro-USB). Canon includes a USB cable in the box. If you’ve misplaced it, any generic Mini-USB to USB-A data cable will work. Make sure it’s a data cable, not a charge-only cable.
Windows Setup
1. Turn off the camera.
2. Plug the Mini-USB end into the port on the left side of the camera (behind the rubber flap).
3. Plug the USB-A end into your PC.
4. Turn the camera on.
5. Windows should detect the Canon 5D Mark III as a portable device. It’ll appear in File Explorer under This PC.
6. Open the device and navigate to DCIM to find your photos.
If Windows doesn’t recognize the camera, try a different USB port (use one directly on the PC, not a hub). You may also need to install the Canon USB driver, available from Canon’s support page for the 5D Mark III.
Mac Setup
1. Turn off the camera and connect the USB cable.
2. Turn the camera on.
3. macOS should open Image Capture automatically, or Photos if that’s your default import app.
4. In Image Capture, you’ll see all the files on the card. Select the images you want and choose a destination folder.
5. If nothing opens automatically, search for Image Capture in Spotlight and select the Canon 5D Mark III from the device sidebar.
Mac users on Ventura or later might need to approve a “connected device” permission prompt the first time.
Using Canon EOS Utility
Canon’s EOS Utility software gives you more than basic file transfer. It’s a free download from Canon’s support site (under the 5D Mark III product page) and runs on both Windows and macOS.
After installing:
1. Connect the 5D Mark III via USB and turn it on.
2. Open EOS Utility. It should detect the camera within a few seconds.
3. From the main screen, you can:
– Download all images or select specific ones.
– Remote Live View Shooting to control the camera from your computer screen.
– Camera settings to adjust shooting parameters remotely.
EOS Utility is especially useful for studio work. You can trigger the shutter from your desk, see a live feed on your monitor, and have each photo land directly in a folder on your computer.
Card Reader Method
The 5D Mark III has dual card slots: one CompactFlash (CF) and one SD/SDHC/SDXC. Depending on how you’ve configured recording, your images might be on either card or both.
Remove the card from the camera and slot it into a USB card reader. The card appears as a removable drive. Navigate to the DCIM folder to find your files, organized by date or session in subfolders.
Card readers are faster than USB transfer through the camera, especially for large batches of RAW files. A USB 3.0 or USB-C reader paired with a fast CF or SD card makes a noticeable difference when transferring hundreds of CR2 files at 25 to 30MB each.
CF vs SD: Which Card to Pull
Check your camera’s recording settings (Menu > Record func+card/folder sel.) to see which card is being used. Options include:
– Standard: Records to one card at a time.
– Auto switch card: Fills one card, then switches to the other.
– Record to multiple: Writes the same images to both cards (a backup strategy).
– Record separately: RAW to one card, JPEG to the other.
If you’re using “Record to multiple,” either card will have the full set of images.
Tethered Shooting
Tethered shooting sends each photo directly to your computer the moment you press the shutter. This is standard practice for studio portraits, product photography, and any situation where you want instant review on a big screen.
With EOS Utility
Connect via USB, open EOS Utility, and choose Remote Shooting. You can control shutter speed, aperture, ISO, focus point, and white balance from the EOS Utility interface. Each shot saves directly to a folder on your hard drive.
With Lightroom Classic
Go to File > Tethered Capture > Start Tethered Capture. Name your session, pick a destination folder, and apply a develop preset or metadata template on import. Each captured image appears in Lightroom’s library immediately.
With Capture One
Capture One Pro supports the 5D Mark III for tethering. Create a new session, connect the camera, and it will appear in the camera panel. Shots land in your session folder and you can apply styles, color adjustments, and crop presets in real time.
Optional Wi-Fi Adapter: WFT-E7A
Canon’s WFT-E7A wireless file transmitter adds Wi-Fi capability to the 5D Mark III. It screws into the tripod socket on the bottom of the camera and connects via the USB port.
With the WFT-E7A, you can:
– Transfer images wirelessly to a computer running EOS Utility.
– Upload images to an FTP server during events (useful for sports and press photographers).
– Use the adapter as a wireless remote trigger from a phone or tablet.
– Link multiple cameras for synchronized shooting.
The WFT-E7A is expensive (it originally retailed for around $700), but you can find used units for a fraction of that. It also adds a secondary battery grip-style handle, which is a nice ergonomic bonus. Setup involves pairing the adapter with your Wi-Fi network through the camera’s menu, then configuring EOS Utility to receive wireless connections.
Canon Webcam Utility
Canon released a free Webcam Utility that lets you use select Canon cameras as webcams. The 5D Mark III is supported. Install the utility on your PC or Mac, connect the camera via USB, and it shows up as a webcam source in Zoom, Teams, Skype, and other video call apps.
For the best results, use a fully charged battery or the optional AC adapter (ACK-E6 with DC coupler DR-E6) so the camera doesn’t shut off mid-call. Set the camera to video mode and disable auto power-off in the menu.
Troubleshooting Connection Issues
If your computer doesn’t recognize the 5D Mark III when connected via USB:
– Try a different cable. Mini-USB cables age and develop internal breaks.
– Try a different USB port. Avoid USB hubs and use a port directly on the computer.
– Check the camera’s communication settings. Go to Menu > Communication > select PC Connection or Print/PTP.
– Restart both devices. Turn off the camera, unplug the cable, restart your computer, and try again.
– Update drivers. On Windows, open Device Manager and check for unknown devices. On Mac, updating to the latest macOS usually resolves driver issues.
If the camera shows up but file transfer is extremely slow, you’re likely connected to a USB 2.0 port. Switch to a USB 3.0 port (usually marked with blue plastic inside the connector). Or better yet, skip the cable entirely and use a fast card reader.