When you purchase through links on our site, we may earn an affiliate commission. Here’s how it works.
How to adjust Canon 5D MARK IV landscape photography settings
The Canon 5D MARK IV has many high-end features, including a 30.4-megapixel full-frame CMOS sensor and a powerful DIGIC+ 6 image processor.
The Canon 5D MARK IV has a total of 61 AF points (41 cross-type), and they are all linked to the metering system of this camera, which will not only help you to detect and track colored objects but also perform face recognition.
It features a bright and sizable upgraded viewfinder with 100% coverage. It’s capable of burst shooting up to 7 frames per second. Also, it has a native ISO range of ISO 100-32000, expandable up to 102400 and down to 50.
How to shoot landscape photography with Canon 5D MARK IV proper settings
STEP 1. Setup your Camera Properly
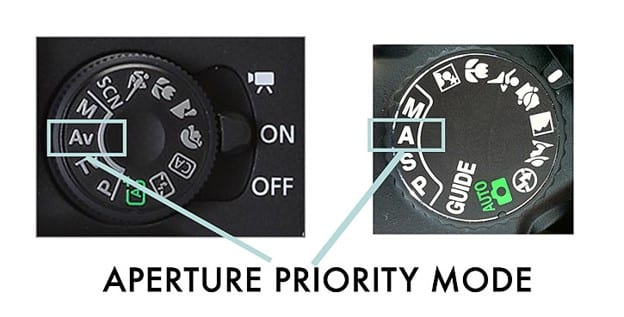
Canon 5D MARK IV landscape photography – aperture priority mode
To take the highest quality landscape photos, setting up your camera correctly is vital. Change the camera mode to aperture priority mode to control the depth of field while the camera sets the appropriate shutter speed for you.
By setting the metering mode to Evaluative/ Matrix, the camera will read the light from all over the scene and calculate the correct exposure.
Also, use exposure compensation to darken or lighten the exposure as required.
STEP 2. Shooting in RAW format is advantageous
In landscape photography, it’s best to shoot in RAW (also known as ‘digital negative’) format. In this format, the camera will capture all image data recorded by the sensor and give you the best possible image quality.
Also, the RAW format allows the user to choose any color space when exporting out, so the color can be adjusted depending on the situation.
For example, if it is going to the WEB, then the output would be in the SRGB color space to get maximum compatibility among web browsers. If it is for the client, then save it in Adobe RGB color space.
STEP 3. Use Polarizing Filter
One of the essential tools in landscape photographers’ bags is a polarizing filter. Once attached to the front lens and rotated to a particular angle, it can cut out most of the reflected light and enhance color saturation and contrast.
Moreover, if you capture photos from distant subjects like a mountain, this polarizing filter can also help you by reducing atmospheric haze and giving you richer colors in the captured shot.
STEP 4. Additional equipment
a) To prevent flaring on a bright and sunny day, always use lens hoods in the camera.
b) Investing in a tripod is essential to get the best landscape photographs. When it is too dark to use a quick shutter without adjusting the ISO speed, instead of increasing the ISO to 800 or more (which has a negative impact), use the tripod to keep the low ISO and longer exposure time.
Also, you can use various Neutral Density Filters, which will lengthen the exposure time several more minutes and create “milky water,” “dragged sky,” etc. effects.
c) Using wide-angle lenses makes a massive impact on your landscape photographs. These lenses will give you a greater depth of field to control and allow you to use faster shutter speeds when taking photos.
In videography, 5D MARK IV with a flip screen can shoot 4k 30fps with 8.8 mp still frame grab, 1080p 60fps (Full HD) and 720p 120fps (HD).
The 5D Mark IV body design is pretty similar to the previous MARK III: an all-black body (5.9 x 4.6x 3 inches) comes with a substantial grip and faux-leather texture surface, furthermore, it is improved with dust and weather resistance.
See Also