When you purchase through links on our site, we may earn an affiliate commission. Here’s how it works.
Do you need to reduce the size of an image before sharing it online? This article provides a guide on how to resize a single photo and convert it to a web-friendly JPEG format:
Steps To Resize A Single Photo on Nikon D7100
Step 1: Selection
Begin by selecting the file you wish to resize.
Click on the Playback button to view all your captured images.
You can browse these images in two ways:
The first method involves viewing thumbnails and small previews, allowing easy image identification.
Alternatively, use the single image mode to examine details closely and select your photo. Choose the method that suits you best and switch between them by clicking ‘OK.’
Step 2: Initiation
After locating the desired image, press the I button on your camera.
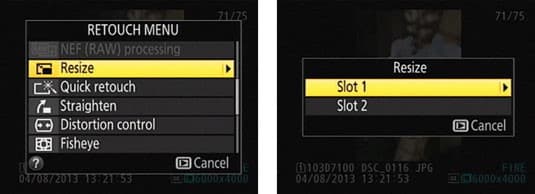
This action brings up the retouch menu, offering options such as resize, quick retouch and straighten.
Select the resize function.
This feature enables you to generate a low-resolution, email-friendly version of your photo, bypassing the limitations of larger RAW files for online sharing.
Step 3: Resize
Upon accessing the resize menu, various options will appear.
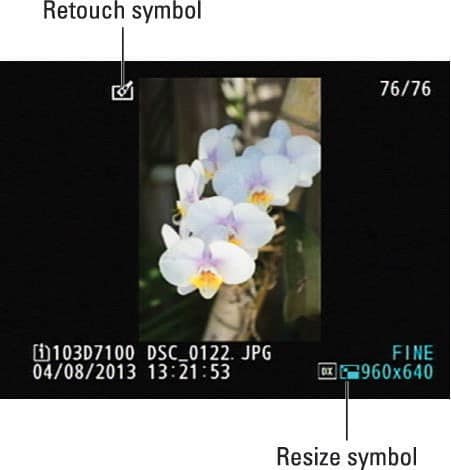
These options are divided into two segments. The first part lists resolutions like 1920 x 1080 or 1280 x 856 or 960 x 640, indicating the image’s pixel count. Higher pixel counts mean larger images.
The second segment displays the file size, such as 2.5M or 1.1M. Remember, Gmail imposes a 25M limit; files exceeding this size are sent via a Google Drive link.

Step 4: Storage
The image automatically saves to a single memory card. When you transfer the card, you can specify a particular folder for easy access.
If you have multiple memory cards, choose the one you prefer for saving. This option allows for organized file management across different cards.
Step 5: Selection
After selecting the storage location, choose the image size from the provided options.
Highlight the desired resolution and confirm by clicking on OK.
Step 6: Confirmation and Saving
Confirming with OK saves the resized image as a duplicate, preserving the original.
This resizing is achieved through downsampling, which reduces the pixel count.
A retouch icon in the image’s top left corner distinguishes the modified version.
DSLRs are favored for their high-resolution capabilities, but this feature can complicate online sharing. Resizing images facilitates easier distribution without creating and sharing drive links.
See Also