
How to Use Nikon D5300 Auto Exposure Bracketing
Nikon D5300 auto exposure bracketing is one of those features that can save you from blown highlights and lost shadows. If you’re not sure what bracketing does, here’s the short version: the camera takes multiple shots of the same scene at different exposure levels, so at least one of them comes out properly exposed.
The Nikon D5300 features a 24.2-megapixel DX-format CMOS sensor with an F-mount lens system. It’s packed with features including Active D-Lighting, Full HD video recording, 5fps continuous shooting, and built-in Wi-Fi and GPS for easy photo sharing through Nikon’s SnapBridge app.
Here’s how to set up and use auto bracketing on the D5300.
Why Use Auto Bracketing?
Photographers use auto bracketing to make sure at least one photo is properly exposed when they don’t have time to review and adjust settings between shots. It’s especially useful in high-contrast scenes (think sunsets, interiors with bright windows, or backlit subjects) where the camera’s meter might not get the exposure exactly right.
Bracketing gives you a set of images at different exposures. You can pick the best one later, or combine them into an HDR image for even more dynamic range.
Set Your Exposure Mode
Start by choosing the right exposure mode for your shooting situation. The D5300 supports P (Program), S (Shutter Priority), A (Aperture Priority), and M (Manual) modes.
- Open the camera menu by pressing the Menu button on the back of the camera.
- Navigate to the exposure settings in the settings list.
- Highlight the exposure option and select P, S, A, or M depending on what you need.
For most bracketing situations, A (Aperture Priority) mode works well because it lets the camera adjust shutter speed while you control the depth of field.
Find the Bracketing and Flash Settings
After you’ve selected your exposure mode, you’ll need to find the bracketing settings to fine-tune your setup.
- Look for the bracketing or flash option in the custom settings menu.
- Select your preference and confirm by pressing OK.
Select Auto Bracketing and Press OK
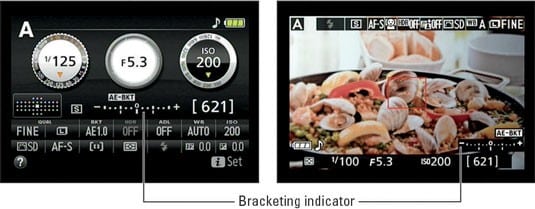
Now find the auto bracketing option in the menu and select it. This gives you three bracketing types to choose from:
- Auto Exposure (AE) bracketing: varies the shutter speed or aperture to change exposure.
- White Balance (WB) bracketing: takes shots with different white balance settings for color accuracy.
- Active D-Lighting (ADL) bracketing: applies different levels of shadow recovery to each shot.
For most situations, AE bracketing is what you want. WB bracketing is useful if you’re shooting in mixed lighting, and ADL bracketing helps when you’re dealing with very high-contrast scenes.
Choose Your Bracketing Type
Pick the bracketing option that fits your situation and confirm with OK. The camera will show the number of shots and the exposure increment for each.
Set the Bracketing Increment
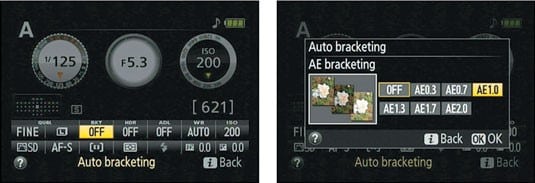
Press the ‘off’ option to specify how much exposure variation you want between shots. Common increments are 0.3 EV, 0.7 EV, or 1.0 EV. A larger increment gives you more variation between frames, which is helpful in high-contrast scenes.
Then finalize your settings and start shooting your bracketed series. The camera will automatically take the specified number of shots at different exposure values.
Tips for Better Bracketed Shots
- Use a tripod when possible. Keeping the camera steady ensures your bracketed shots line up perfectly, which matters a lot if you plan to merge them into an HDR image.
- Use the self-timer or a remote shutter release to avoid camera shake from pressing the shutter button.
- Shoot in RAW format for maximum editing flexibility later.
Final Notes
The Nikon D5300 has been well-received since its launch, picking up positive reviews and awards for its design and feature set. It represents a solid step up from earlier entry-level Nikon bodies, with an updated design and a range of new features.
With its durable build and clean design, the D5300 works well for both beginners and more experienced photographers. Auto exposure bracketing is one of those features that you’ll reach for again and again, especially in tricky lighting situations where getting the exposure right on the first shot is tough.


