When you purchase through links on our site, we may earn an affiliate commission. Here’s how it works.
Light Portrait Photography – Overview
Light adds beauty to a photograph and acts as its foundation. The reason is simple: Proper lighting makes everything efficiently visible.
That’s why people are in light portrait photography. It allows them to play and experiment with light during the portrait photography sessions.
However, understanding how to perform fantastic light portrait photography might be tricky.
There are several things to control when it comes to lighting. You must ensure adequate lighting in the portrait and that it contrasts nicely with the subject.
Furthermore, proper photography equipment is needed for light portraits. Investing in a mobile phone would be better if you want to perform light portrait photography.
In a survey of 881 professional photographers in North America and Europe, 64% of respondents said they rarely use smartphones for professional photographs.
Apart from that, let’s talk about how you can take the best light portrait photographs by following these simple tips and techniques.
6 Tips for Perfect Light Portrait Photography
You would be wondering about the techniques and ways to take perfect light portraits. Let’s check out some of the effective tips for portrait photography lighting:
1. Natural vs Artificial Lighting
The sun provides the best lighting for portrait photography. It’s a natural source of light that can be shaped by using diffusers or reflectors.
However, it depends on when you are shooting the portrait. Artificial lights are the best choice if you don’t want to rely on certain hours of the day for your portrait photography sessions.
Artificial lights will allow you to control when and where to add lights during your portrait photography sessions. You can even shape the artificial light to fall as you like or around the subject.
For artificial lights, you have to make some investments in lighting tools for your portrait photography.
2. Hard or Soft
When you are sure of using artificial lighting, you have to select whether you will go for hard or soft lighting.
It will depend on the distance and the size of the light source. If the light source is larger and closer relative to the subject, the result will be softer.
Hard light adds more shadows on backdrops in the background and the subject’s face. It works well if you want a classic portrait.
In such cases, you may need to use diffusers, softboxes, and reflectors.
3. Continuous or flash
Continuous lighting is better for simple portrait photography. It allows you to shoot what you see.
However, if you want to capture movement, you will need a flash burst. You can also opt for a lighting tool that offers continuous and flash lighting options.
4. Light Equipment
You can choose the right equipment once you know whether you want continuous or flash lighting. There are three main tools.
The options include spotlights, strobes, and LEDs.
Strobes can be used in a studio to shoot portraits. They require a power supply but provide a controlled, intense light output suitable for studio use.
Hence, they are perfect for studio photography, but only for studio photography. If you want portability, you can also use Speedlight.
However, they don’t offer outputs similar to strobes and are hard to use. LED lights are another type of light equipment that you can get.
5. Contrast and Composition
Along with the lighting in your portraits, the composition and contrast also play a crucial role. When you capture a picture, it should be visually appealing and eye-catching. It goes for all types of photography.
Hence, it also focuses on the color contrast and composition of the subject and the background. It will add more beauty to your light portraits.
6. Styling
The subject should be crafted to match the lighting and background. The portrait won’t be flattering if your subject doesn’t fit in with the lights. Hence, the subject should be fully immersed in the scene.
Top 6 Light Portrait Photography Setups
As you know, lighting is the foundation for successful light portrait photography. Whether it’s a character study or a corporate headshot, several ways exist to set up lights for your portrait photography. Some of the best styles include:
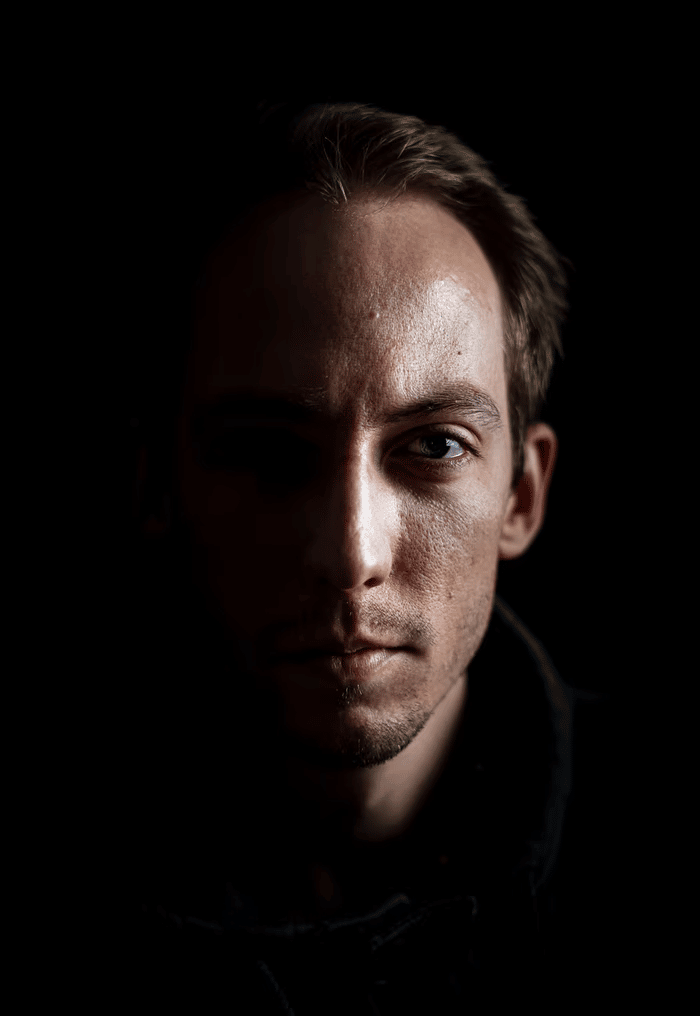
1. Split Lighting
Split lighting refers to a lighting technique that splits the face into two halves- one part having a shadow, the other having light.
This type of lighting technique is best for creating dramatic images like a portrait of an artist or a musician.
Split lighting is often associated with dramatic and intense portraits, making it a popular choice for male subjects, though it can be used for all genders.
Light Portrait Photography Setups – split lighting
2. Loop Lighting
Loop lighting refers to that lighting where you create small shadows of your subject’s noses on the cheeks.
For this lighting, you need to place the light source or tool slightly higher than your subject’s eye levels and approximately 30-45 degrees from the camera.
It also depends on your subjects and how the position will result in the portrait. Loop lighting is easy to create, and that’s why it’s pretty popular when it comes to portrait photography.
3. Rembrandt Lighting
This lighting pattern is known as Rembrandt lighting because the painter, ‘Rembrandt,’ used this pattern in his paintings. Its main emphasis is the triangle of light on the cheek of the subject.

Light Portrait Photography Setups – Rembrandt lighting
In this lighting, the shadow of the cheek and nose touches and creates a little light triangle in the middle. It adds a darker feel to the images.
Your subject needs to turn slightly away from the light source, and the light should be above the top of the subject’s head for this lighting effect.
4. Butterfly Lighting
As the name suggests, butterfly lighting creates a small shadow under the subject’s nose that resembles a butterfly. In such lighting setups, You must place the primary light source above the camera or directly behind it.
Such a lighting technique is mainly used for glamour shots or creating shadows under the chin and cheeks. It emphasizes wrinkles more, which makes it better for older subjects.
Light Portrait Photography Setups – butterfly lighting
5. Broad Lighting
Broad lighting is a style in which the side of the subject’s face turned toward the camera is well-lit. Any lighting, such as a loop, split, or Rembrandt, can be broad lighting.
Such lighting happens when your subject’s face is slightly turned away from the center, and their face’s side is towards the camera and broader in light.
Broad lighting
This type of lighting is sometimes used for “high key” portraits. It will make your subject’s face look broader and more expansive, which will make slim people’s faces look wide.
6. Short Lighting
The short lighting technique is the opposite of broad lighting. Such type of lighting techniques are used in darker or low-key portraits.
More of the face of your subject will be in the shadow if you use this lighting technique. Hence, it’s perfect for adding a slimmed or flattering look to the model.
Light Portrait Photography Setups – short lighting
Conclusion
Light portrait requires patience. Finding a patient model would allow you to get your desired portrait more easily.
Light portrait photography’s primary emphasis is on mastering lighting techniques and patterns to enhance the subject’s features.
That’s why we have included the top lighting patterns for portrait photography. These patterns can help you make your portraits perfect. In addition, we have included lighting tips for portrait photography.
See Also