Why the Nikon P900 Still Turns Heads
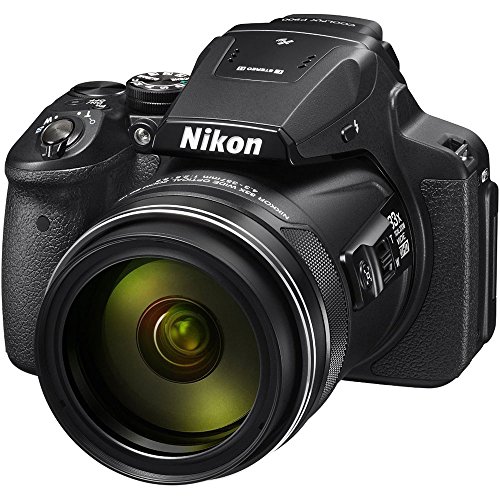
The Nikon Coolpix P900 has one of the most extreme zoom lenses ever put on a consumer camera. Its 83x optical zoom covers 24mm to 2000mm equivalent, which means you can photograph the craters on the moon or read a license plate from across a parking lot. It also includes Wi-Fi, NFC, GPS geotagging, a fully articulating screen, and 1080p video. Even years after its release, the P900 remains popular with birdwatchers, plane spotters, and anyone who wants to get impossibly close to distant subjects.
If you’re looking at an even longer reach, our guide on the Nikon P1000 covers its successor, which pushes the zoom all the way to 125x.
Initial Setup
Charge the EN-EL23 battery using the included charger. A full charge takes about three hours. Slide the battery into the grip compartment and insert an SD or SDHC/SDXC card. Cards rated UHS-I Class 3 or faster are recommended if you plan to shoot video regularly.
Power on the camera and set your language, date, and time zone. The GPS feature uses the time zone setting for accurate location data, so get this right from the start.
Shooting Modes Walkthrough
The mode dial on top of the P900 gives you quick access to all major shooting modes.
Auto Mode
Full automatic control. The camera picks everything, including scene recognition. Good for casual shooting and handing the camera to someone who’s not familiar with it.
Program (P) Mode
The camera handles shutter speed and aperture, but you can adjust ISO (up to 6400), white balance, exposure compensation, and metering mode. This is where most intermediate shooters will spend their time.
Shutter Priority (S) Mode
You pick the shutter speed, the camera picks the aperture. Use faster shutter speeds (1/500s or faster) when shooting birds in flight or other fast action. Use slower speeds (1/30s or slower) for intentional motion blur, like flowing water.
Aperture Priority (A) Mode
You set the aperture, the camera sets the shutter speed. The P900’s aperture range is limited compared to interchangeable lens cameras (f/2.8 at wide, f/6.5 at full zoom), so the depth of field effect is subtle. Still, shooting wide open at f/2.8 at the wide end can produce some background separation for portraits.
Manual (M) Mode
Full control over both shutter speed and aperture. This is the go-to mode for moon photography, where you need specific exposure settings. A common starting point for the moon: 1/250s, f/6.5, ISO 100.
Scene and Effects Modes
The P900 includes scene presets for Landscape, Night Portrait, Sunset, Snow, Bird-watching, and Moon. Yes, there’s a dedicated Moon scene mode that dials in the right exposure automatically. The Effects dial position offers filters like Selective Color, High Contrast Monochrome, and Miniature Effect.
Mastering the 83x Zoom
The zoom on the P900 is genuinely wild. At 2000mm equivalent, you can fill the frame with the moon or pick out individual birds in a tree half a mile away. But that extreme reach comes with challenges.
Use a Tripod at High Zoom
At anything beyond about 50x, handheld shooting becomes very difficult. Even with VR (Vibration Reduction) stabilization turned on, the slightest hand movement sends the image jumping across the frame. A sturdy tripod with a fluid head is essential for any serious telephoto work. If you don’t have a tripod, brace the camera against a solid surface like a fence post or car roof.
The Snap-Back Zoom Button
This is one of the P900’s best features. When you’re zoomed in tight and lose track of your subject, press and hold the button on the left side of the lens barrel. The camera temporarily zooms out so you can reacquire the subject. Release the button and the zoom snaps back to where it was. For birdwatching, this feature is a lifesaver. You’ll lose a bird in the frame constantly at high zoom, and the snap-back button lets you find it again in seconds.
Bird and Moon Photography Tips
For birds, shoot in S mode with a shutter speed of at least 1/500s to freeze wing movement. Bump the ISO up to 400 or 800 if needed for proper exposure. Use continuous autofocus (AF-F) and continuous shooting mode to capture bursts of frames.
For the moon, switch to M mode. Start with 1/250s, f/6.5, ISO 100 and adjust from there based on the moon phase and atmospheric conditions. Use a tripod and a 2-second self-timer to avoid camera shake from pressing the shutter button. Zoom to maximum (2000mm) and fine-tune your framing.
VR Stabilization
The P900’s VR system does an impressive job considering the zoom range. Keep it set to Normal for general shooting. Switch to Active when shooting video while walking. Turn VR off when the camera is on a tripod, since the stabilization system can actually introduce small vibrations when the camera is already steady.
Wi-Fi and NFC Transfer
Download Nikon’s Wireless Mobile Utility app (iOS or Android). On the P900, open the Wi-Fi menu and select Connect to smart device. The camera creates a Wi-Fi hotspot. Connect your phone to it, open the app, and you can browse and download images from the camera. You can also use the app for basic remote shooting with a live preview on your phone.
If your phone supports NFC, touch the phone to the NFC logo on the right side of the camera to connect instantly without going through the Wi-Fi menu.
GPS Geotagging
The built-in GPS records latitude and longitude data for every photo. Turn it on in the Location Data menu under the setup options. A GPS icon appears on screen when the receiver has a fix. The first fix after powering on can take a minute or two, especially if the camera has been turned off for a while.
Geotagged photos show up on a map when you view them in apps like Google Photos, Apple Photos, or Lightroom. Keep in mind that GPS uses extra battery power. If battery life is a concern, turn GPS off when you don’t need location data.
Video Recording and Manual Focus
The P900 records 1080p video at 30fps or 60fps. You can zoom during recording, and the camera’s autofocus adjusts continuously. For smoother zoom movement during video, use the side zoom lever instead of the top ring, since it moves at a steadier speed.
At extreme zoom, autofocus can hunt back and forth. Switch to manual focus (press the function button and select MF) when the camera struggles. Use the control dial to adjust focus precisely. Manual focus is also better for moon and astro work, where you can dial in focus on a bright star or the moon’s edge and lock it.
![67mm Lens Cap Cover for Nikon CoolPix P900 P950 Digital Camera (for Accessories),HUIPUXIANG [2 Pack]](https://www.technowifi.com/wp-content/uploads/2026/08/67mm-lens-cap-cover-for-nikon-coolpix-p900-p950-digital-camera-for.jpg)