When you purchase through links on our site, we may earn an affiliate commission. Here’s how it works.
How to Adjust Motion Sensitivity on Arlo Cameras
Every Arlo camera has a motion detection system, but “motion detection” works differently depending on which Arlo model you own. Some cameras use passive infrared (PIR) sensors that detect heat signatures, while others use pixel-based analysis that watches for visual changes in the frame. Understanding which type your camera uses is the first step to dialing in the right sensitivity because the same sensitivity number means very different things on different systems.
Getting sensitivity right matters more than most people realize. Set it too high and your phone buzzes every time a car drives by, a tree branch sways, or a cloud shadow moves across your driveway. Set it too low and the camera misses the delivery driver walking up to your door. The goal is a setting that catches what you care about and ignores what you don’t.
How Motion Detection Works on Arlo Cameras
Arlo uses two fundamentally different motion detection technologies across its product line. Knowing which one your camera uses determines how you should adjust sensitivity and what kind of false alerts to expect.
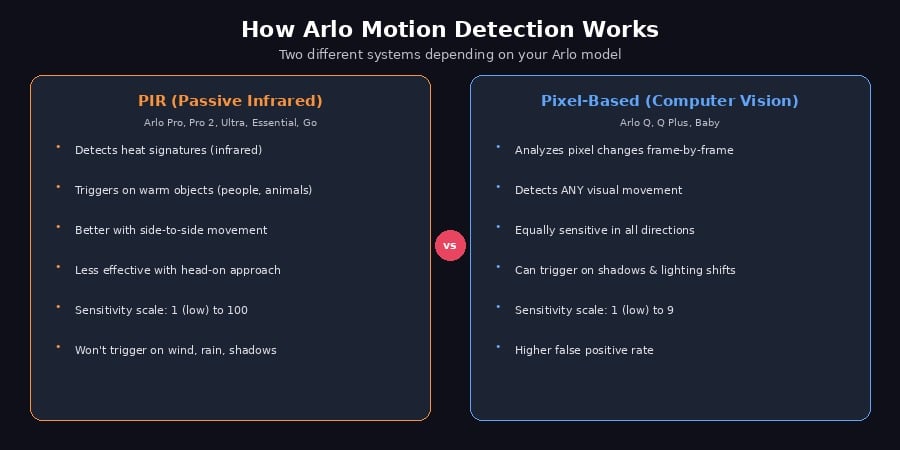
Image PIR cameras detect heat, pixel-based cameras detect visual change, same slider, very different behavior
PIR (Passive Infrared) cameras include the Arlo Pro, Pro 2, Pro 3, Ultra, Essential, Go, and all wire-free models. These cameras have a dedicated infrared sensor that detects heat signatures moving across their field of view. When something warmer than the background, like a person, animal, or car engine, moves through the detection zone, the sensor triggers a recording.
PIR sensors are inherently better at detecting side-to-side movement across the camera’s field of view than movement directly toward or away from the camera. Think of it like a trip wire an object moving sideways crosses multiple detection zones, while one walking straight at the camera might only trigger a single zone. This is why mounting position matters: aim the camera so that expected traffic moves across the frame, not directly at it.
The sensitivity scale on PIR cameras runs from 1 (lowest) to 100 (highest). Higher numbers mean the sensor reacts to smaller or cooler heat signatures at greater distances.
Pixel-based cameras include the Arlo Q, Q Plus, and Baby monitor. Instead of detecting heat, these cameras compare consecutive video frames and look for pixel changes. Any visual change in the image triggers a detection. This means they respond to shadows moving across a wall, changing sunlight patterns, reflections, and essentially any visual movement in the frame.
The sensitivity scale on pixel-based cameras runs from 1 to 9. These cameras tend to generate more false alerts because they react to visual changes that PIR cameras would ignore (like cloud shadows or headlight reflections).
How to Adjust Sensitivity
The process is the same whether you’re using the Arlo mobile app or the web portal, with minor visual differences between the two interfaces.
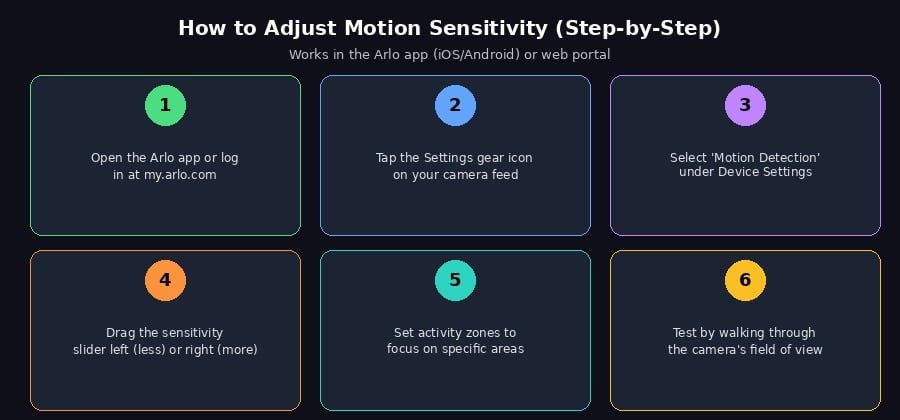
Image Six steps from opening the app to testing your new settings
Step 1: Open the Arlo app on your phone (iOS or Android) or log in to my.arlo.com on a computer.
Step 2: Find the camera you want to adjust. Tap the Settings gear icon on that camera’s feed, or select the camera and go to its device settings.
Step 3: Look for “Motion Detection” under the device settings. On newer app versions, this might be under “Motion Sensitivity” directly.
Step 4: Drag the sensitivity slider to your desired level. Moving it right increases sensitivity (detects smaller/farther movements), moving it left decreases it (only detects larger/closer movements). The change takes effect immediately you don’t need to save or confirm.
Step 5: If your Arlo model supports activity zones (most current models do), set up zones to limit detection to specific areas of the camera’s view. This is covered in detail below.
Step 6: Test your new settings. Walk through the camera’s field of view at the distance you want it to detect, and check whether it triggers a recording. Adjust and repeat until the behavior matches your expectations.
Recommended Sensitivity Settings
These are starting points based on common placement scenarios. Every environment is different trees, traffic patterns, ambient temperature (which affects PIR sensors), and camera angle all influence what sensitivity level works best. Start here and fine-tune over the next few days based on what alerts you’re getting.

Image Start with these levels, then adjust based on false alert frequency values shown for PIR cameras (1-100 scale)
Indoor, low traffic (hallway, garage entry): 60-70. You want to catch people walking through but not trigger on minor air movement or pet activity. This range reliably detects adult-sized heat signatures while ignoring most background fluctuations.
Indoor with pets: 40-50. Cats and small dogs produce less heat than humans and move at lower heights, so reducing sensitivity helps the camera “see past” them. This isn’t perfect a large dog close to the camera will still trigger alerts, but it significantly reduces pet-triggered false notifications.
Outdoor, front door/porch: 70-80. You want reliable detection of visitors, delivery drivers, and anyone approaching your door. Higher sensitivity ensures the camera starts recording before the person reaches the door rather than as they’re already leaving.
Outdoor, facing a busy street: 30-50. If your camera’s view includes a sidewalk or street, higher sensitivity means constant alerts. Lowering to 30-50 (combined with activity zones that exclude the street) lets you catch people on your property without being notified about every passing pedestrian.
Outdoor, backyard: 60-70. A middle ground that catches people entering the yard while ignoring most wildlife and wind-blown objects. If you’re getting frequent false alerts from animals, drop to 50.
Baby monitoring (Arlo Baby or indoor camera): 80-90. You want to catch small movements, such as a baby rolling over or standing up in a crib. False alerts are less annoying in this context because you want to err on the side of catching everything.
Activity Zones: Your Most Powerful Tool
If adjusting the sensitivity slider alone doesn’t solve your false alert problem, activity zones will. Activity zones let you draw rectangles on the camera’s view to define exactly where motion should trigger recordings. Motion that occurs outside these zones is completely ignored.
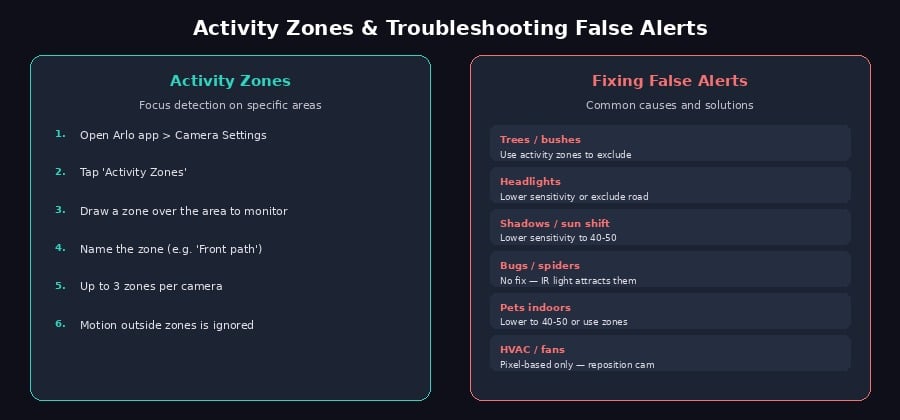
Image Activity zones eliminate entire categories of false alerts by excluding problem areas from detection
To set up activity zones: open the Arlo app, go to your camera’s settings, and select “Activity Zones.” You’ll see a live or snapshot view from the camera. Draw a rectangle over the area you want to monitor, for example, your walkway, driveway, or front porch. Name the zone so you know what it covers. Most Arlo cameras support up to three activity zones.
The real power of activity zones is exclusion. If your camera sees a tree that sways in the wind, don’t try to lower sensitivity to ignore it, you’ll end up missing real events. Instead, draw your activity zone to exclude the tree entirely. The camera still records what happens in the zone while ignoring the tree’s movement completely.
Troubleshooting Common False Alert Sources
Trees, bushes, and foliage: The most common false alert source for outdoor cameras. Wind causes movement that registers as motion on both PIR and pixel-based systems. Use activity zones to exclude vegetation from the detection area.
Headlights and reflections: Cars passing at night cast headlight beams across walls, driveways, and windows. Pixel-based cameras are especially vulnerable. Lower sensitivity or use activity zones to exclude the road.
Shadows and sunlight changes: As the sun moves throughout the day, shadows shift. Pixel-based cameras interpret this as movement. PIR cameras handle this better since shadows don’t produce heat, but they can still trigger if the shadow crosses the sensor itself.
Insects and spiders: Arlo’s infrared night vision LEDs attract bugs. A spider building a web directly in front of the lens will trigger non-stop alerts. There’s no software fix for this; you need to periodically clear webs from the camera and consider positioning the camera away from lights that attract insects.
Pets indoors: Lower sensitivity to 40-50 for most pets. Very large dogs may still trigger any sensitivity. For households with both pets and security concerns, position the camera at a height where pets are below the PIR sensor’s primary detection zone (mounting higher and angling slightly downward helps).
This guide covers sensitivity adjustment for all current Arlo camera models, including Arlo Pro, Pro 2, Pro 3, Pro 4, Ultra, Ultra 2, Essential, Essential XL, Go, Go 2, Q, Q Plus, Baby, and Video Doorbell. The app interface may vary slightly between Arlo app versions, but the underlying settings are the same. Activity zone availability depends on your Arlo subscription plan; some features may require Arlo Secure.
See Also