When you purchase through links on our site, we may earn an affiliate commission. Here’s how it works.
Your Nikon D5300 can bring on some perfect pictures with its viewfinder in auto mode feature.
It is usually seen among new photographers that they are hesitant to move from a point-and-shoot camera or a smartphone camera as they feel like a DSLR is far too complicated.
This fear may have been justified many years ago, but with the advancements available today, there is no fear of complexity.
This is because all modern cameras have point-and-shoot capabilities, too. Thus, you are not forced to navigate complex settings.
Taking a picture with the Viewfinder in Auto Mode in Nikon D5300
Step 1: Go to Settings of your Nikon D5300
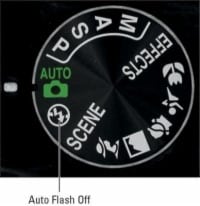
- To take pictures with the viewfinder, you must first set the camera to Auto Mode.
- This lets the camera know you want to autofocus and use default settings.
Step 2: Go to the Lens setting
- You must set the lens also to the autofocus mode
- To do this, you need to toggle the switch on the side of the lens
- The setting you must select will be labeled “A” on the lens.
Step 3: Find an object
- Once all these settings are done, all that is left to do is take the picture.
- To do this, use the viewfinder to locate the subject.
- Make sure the subject is within the autofocus brackets
- If the object is outside this bracket, it will not be in focus and you will end up focusing on the wrong object, with the object you desired becoming blurred.
Step 4: Shooting and camera wizardry
1. Once the object of desire is in the autofocus bracket, you must click the shutter button halfway. If you click it thoroughly, it will take a picture without running any tests.
2. But if you click halfway correctly, the following happens: 1) the exposure reading is taken: In this method, the camera tries to determine how much light is available and sets the exposure level accordingly. If things change, you can manually set it to the desired level.
If the camera doesn’t have enough light, it will use the auto flash. If you may not or do not want to use the flash, go back to step 1 and select Auto No Flash. This is the same as auto, but it will not engage the flash.
3. After the exposure reading, the camera autofocus process begins. In this step, if there is insufficient light, the camera will shoot a beam to establish the distance between you and your object to autofocus better.
Step 5: Autofocus
1. Once the camera has established focus, it will do two things. First, it will show two boxes in red on the screen, where the distance measurement was done. Second, the autofocus light will turn on, letting you know that focus has been achieved.
2. Once this is done, the autofocus stays on the subject as long as it is not moving. If the object moves, the focus will move with it. For best results, keep it within the autofocus bracket.

Step 6: Record Picture
1. Once you have achieved focus, click the shutter button down to click the picture.
2. If you cannot, try moving away from the subject and allowing it to focus correctly. This will allow you to record the picture.
