When you purchase through links on our site, we may earn an affiliate commission. Here’s how it works.
How to Create Your Own Options Menu on the Nikon D5600
The Nikon D5600 has six menu tabs with dozens of settings spread across them. If you’re constantly diving into the shooting menu to change image quality, then jumping to custom settings to tweak autofocus, and then back to the setup menu for something else, you’re burning time that could be spent shooting.
That’s what My Menu solves. Think of it like a favorites playlist for your camera settings instead of scrolling through six separate menus to find the handful of options you actually change regularly; you pull them all into one custom tab that holds up to 20 items. ISO sensitivity, image quality, focus mode, Active D-Lighting, interval timer, whatever you use most, regardless of which menu it normally lives in, can go into My Menu.
This guide walks through the full process: adding items, rearranging them, removing ones you don’t need, and a useful trick to make My Menu the first thing you see when you press the MENU button.
Where to Find My Menu
My Menu is the last tab in the D5600’s menu system. Press the MENU button on the back of the camera, then use the multi-selector (the directional pad) to scroll left past all the other tabs Shooting, Custom Settings, Setup, Retouch until you reach the wrench-and-star icon at the far end.
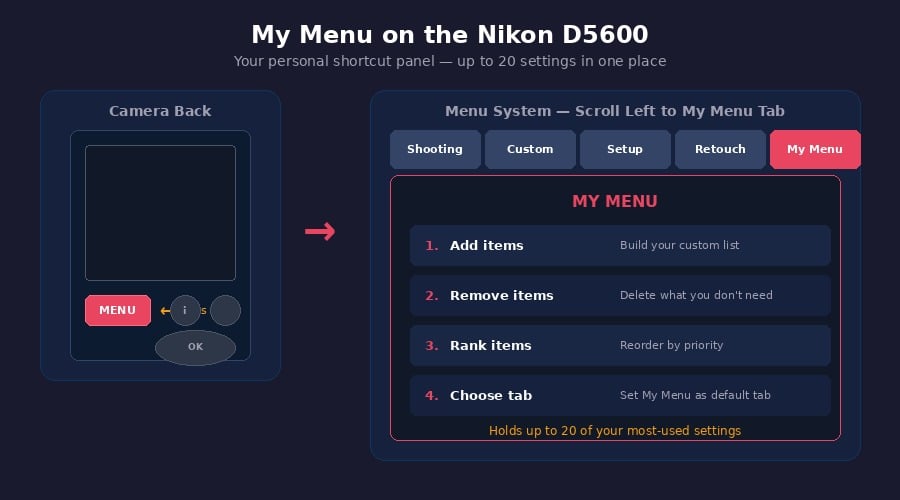
Show Image Press MENU, then scroll left to the last tab, My Menu, which holds up to 20 of your most-used settings
When you first open it, the tab is empty. You’ll see four management options: Add items, Remove items, Rank items, and Choose tab. These are the tools you’ll use to build and organize your custom menu.
Adding Items to My Menu
Select “Add items” and press OK. The camera displays a list of all its menu categories: Shooting menu, Custom settings, Setup menu, and Retouch menu. Pick the category that contains the setting you want to add.
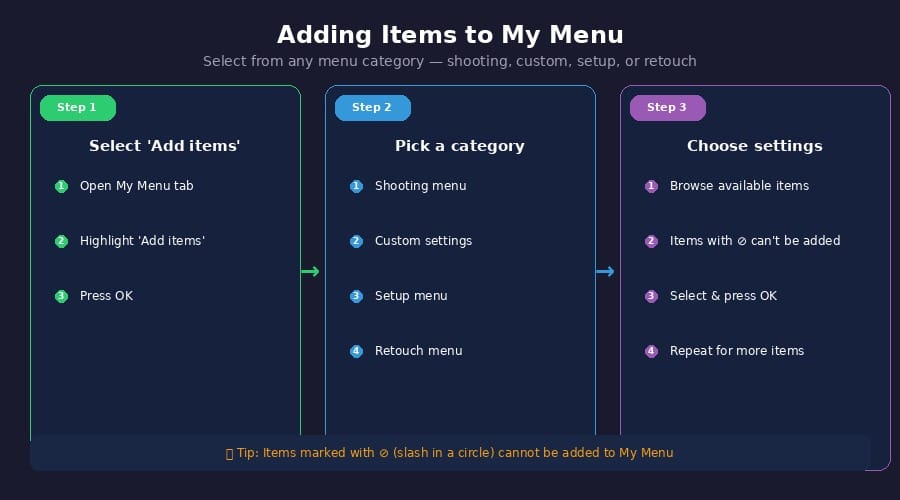
Show Image Select Add items → Pick a menu category → Choose the specific settings you want
After selecting a category, you’ll see every individual setting within it. Scroll through and highlight the one you want, then press OK. The camera asks you to confirm the position, press OK again, and it’s added.
One thing to watch for: some settings have a circle-with-a-slash icon next to them. These can’t be added to My Menu; they’re either system-level settings that don’t make sense as shortcuts or options that depend on other hardware configurations.
You can repeat this process for as many items as you want, up to the 20-item maximum. There’s no restriction on mixing categories, so you could have three items from the shooting menu, two from custom settings, and five from setup, all sitting together in My Menu.
Practical starting point: If you’re not sure what to add, these settings are worth pulling in for most shooting situations Image quality (to toggle between RAW and JPEG), ISO sensitivity settings (to adjust Auto ISO behavior), White balance (for quick changes under different lighting), AF-area mode (to switch between focus point configurations), and Active D-Lighting (to control highlight and shadow recovery).
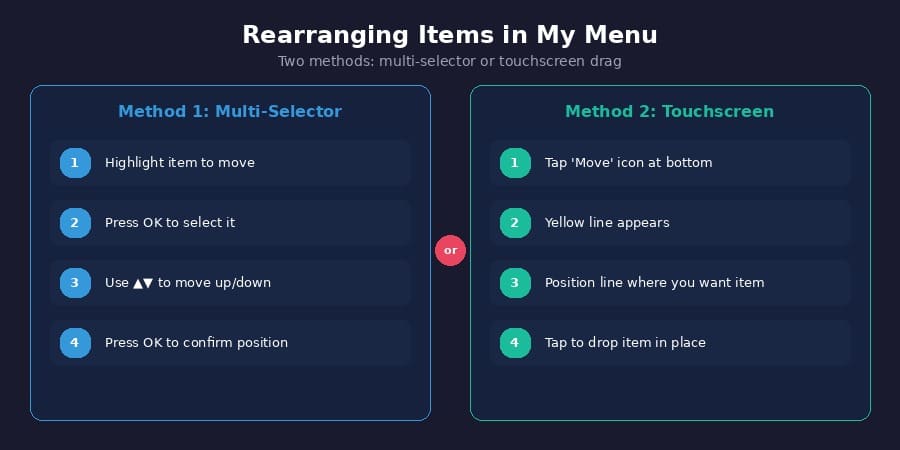
Rearranging Items
Once you’ve added more than one item, the order they appear in matters the items you change most frequently should be at the top.
Show Image Two ways to reorder: use the multi-selector buttons or tap and drag on the touchscreen
Select “Rank items” from the My Menu management screen. The D5600 gives you two ways to move things around.
Using the multi-selector: Highlight the item you want to move and press OK. The item becomes “grabbed” now use the up and down arrows on the multi-selector to slide it to the position you want. Press OK again to drop it in place.
Using the touchscreen: Tap the “Move” icon at the bottom of the screen. A yellow positioning line appears. Drag or tap to position this line above where you want the item placed, then tap to confirm. The item snaps into its new position.
Either method works; the multi-selector is more precise, and the touchscreen is faster if you’re doing a lot of reorganizing.
Removing Items from My Menu
Settings you thought you’d use constantly might turn out to be set-and-forget options that don’t need a shortcut. To clean up:

Show Image Remove items you don’t use often, and consider enabling Choose Tab to make My Menu your default view
Select “Remove items” from the My Menu management screen. Every item in your custom list appears with a checkbox. Check the ones you want to remove, then press OK. The camera asks for confirmation, select OK again, and they’re gone.
This only removes items from My Menu; it doesn’t delete the settings themselves. Image quality still lives in the shooting menu, AF-area mode still lives in custom settings. You’re just removing the shortcut.
Pro Tip: Make My Menu Open First
By default, pressing the MENU button takes you to the Shooting menu tab. If you’ve built a useful My Menu, you probably want to land there instead.
The “Choose tab” option handles this. Select it from the My Menu management screen and set it to ON. Now every time you press MENU, the camera jumps straight to My Menu instead of making you scroll past five other tabs to reach it. It’s a small change that saves a surprising amount of time during a shoot. Think of it like setting your most-used app as the home screen on your phone.
Tips for Building a Good My Menu
The 20-item limit sounds generous, but a bloated My Menu defeats the purpose. A focused list of 8–12 items that you actually change during a shoot is more useful than 20 items where half rarely get touched.
Group related settings together. Put ISO sensitivity and Auto ISO settings next to each other. Put image quality and image size together. This way, you’re not jumping around within the custom menu itself.
Reassess after a few shoots. The settings you thought you’d change constantly might stay untouched, while others you didn’t consider keep sending you back to the main menus. Adjust accordingly removing and adding items takes seconds.
This guide covers the Nikon D5600 (sold as the D5600 in all markets). The same My Menu feature and steps apply to the Nikon D5500 and D3400, though the available settings may differ slightly by model. The D5600’s touchscreen drag method for rearranging items is not available on models without a touchscreen
See Also