When you purchase through links on our site, we may earn an affiliate commission. Here’s how it works.
How to Customize the Nikon D5600’s Buttons
The Nikon D5600 ships with every button assigned to a default function. The Fn button opens ISO, the AE-L/AF-L button locks exposure and focus, and the shutter button handles both focusing and shooting. For a lot of people, those defaults work fine. But if you’ve been shooting for a while and keep wishing a certain button did something different, the D5600 lets you reprogram several of its physical controls through the Custom Settings menu.
This isn’t about adding new capabilities to the camera; the hardware stays the same. It’s about rearranging which button triggers which function so the camera matches how you actually shoot. Think of it like remapping keys on a keyboard, the letters don’t change, but you can put the ones you use most where your fingers naturally land.
This guide covers every customizable button on the D5600, what you can assign each one to do, and a particularly useful technique called back-button focus that’s worth considering even on an entry-level body.
Which Buttons Can Be Customized?
The D5600 has three main buttons you can reprogram, plus two additional controls with adjustable behavior. All of them live under the same menu path: Custom Settings → f (Controls).
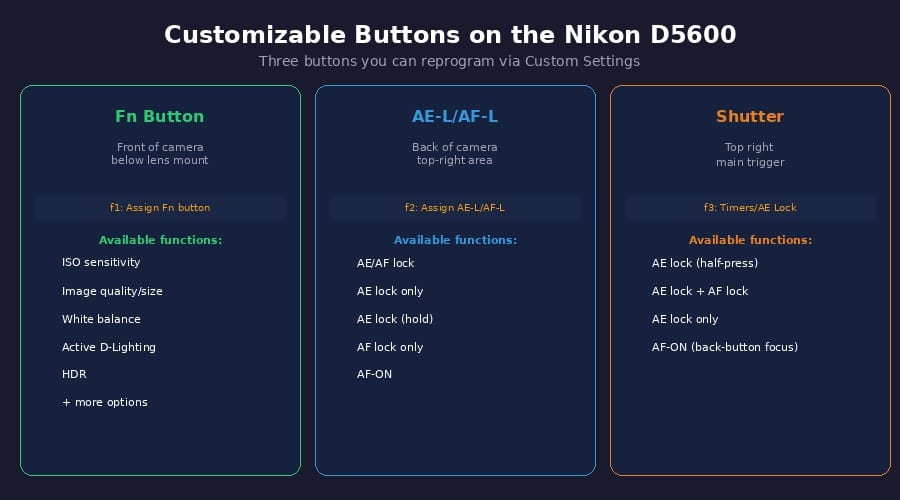
Three primary customizable buttons, each with its own set of assignable functionsThe
Fn (Function) button is located on the front of the camera body, just below the lens mount on the left side. This is the most versatile button with the most assignment options.
AE-L/AF-L button on the back of the camera near the top-right corner, next to the viewfinder. Controls auto-exposure lock and autofocus lock behavior.
The shutter button is the main shooting trigger on top. You can change what happens when you half-press it (the focus and metering behavior).
Two additional controls, the OK button (in Live View mode) and the command dial rotation direction, can also be adjusted in the same menu section.
How to Access Button Customization Settings
All button assignments are in one place. Here’s the path:
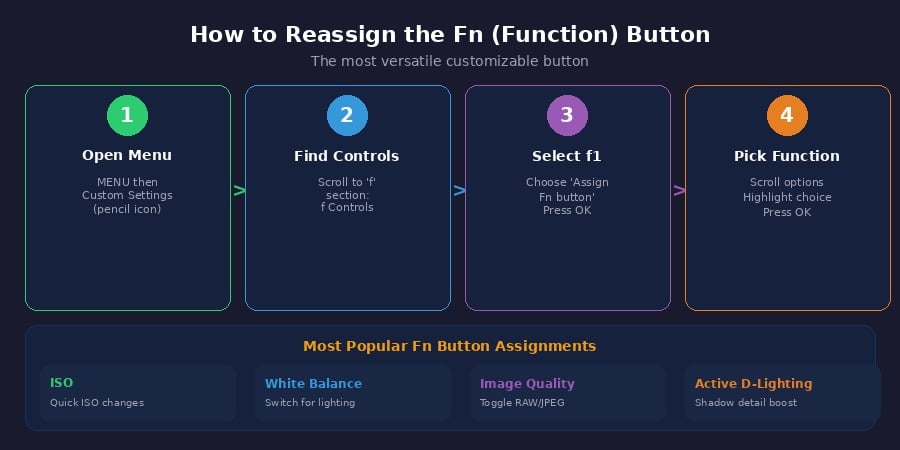
Same four-step path for every button, just pick the relevant f-number option in step 3
Press the MENU button. Navigate to the Custom Settings tab (the pencil icon). Scroll down to section “f” labeled “Controls.” Inside, you’ll find f1 through f5, each corresponding to a different button or control. Select the one you want to change, browse the available functions, highlight your choice, and press OK. The change takes effect immediately.
A helpful detail: on any option screen, look for a question mark icon at the bottom. Selecting it shows a brief description of what that function does, which is useful if you’re not sure what “AE lock (hold)” means compared to “AE lock only.”
Customizing the Fn Button (f1)
The Fn button is the one you’ll probably customize first because it has the most options and it’s in the most accessible position, your left index finger rests right on it while shooting.
Default assignment: ISO sensitivity. Press Fn and spin the command dial to cycle through ISO values.
Available alternatives:
Image quality/size Press Fn + command dial to switch between JPEG Fine, JPEG Normal, RAW, and RAW+JPEG without opening any menus. Useful if you normally shoot JPEG but occasionally want RAW for tricky lighting situations.
White balance Press Fn + command dial to cycle through white balance presets (Auto, Daylight, Shade, Cloudy, Tungsten, Fluorescent, Flash) faster than the menu when you’re moving between indoor and outdoor lighting.
Active D-Lighting Toggles the camera’s built-in highlight/shadow recovery. Handy for high-contrast scenes where you want to quickly boost shadow detail without changing exposure.
HDR Enables the camera’s HDR mode, which takes multiple exposures and combines them. The D5600’s HDR is single-press, so having it on the Fn button lets you toggle it on for a specific shot without leaving it enabled.
Bracketing burst If you do your own HDR processing, this lets you trigger exposure bracketing from the Fn button instead of navigating the menu each time.
To change it: Custom Settings → f1 (Assign Fn button) → highlight your preferred function → OK.
Customizing the AE-L/AF-L Button (f2)
This button sits under your right thumb on the back of the camera. By default, pressing it locks both auto-exposure and autofocus simultaneously useful for recomposing a shot without the camera readjusting focus or brightness.
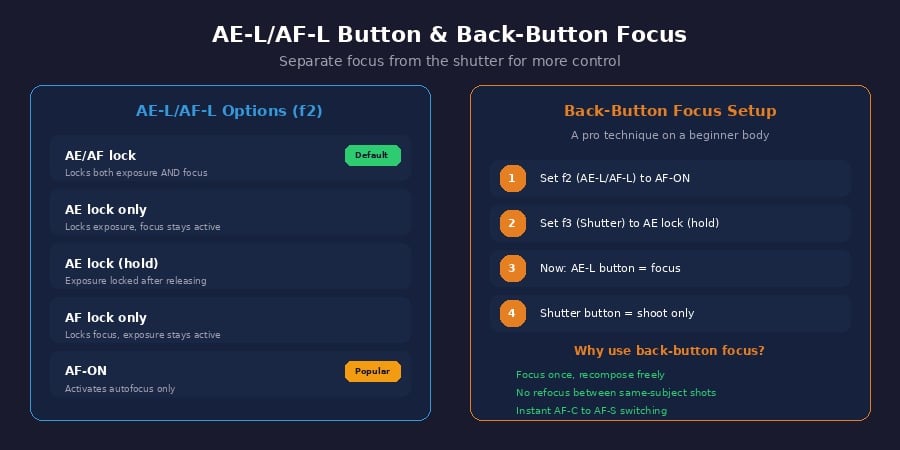
Five options for the AE-L/AF-L button: AF-ON enables the popular back-button focus technique
The five options:
AE/AF lock (default) Pressing the button locks both exposure and focus for as long as you hold it. Release the button and both unlock. This is the standard behavior.
AE lock only. Exposure locks when you press the button. Focus continues to track normally. Use this when you want to meter off one area (like a bright sky) but keep focusing on your actual subject.
AE lock (hold) Exposure locks when you press the button and stays locked even after you release it. It unlocks when you press it again or half-press the shutter. Useful when shooting multiple frames of the same scene at consistent exposure.
AF lock only. Only focus locks. Exposure continues to adjust. Use this when you want to lock focus on a subject but let the camera adjust exposure as lighting changes.
AF-ON Pressing the button activates autofocus. This is the setting used for back-button focus, which is covered below.
Setting Up Back-Button Focus
Back-button focus is a technique where you separate the focusing function from the shutter button. Instead of the shutter button handling both focus and shooting (the default), you move focusing to the AE-L/AF-L button on the back. The shutter button only fires the shutter.
Why would you want this? Because it gives you the flexibility of both AF-S (single/one-shot focus) and AF-C (continuous focus) in a single setup. Hold the back button to continuously track a moving subject. Release it and the focus locks. Now you can recompose and shoot multiple frames without the camera refocusing each time you half-press the shutter.
To set it up on the D5600, you need two changes:
Step 1: Go to Custom Settings → f2 (Assign AE-L/AF-L button) → select AF-ON. This makes the back button activate autofocus.
Step 2: Go to Custom Settings → f3 (Timers/AE lock) → select AE lock (hold). This changes the shutter button so that half-pressing it locks exposure instead of activating focus.
Now the back button focuses and the shutter button shoots. Press and hold the back button while tracking a bird in flight, and the camera continuously focuses. See a static landscape? Just don’t press the back button. Focus stays wherever you last set it, and you can fire the shutter as many times as you want without the camera hunting for focus.
It takes about a day of shooting to break the habit of half-pressing the shutter to focus, but most photographers who switch to back-button focus never go back.
Customizing the Shutter Button (f3)
The shutter button’s half-press behavior is controlled through Custom Settings → f3 (Timers/AE lock). This determines what happens when you press the shutter button halfway down.
Default: Half-pressing the shutter activates autofocus and starts metering, but exposure is only locked at the moment the shutter fires. Focus locks when achieved (in AF-S mode) or continues tracking (in AF-C mode).
AE lock (half-press): Half-pressing the shutter locks exposure at that moment. The exposure stays locked as long as you hold the shutter halfway. This is useful when you want to meter off one area and hold that exposure while recomposing.
If you set up back-button focus (above), you’ll want this set to AE lock so the shutter button handles exposure locking while the back button handles focus.
Other Customizable Controls (f4 and f5)
f4: OK button (Live View) Changes what the OK button does when you’re in Live View mode. The default is subject tracking (the camera follows the focus point across the frame). You can also set it to zoom to the center of the frame for checking focus.
f5: Command dial lets you reverse the rotation direction of the command dial for exposure settings. If spinning the dial clockwise to increase a value feels backwards to you, this setting lets you flip it. This is purely preference; there’s no functional advantage either way.
Quick Reference
Show Image All five customizable controls in one reference menu path, default, and recommended use
All button assignments can be changed as often as you want with no risk to the camera. If a new assignment doesn’t work for your shooting style, just go back to Custom Settings → f Controls and switch it to something else or reset it to the default.
This guide covers the Nikon D5600. The same Custom Settings → f Controls menu exists on the Nikon D5500 with identical options. The Nikon D3400 and D3500 have a more limited version of button customization (fewer assignable functions). Higher-end models like the D7200 and D7500 offer more customizable buttons and additional assignment options, but the process for changing them is the same
See Also