When you purchase through links on our site, we may earn an affiliate commission. Here’s how it works.
How to Use the Computer Software of Canon EOS Rebel T7/2000D
The Canon EOS Rebel T7/2000D doesn’t come with a software CD in the box, Canon moved to downloads-only a while back. But the free software they offer is worth grabbing, especially EOS Utility, which turns your computer into a control center for the camera. You can download photos, shoot remotely from your desk, and even adjust camera settings without touching the camera body.
The problem is that Canon’s download page buries useful programs inside a bundle meant for multiple camera models, and the actual setup has a couple of gotchas that trip people up (like a Wi-Fi setting that silently blocks USB connections). This guide walks through everything: which software to get, how to connect, and how to actually use it.
Which Software Do You Need?
Canon offers several free programs for T7/2000D owners. You don’t need all of them, but two are genuinely useful and one is a nice bonus for advanced users.
The three free Canon programs — EOS Utility is essential, DPP is highly recommended, Picture Style Editor is for advanced users
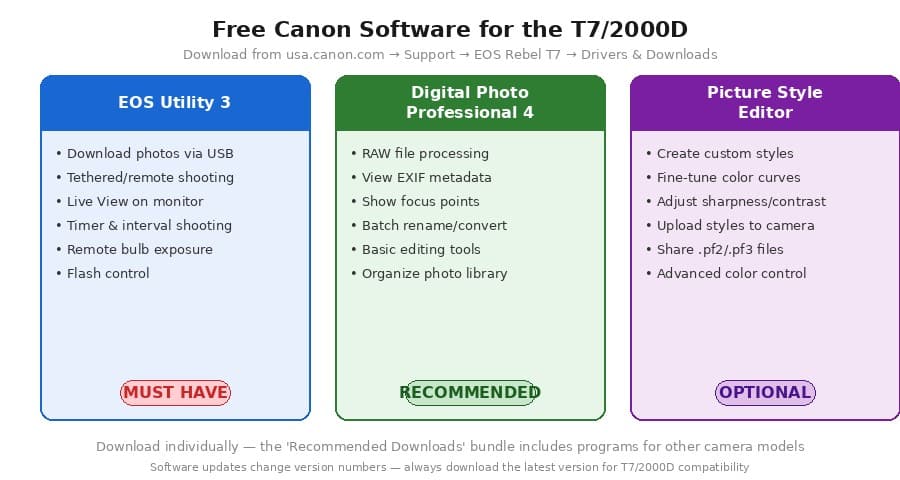
EOS Utility 3 is the must-have. Think of it as the bridge between your camera and computer, it handles photo transfers, lets you control the camera remotely from your screen (called tethered shooting), and manages basic camera settings like date, time, and owner information. If you only download one program, this is the one.
Digital Photo Professional 4 (DPP) is Canon’s free photo editor. It’s not Lightroom, but it does something most free editors can’t: it processes RAW files natively and shows you the exact focus points your camera used for each shot. That focus point overlay alone makes it worth installing, it’s a fast way to figure out why a shot came out sharp or soft.
Picture Style Editor is optional. It lets you create custom Picture Style profiles (think of them like Instagram filters but built into the camera’s processing engine) that you can upload to the T7/2000D. Most people won’t need this, but it’s there if you want precise color control.
How to Download the Software
Go to usa.canon.com, search for “EOS Rebel T7,” and click on the support page. Select the “Drivers & Downloads” tab, then choose your operating system (Windows or Mac).
You’ll see a “Recommended Downloads” bundle near the top. Skip it. That bundle includes software for other Canon models that won’t work with the T7/2000D. Instead, scroll down and download EOS Utility and Digital Photo Professional individually. The version numbers change with updates, so don’t worry if they’re different from what’s shown here. Just always grab the latest version to ensure T7/2000D compatibility.
Run the installer for each program and follow the on-screen prompts. Nothing unusual here, standard next-next-finish installations.
Connecting Your Camera to the Computer
This is where people hit unexpected roadblocks. The physical connection is simple, but there are two settings you need to check first or the camera won’t communicate with the software.
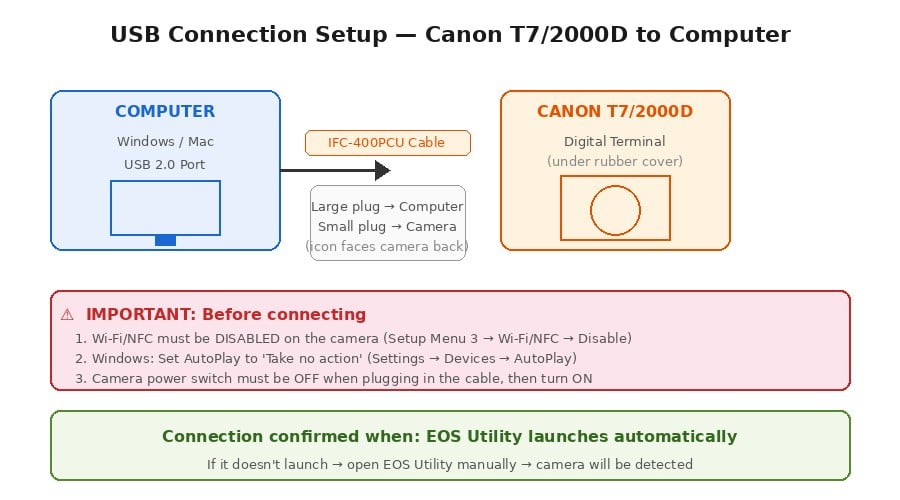
The connection path and the three things you must check before plugging in
Before you plug in the cable, do these two things:
First, on the camera, go to Setup Menu 3 and make sure Wi-Fi/NFC is set to Disable. When Wi-Fi is enabled, the camera blocks USB communication entirely. This is the number one reason people think their camera isn’t being detected, everything looks right, the cable is connected, but the software just sits there because Wi-Fi is silently blocking the connection.
Second, on Windows, go to Settings → Devices → AutoPlay and set your camera’s dropdown to “Take no action.” Without this, Windows may try to handle the camera connection itself instead of letting EOS Utility take over.
Now connect the cable:
The T7/2000D uses Canon’s IFC-400PCU interface cable (not included in the box, you may need to buy one separately or use any compatible USB cable). The large plug goes into your computer’s USB port. The small plug goes into the camera’s Digital Terminal, which is under a small rubber cover on the left side of the camera body. When inserting the small plug, orient it so the cable icon faces the back of the camera.
Turn the camera’s power switch to OFF before connecting, then flip it to ON. EOS Utility should launch automatically. If it doesn’t, open EOS Utility manually, it will detect the connected camera within a few seconds.
Using EOS Utility: The Main Window
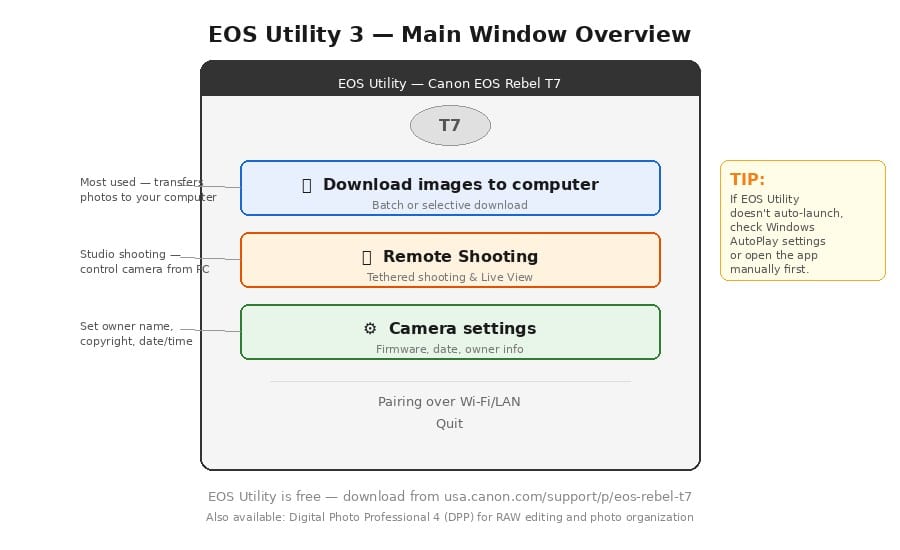
Once connected, EOS Utility presents a clean main window with three primary options.
The EOS Utility main window — simple layout with three main functions
Download images to computer is what you’ll use most. It gives you two modes: batch download (grabs everything new) and selective download (lets you browse thumbnails and pick which photos to transfer).
Remote Shooting opens the tethered shooting interface, which lets you control the camera from your computer screen, useful for studio work where a client or colleague wants to see the shots on a larger display.
Camera settings lets you update the camera’s firmware, set the date and time, and enter owner/copyright information that gets embedded in every photo’s metadata.
Downloading Photos: Batch vs. Selective
EOS Utility gives you two distinct download methods, and choosing the right one depends on whether you want speed or control.
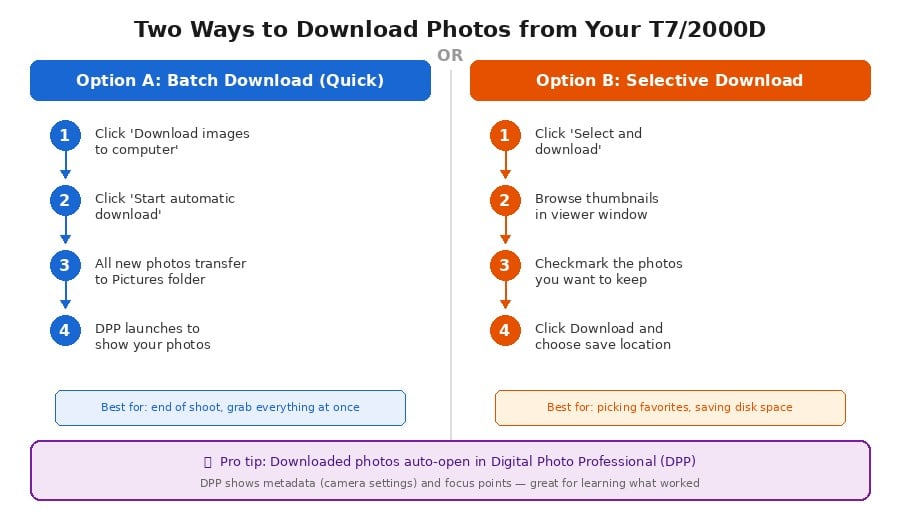
Two download paths — batch for speed, selective for control
Batch download is the fast option. Click “Download images to computer,” then “Start automatic download.” Every new photo on the card transfers to your Pictures folder, and Digital Photo Professional launches automatically to display them. This is ideal at the end of a shoot when you want everything off the card quickly. Think of it like dumping an entire folder onto your desktop, fast, no decisions required.
Selective download gives you more control. Click “Select and download” and you’ll see a grid of thumbnails from the camera’s memory card. Click to checkmark the ones you want, then hit Download and choose where to save them. Use this when you shot 500 photos but only want to keep 50. It saves disk space and keeps your library clean.
One useful detail: after downloading (either method), Digital Photo Professional opens automatically and shows the transferred images. From there you can view the EXIF metadata (every camera setting used for the shot) and even see which focus points the camera selected. This is genuinely helpful for learning. If a photo turned out great, you can see exactly what settings made it work.
Remote Shooting (Tethered Mode)
Tethered shooting means your camera stays connected to the computer, and you control it from the screen instead of pressing buttons on the body. Every shot you take transfers immediately to the computer and displays at full size.
This is a studio feature. If you’re doing product photography or headshots with a client watching, tethered shooting lets everyone see the results on a large monitor instead of squinting at the camera’s 3-inch LCD. You can adjust shutter speed, aperture, ISO, and white balance right from the EOS Utility control panel.
To use it: click “Remote Shooting” in the main window, then enable Live View in the capture window. Your computer monitor becomes a live viewfinder. Click the on-screen shutter button (or press the physical shutter on the camera) and the photo transfers to the computer instantly.
EOS Utility also supports timer shooting (delay from 0 seconds to 99 minutes) and interval shooting (minimum 5 seconds between shots), which is useful for time-lapse work without buying an external intervalometer.
Troubleshooting: Camera Not Detected
If EOS Utility doesn’t see your camera, work through these in order: confirm Wi-Fi/NFC is disabled on the camera (this fixes it about 80% of the time), check that the USB cable is fully seated at both ends, try a different USB port on the computer, and make sure you’re using the same USB port you used during initial setup, switching ports sometimes requires re-confirming settings in Windows.
If none of that works, uninstall and reinstall EOS Utility. Canon occasionally updates the software, and version mismatches between the program and your camera’s firmware can cause detection issues.