When you purchase through links on our site, we may earn an affiliate commission. Here’s how it works.
Final Cut Pro X, initially released July 21, 2011, is one of the top video editing software available, published by Apple Inc. as part of their Pro Apps family of software programs. It is a non-linear video editing software solely available for macOS users.
It is a one-time purchase for 299 USD, and perfect for a MAC user, as it will be optimized greatly by your machine.
It does most of its rendering in the background, as you’re working, adding effects, Final Cut renders your project in the background, giving you a smoother and continuous workflow.
Final Cut Pro X is considered as one of the best, alongside Adobe Premiere Pro. Its consumers widely vary from film hobbyists to professional level editors.
It has been used in the production of The Social Network, 500 Days of Summer, X-Men Origins: Wolverine, and many others.
Many have preferred this software saying that it is faster and smoother, and some even say that even if it’s a high-end video editing tool it’s relatively easy to use.
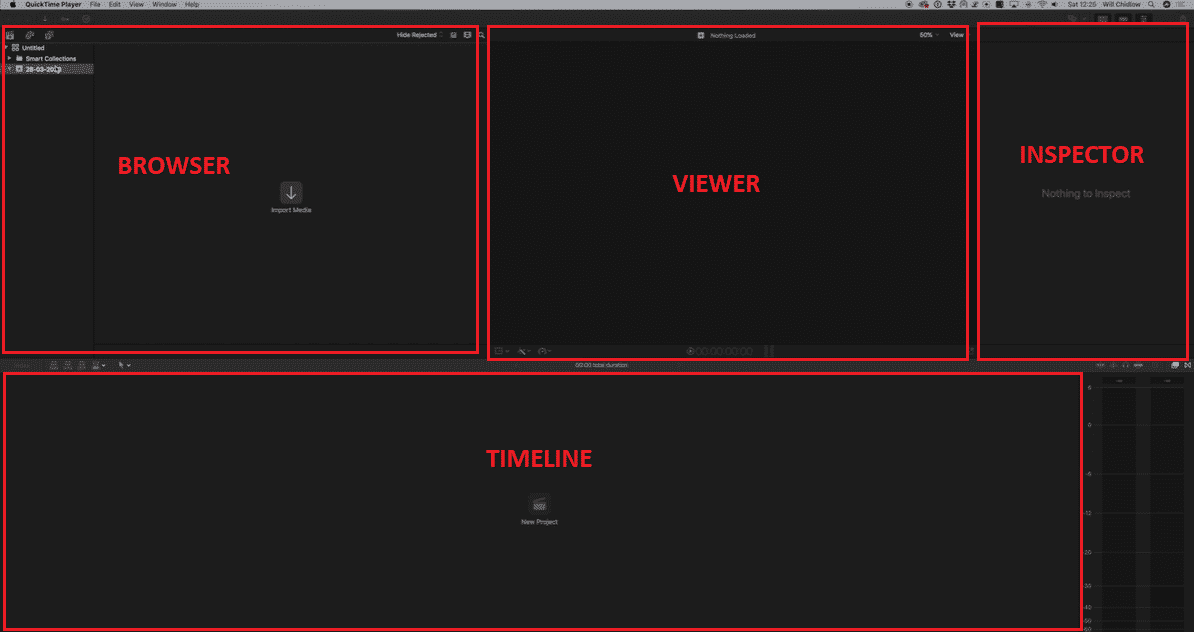
At first glance, it might be confusing, but as you let yourself be familiar with it, it’s easy to use. Above are the main parts of Final Cut Pro X, let me explain briefly what they are for.
BROWSER
This is where you manage your files. This is where your imported media, clips, music, and other files will be located. You’ll notice three (3) little buttons in the left corner. In order, these are:
![]()
1. Video Tab
- By default, Final Cut creates an Untitled Library for your project, however, I don’t suggest you use this as this will fill up your drive, what you do is right-click on that library – close library.
- Then create a new library: file – new – library. You can choose where to place it, you can direct it to your hard drive, it’s up to you.
- Below this Library folder are 2 sub-folders:
- smart collections
- and an event ( has the date) – you can rename this, this will also contain a keyword that helps to organize your files.
2. Media Tab
- This connects Final Cut to your GarageBand, iTunes, and all internal sound effects that come with it.
3. Titles Tab
- Here you can have access to its built-in titles animations and generators, it has hundreds of free templates for you to use. If you purchased any presets, they will show here.
- Title Animation can be customized by clicking on it on the Viewer Tab or the Inspector Tab.
There are two (2) ways of importing a file.
- Click the import button, navigate where your footage is, fix your settings, etc.
- Go to the finder, navigate the location of the folder, select your folder, drag them to the library.
Final Cut’s neat feature lets you browse your imported clips simply by hovering your cursor over them and it will show on the Viewer Panel, or simply click on the footage, press the space bar to play the clip.
VIEWER
This is where you can preview what you’re editing on your timeline or clips you’re browsing.
INSPECTOR
When you select a clip, the properties of that clip will be shown under the Inspector Tab. Here you can adjust the position, opacity, effects, color correction, general information, etc.
The overall effects control of every clip, transition, effects, anything that can be tweaked can be found here, under the Inspector Tab.
TIMELINE
This will be your workspace. This is where you will create your project. To get started, click the New Project button, set your setting, aspect ratios, etc.
To place a clip on your timeline, you can easily drag and drop it from your library. If you want to select a portion from a source file, you can select you’re in and out (press I & O on keyboard) simply by scanning through your footage, then drag them on your timeline.
The timeline has a magnetic feature in it, which might be helpful to newbies, but could be a nuisance to some.
WHERE ARE THE TOOLS?
The interface may seem empty when you open it, but the tools are placed in a way that does not take too much space.
Basic Tools such as Select, Trim, Position, Zoom are located at the left corner of your timeline. (see image below) Learning the keyboard shortcuts would be a good way to speed up your workflow.
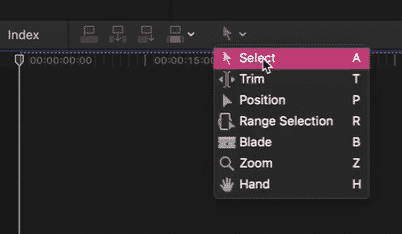
Effects and Transitions are located at the right corner of your timeline. (see image below) Selecting the Effects / Transition button will open up your transition and effects library.

For something considered as a professional video editor, Final Cut Pro X, in general, can be a great choice, because, despite its feature, It is easy, fast and simple to use.
It has an auto-save feature so you won’t have to worry about losing your project. It is packed with a good selection of 2D and 3D titles, transitions, and video & audio effects.
It also supports a wide variety of file formats. Has a good range of color adjustments, provides fast rendering as well, and all that for a one-time fee only.
The workspace is clean, some editors find the workflow a bit restrictive, while others find it organized and clean.
The thing about Final Cut’s workspace, is the controls are hidden. Unlike other editors where almost all basic controls are out in the open, Final Cut could give you a hard time locating where it is.
For example, for first-time users, would you guess that that (image above) is the Effects / Transition button? I don’t think so.
You’re going to have to learn where everything is and once you get yourself familiar with it, Final Cut is pretty much easy to understand and once you get the hang of it, surely you’ll be able to progress to its more advanced features and use it to your advantage.