When you purchase through links on our site, we may earn an affiliate commission. Here’s how it works.
How to work with DaVinci Resolve
DaVinci Resolve is a color correction and an NLE software, a non-linear video editing software compatible with macOS, Windows, and Linux.
It’s known to be one of the best video editing software available and is now considered a significant player in the post-production industry.
It’s so good it’s being leveled with Final Cut Pro and Adobe Premiere Pro. It has been used by professional editors and colorists working on movies and TV shows, such as Star Wars: The Last Jedi, Bohemian Rhapsody, The Walking Dead, Jurassic Park: The Fallen Kingdom and so much more. This software is also very popular among Vloggers and Content Creators.
DaVinci Resolve started as a color correction and color grading tool, which this software is highly known for.
Their latest version has advanced video editing features which makes it a powerhouse video editing application today.
DaVinci Resolve has a free version, with reduced functionality but can do everything that you would need from a video editing software on a high level.
The paid version known as the DaVinci Resolve Studio is priced at 299 USD one-time purchase.
Let’s dive into the DaVinci Resolve Software. For beginners, this might be intimidating-looking software, but it’s a very easy and organized one.
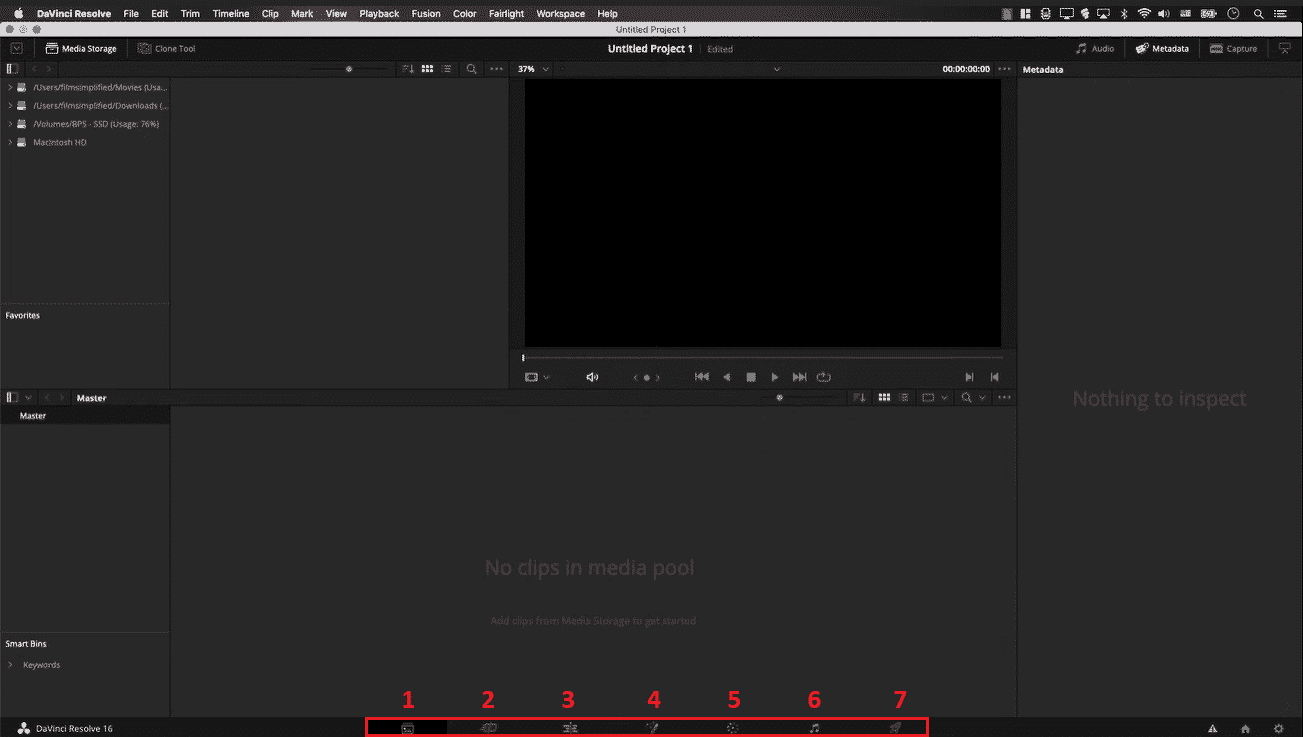
DaVinci has (7) seven panels / tabs / page. If you look at the image above, there are several icons at the bottom.
DaVinci has designed it, in a way that it follows this post-production pipeline. when you click on each tab, it would show you different interfaces built for their purpose. Let me get into it.
1 – Media Tab
This tab is where you will see all your files. You can import your files on any tab, and they will be stored on the Media Tab.
It’s like your library within the software. In Media Tab, you can add additional information for each file. Such as Description, Comments, Keywords, People, Shot, etc.
These are called metadata, which is very helpful because DaVinci has this thing called Smart Bins and Power Bins. (lower-left corner) These somehow serve as a filter that organizes your files.
You can create a smart bin with filtered instructions based on the metadata.
For example, you can set a bin with a filter for 24 fps (frames per second) and it will just automatically place all your 24 fps videos on that folder. It makes it easy to locate files and just makes everything organized. Super helpful especially if you’re working on very big projects.
2 – Cut Tab
This is where you make your initial edits, cut, and put your videos together or arrange your sequence. It has an option called Source Tape. (see image below)
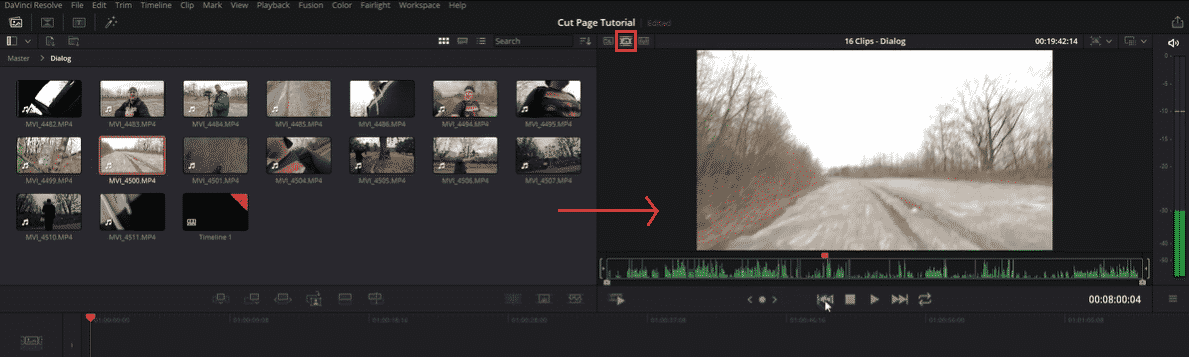
Source Tape is a feature that lets you view all of your videos like it’s one video.
Meaning, you can just simply scrub through all your videos on the source panel (bigger screen – right side), get clips that you need, and place them on the timeline, without ever needing to open all videos, one by one, just to find the scene that you need.
3 – Edit Tab
Now that you’ve pieced together everything on the Cut Tab, this Edit Tab, is where you can adjust the setting of each scene, position, opacity, edit the texts, transitions if you’ve placed any.
This is where you refine your edits. You can also start adding music on this tab, subtitles, 2D and 3D title templates, and add keyframes.
4 – Fusion Tab
Here you can composite realistic visual effects, 2D and 3D titles, motion graphics into your video. It also has an advanced chroma keying feature, you can remove unwanted elements on your video, erase a tree or a person, and add in an entirely new element.
Rotoscoping is also much easier now, as DaVinci can track the movement and so you don’t have to manually rotoscope it frame by frame.
You can add atmospheric effects such as mist or fog, create fire or any element through particles that can move in 3D space. This is where advanced editing and compositing take place.
5 – Color Tab
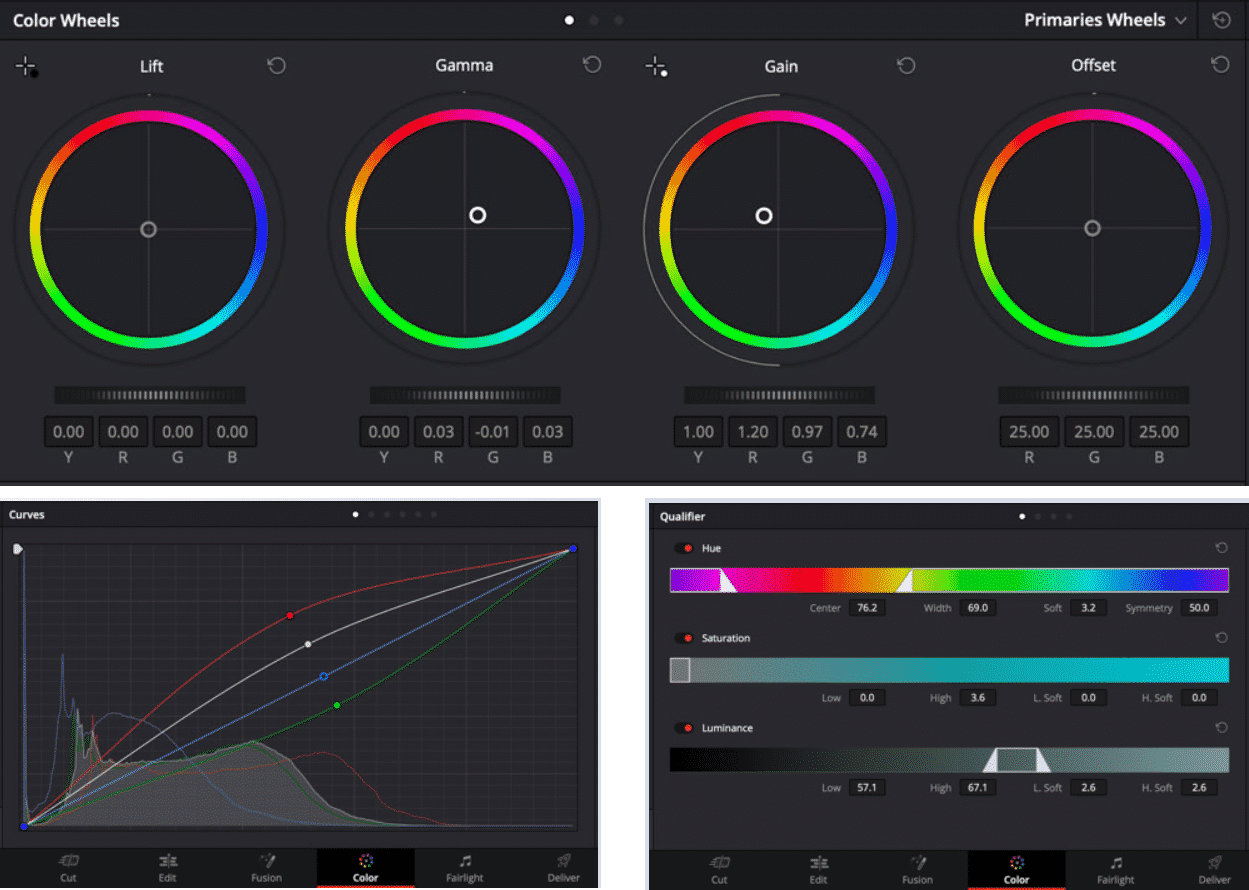
This tab, as the name suggests, is where all color adjustments will be made. all features dedicated to color adjustments are collected inside the Color Tab by taking all the elements from the project on the edit tab. There is a color wheel, curves and panels.
Color Correction – adjusting colors to match screen or film standards and making it as true to life as possible.
Color Grading – modify colors to transmit a message, an emotion, or a moment.
Color Wheel is where you adjust your YRGB, contrast, saturation, hue, temp, tint. Curves intensify each RGB color or overall light, then all these adjustments can be limited to a portion of your video by using a window panel.
It’s like masking. You can change lip color, skin, etc. DaVinci has a wide range of color adjustment tools and a complete set of HDR image processing and grading features so you can work on formats such as Dolby Vision, Hybrid Log-Gamma, and more!
6 – Fairlight Tab
This is a fully functional DAW or the Digital Audio Workstation within the software. This is where you can adjust audio and sound effects.
Normalize your audio levels. It allows you to record in real-time, it gives you precise editing and synchronization of video and audio. It has an extensive metering feature. You can also browse their internal sound library database that has about 1000+ audio clips.
7 – Deliver Tab
This is your final stage. Here you can export your video into many, different formats.
It has export presets for YouTube, Vimeo, ProRes, H264, H265. It also lets you export your project into a new timeline on different software such as Final Cut Pro, Adobe Premiere Pro, or Avid. DaVinci supports a huge amount of file formats that are compatible with almost all devices and media.
All of these tabs are connected, so when you change something on the edit tab, it will be synced on the cut tab, the fusion, audio, and so on.
The fact that it’s cross-platform software, and has multiple software linked together, makes DaVinci Resolve, on its own, a super-powerful post-production machine.