When you purchase through links on our site, we may earn an affiliate commission. Here’s how it works.
How to Mount a GoPro on a Helmet
Mounting a GoPro to a helmet turns a regular ride into shareable footage, whether you’re motovlogging, mountain biking, skiing, or skydiving. But “stick a camera on your helmet” is deceptively simple advice. Where you put it, how you attach it, and what mount type you use all affect the footage quality, wind noise, camera stability, and most importantly, your safety.
The GoPro box includes the basic hardware you need for a helmet mount (flat and curved adhesive mounts, a mounting buckle, and a thumbscrew), but there are also aftermarket options like chin mounts and vented strap mounts that produce better footage for specific activities. This guide covers all four common mounting methods, the installation process for each, and the camera settings that produce the best helmet-mounted footage.
Mount Types: Which One to Use
There are four common ways to attach a GoPro to a helmet, each producing different footage angles and requiring different attachment methods. The right choice depends on your helmet type and what kind of footage you want.
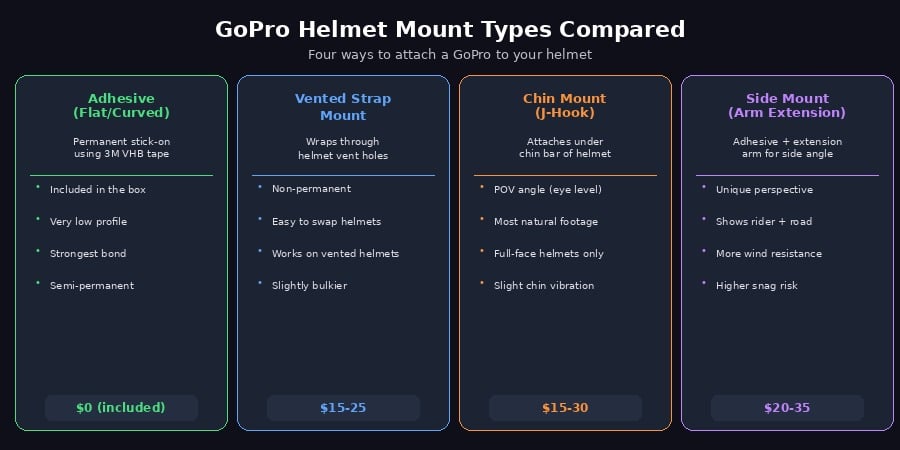
Image Four mounting options, adhesive is included in the box, the others are aftermarket accessories
Adhesive mount (flat or curved) is what comes in the GoPro box. A flat 3M VHB adhesive pad bonds the mount directly to the helmet surface. Use the flat mount for smooth, level surfaces like the top of a helmet. Use the curved mount for rounded surfaces like the sides. This is the most secure attachment method. Once bonded, the mount is essentially permanent (removing it requires heat and a pry tool). The trade-off is that you’re committing that mount to that helmet.
Vented strap mount threads a nylon strap through the ventilation holes on bike helmets, ski helmets, or any helmet with elongated vents. No adhesive required, which means you can move the mount between helmets in seconds. The downside is it’s slightly bulkier and only works on helmets with compatible vent patterns.
Chin mount (J-hook style) attaches to the chin bar of full-face motorcycle helmets, positioning the GoPro at chin level. This produces the most natural-looking POV footage because the camera sits close to your eye level and captures the road, your handlebars, and instrument cluster much closer to what your eyes actually see than a top-of-helmet angle. This has become the most popular motovlogging mount for good reason.
Side mount (arm extension) uses an adhesive base plus an articulated arm to position the camera on the side of the helmet. This captures a unique angle that shows your profile alongside the road. It’s popular for cinematic motovlog intros and B-roll, but the extended arm creates more wind resistance and increases the risk of the mount catching on something.
How to Apply an Adhesive Mount (Step-by-Step)
The adhesive mount is the most common method and the one included with every GoPro. Getting the application right matters because 3M VHB adhesive is designed to be permanent a poorly placed mount means either living with a bad angle or replacing the adhesive pad.
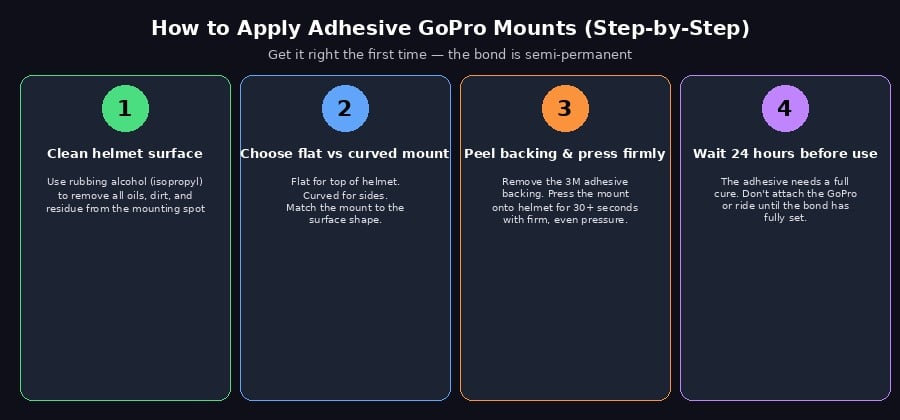
Image Get the placement right before peeling the backing. The 3M adhesive doesn’t give second chances easily
Step 1: Clean the helmet surface thoroughly. Use rubbing alcohol (isopropyl alcohol, 90% or higher) and a lint-free cloth to clean the spot where you’ll place the mount. You’re removing invisible oils from fingerprints, manufacturing residue, and any dirt that would weaken the adhesive bond. Let it dry completely before proceeding.
Step 2: Choose flat or curved mount. Hold each mount type against your planned mounting spot. The one that sits flush with no gaps or rocking is the correct choice. Using a flat mount on a curved surface (or vice versa) creates stress points that weaken the bond over time.
Step 3: Peel the adhesive backing and press firmly. Before peeling, hold the mount in position and check the angle once it’s stuck; adjustments are difficult. When you’re satisfied with the placement, peel the 3M backing, press the mount onto the helmet surface, and apply firm, even pressure for at least 30 seconds. Press along the edges, not just the center.
Step 4: Wait 24 hours before use. This is the step people skip, and it’s the step that causes mounts to fail mid-ride. 3M VHB adhesive reaches its full bond strength after 24 hours of curing at room temperature. Attaching your GoPro and riding immediately risks the mount detaching under vibration and wind stress. Let it cure overnight. Apply the adhesive at room temperature (not in a cold garage) for the best bond.
Mounting Positions: Where to Put It
Where you mount the camera on the helmet dramatically changes what your footage looks like. Each position has specific strengths and weaknesses.
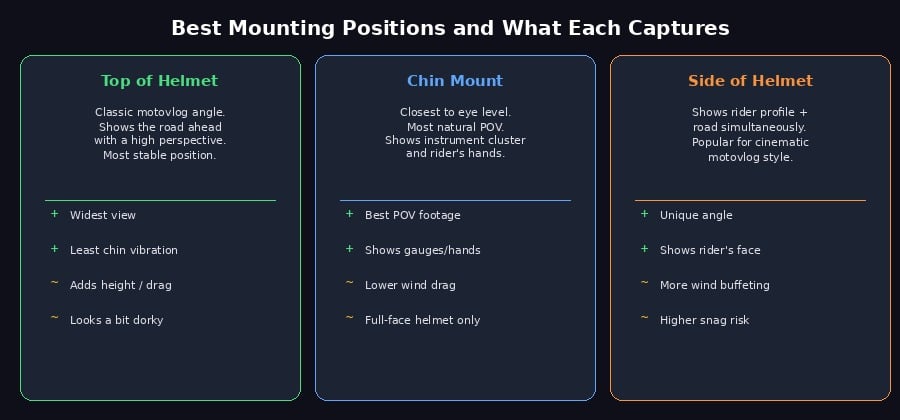
Image: Choose the position based on the footage style you want. Chin mount produces the most natural POV
The top of the helmet is the classic GoPro position. The camera sits on the crown of the helmet looking forward, producing a high-angle view of the road ahead. This gives the widest field of view and the most stable footage (less vibration than chin-level). The downsides: it adds noticeable height, increases wind drag (and noise at highway speeds), and the high perspective doesn’t look like what your eyes see it looks like a surveillance camera angle. It’s also the most visible position, which some riders dislike aesthetically.
The Chin mount has become the standard for motovloggers because it produces footage closest to your natural eye level. You see the road, your handlebars, your instrument cluster, and your mirrors, the same view you actually experience while riding. It also sits below the windscreen line on many bikes, reducing wind noise. The limitation is that it only works with full-face helmets that have a chin bar, and vibration at the chin level can be slightly higher than top-mount (HyperSmooth stabilization handles this well).
Side mount produces the most cinematic angle, a view that shows your helmet, face shield, and the road alongside you. It’s dramatic and interesting for short clips, but not ideal as your primary angle because you can’t see directly ahead. Side mounts also experience the most wind buffeting and have a higher snag risk. Many motovloggers use a side mount as a secondary camera alongside a chin-mount primary.
Assembling the GoPro Mount Hardware
Before sticking anything to your helmet, assemble the mounting hardware so you understand how the pieces connect.
Mounting frame or housing: If your GoPro uses a frame (older models like Hero 3/4), open the latch, slide the camera in until it sits flush, close and latch it. If you have a newer GoPro (Hero 5 and later) with built-in mounting fingers, you don’t need a frame; the fingers on the bottom of the camera attach directly to the buckle.
Mounting buckle: Slide the camera’s mounting fingers (or the frame’s fingers) into the buckle slots. Insert the thumbscrew through both sets of fingers and tighten it. The thumbscrew should be snug but not overtightened; you want to be able to adjust the angle.
Buckle to adhesive mount: Click the mounting buckle onto the adhesive base. It slides in from the back and clicks into position. This connection is tool-free and is designed to be the quick-release point, so you can remove the camera and buckle from the adhesive base without disturbing the adhesive bond.
Safety Considerations
Helmet-mounting a camera introduces risks that are easy to underestimate. A few non-negotiable rules.
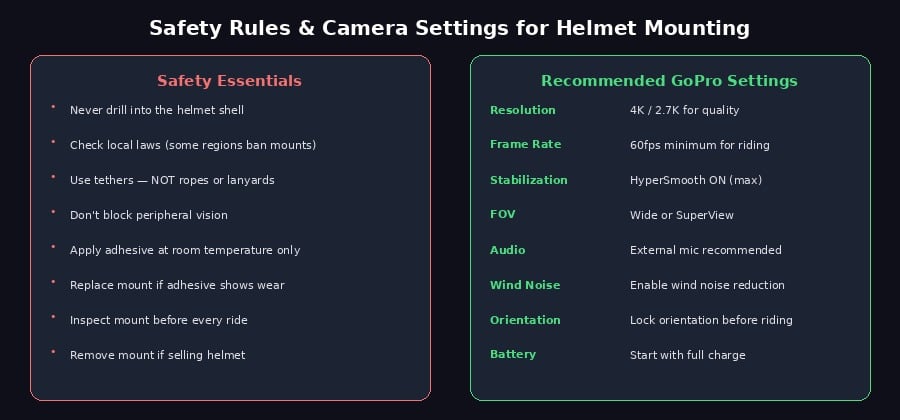
Image Safety rules are non-negotiable and the right camera settings make a huge difference in footage quality
Never drill into the helmet. Drilling compromises the structural integrity of the shell. Adhesive mounts and strap mounts are the only safe attachment methods.
Check local regulations. Some jurisdictions have laws about attaching objects to helmets. In certain regions, anything that protrudes from the helmet shell violates helmet safety standards and can result in fines or void insurance claims. Research your local laws before mounting.
Use a camera tether, not a rope or lanyard. GoPro sells thin tethers specifically designed for this purpose. They keep the camera attached to you if the mount fails, but they’re thin and short enough that they won’t catch on anything or create a strangulation hazard. Never use a long rope, cord, or lanyard in a crash, a dangling camera on a long cord becomes a flail.
Don’t block your peripheral vision. Side mounts and extended arm mounts can enter your peripheral field of view, especially on open-face helmets. If you can see the camera or mount arm while looking ahead, it’s positioned wrong.
Inspect the mount before every ride. Give the mount a firm tug and twist before each use. Check for cracks in the adhesive bond, looseness in the buckle connection, and any signs that the mount is lifting at the edges.
Recommended GoPro Settings for Helmet Footage
Camera settings make a significant difference in the quality of helmet-mounted footage.
Resolution: 4K gives the highest quality and the most cropping flexibility in editing. If storage or battery life is a concern, 2.7K is a good balance. 1080p looks fine for social media but limits what you can do in post.
Frame rate: 60fps minimum for riding. Motion at speed looks choppy at 30fps. If you plan to create slow-motion clips of highlights, record at 120fps (available at 2.7K or lower on most GoPro models).
Stabilization: Turn HyperSmooth to its maximum setting. Helmet footage without stabilization is borderline unwatchable even smooth roads create constant micro-vibrations that make footage nauseating. HyperSmooth transforms shaky helmet cam into smooth, professional-looking footage.
Field of view: Wide or SuperView for the most immersive perspective. Linear removes the fisheye distortion but narrows the view. For motovlogging, Wide is the standard; for action sports like mountain biking, SuperView captures more of the trail.
Wind noise reduction: Enable it. At anything above 30mph, wind noise dominates the audio. The built-in wind noise reduction helps, but for serious audio quality, use an external microphone with a foam windscreen the GoPro Media Mod or a lavalier mic routed under your jacket works well.
This guide applies to all GoPro models from Hero 3 through Hero 13. The adhesive mounts and mounting buckle system are backward compatible across all Hero models. HyperSmooth stabilization is available on Hero 7 and newer (HyperSmooth 2.0 on Hero 8, 3.0 on Hero 9, 4.0 on Hero 10, and 6.0 on Hero 13). Older models benefit from software stabilization in post using GoPro’s free Quik app.