When you purchase through links on our site, we may earn an affiliate commission. Here’s how it works.
How to Fix Tilted and Distorted Images on the Nikon D5600
The Nikon D5600 has three built-in correction tools that fix tilted horizons, lens distortion, and perspective problems directly on the camera, without transferring files to a computer. Think of them as Photoshop’s Transform tools, but accessible through the camera’s Retouch Menu with a few button presses.
Every correction creates a new copy of your image. The original file stays completely untouched on your memory card. This means you can experiment freely, try different straight angles or distortion amounts, and if you don’t like the result, delete the copy and try again. The original is always there.
Three Correction Tools: What Each One Fixes
The Retouch Menu contains three separate tools for fixing geometric problems in your photos. Each addresses a different issue, and understanding which to use saves you from applying the wrong correction.
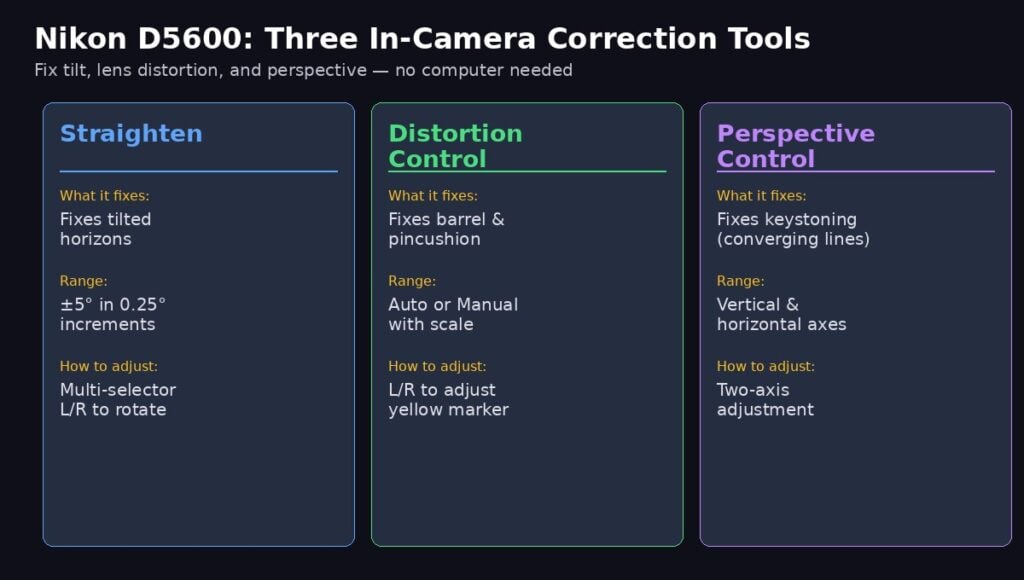
Three tools, three problems Straighten fixes tilt, Distortion Control fixes lens curves, Perspective Control fixes converging lines
Straighten corrects a tilted horizon when the camera wasn’t perfectly level when you took the shot. It rotates the image in 0.25-degree increments up to ±5 degrees. This is by far the most common fix you’ll use, since even a 1-2 degree tilt is immediately noticeable in photos with a visible horizon line.
Distortion Control corrects barrel distortion (lines bowing outward) and pincushion distortion (lines bowing inward) caused by your lens. Wide-angle lenses cause barrel distortion; telephoto lenses cause pincushion. The tool offers both Auto mode (which detects your lens and applies a preset correction) and Manual mode (where you control the amount with a slider).
Perspective Control corrects converging vertical or horizontal lines the effect you see when photographing a tall building from ground level and the sides appear to lean inward toward the top. It provides two independent axes of adjustment so you can correct vertical and horizontal convergence separately.
How to Straighten a Tilted Image
A crooked horizon is the most common composition mistake, and the easiest to fix. The Straighten tool overlays a grid on your image so you can precisely align the horizon with a reference line.
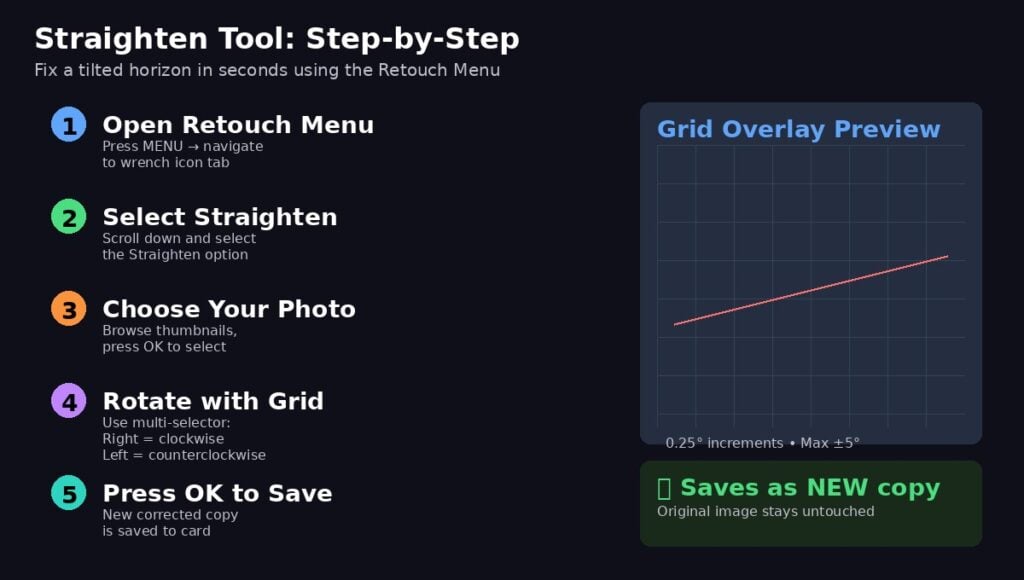
Five steps from Retouch Menu to saved correction the grid overlay makes alignment precise
Step 1: Press the MENU button and navigate to the Retouch Menu (the paintbrush icon tab).
Step 2: Scroll down to “Straighten” and press OK.
Step 3: The camera displays your photos as thumbnails. Navigate to the tilted image and press OK to select it.
Step 4: A grid overlay appears on the image. Use the multi-selector to rotate: press right for clockwise rotation, left for counterclockwise. Each press rotates the image 0.25 degrees. The maximum rotation is 5 degrees in either direction if your image is more tilted than that, you’ll need editing software.
Step 5: When the horizon aligns with the grid lines, press OK. The camera saves a straightened copy as a new file. The original remains untouched.
Important: Straightening the crops the image slightly. The camera rotates the image and then crops to a rectangle, which cuts off the corners. Frame your shots with a small margin if you anticipate needing straightening later.
Fixing Barrel and Pincushion Distortion
Lens distortion is a physical property of the optics it’s not a camera error, it’s a lens characteristic. The Nikon 18-55mm kit lens produces visible barrel distortion at 18mm (straight lines near the frame edges bow outward) and mild pincushion distortion at 55mm (lines bow inward). Distortion Control corrects both.
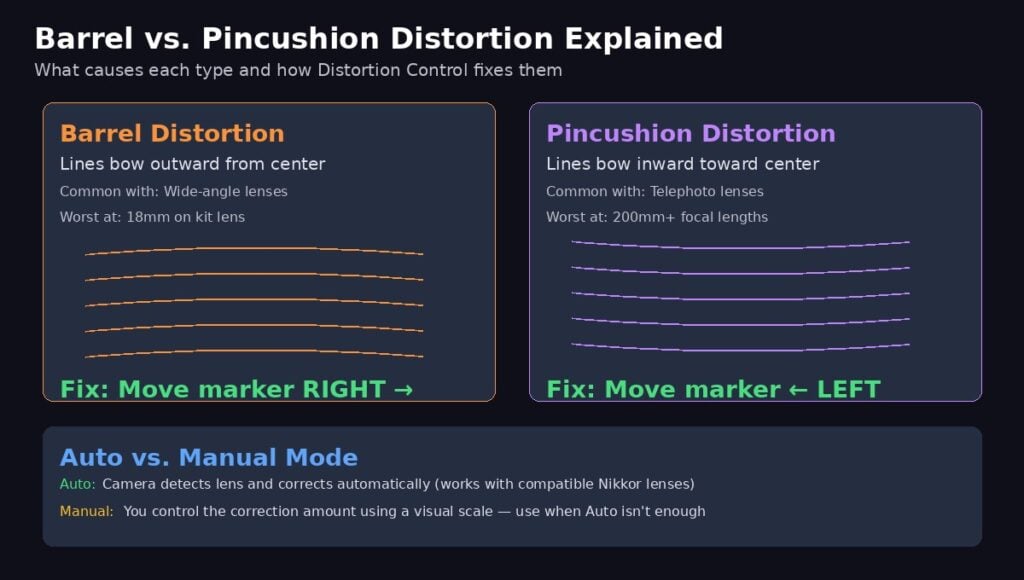
Barrel distortion bulges outward (common at wide-angle) Pincushion pulls inward (common at telephoto)
To access Distortion Control: Open the Retouch Menu, select “Distortion Control,” choose your image, then select either Auto or Manual.
Auto mode identifies the lens used (stored in the image’s EXIF data) and applies a preset correction profile. This works reliably with Nikkor lenses and produces good results with minimal effort. If you shoot with a Nikkor 18-55mm, 18-140mm, or similar lens, Auto mode usually nails the correction.
Manual mode displays a grid overlay with a yellow marker on a scale. Move the marker right to correct barrel distortion (push the bulging lines back inward) or left to correct pincushion distortion (push the pinching lines back outward). The grid helps you judge when the lines look straight.
Think of it like straightening a flexible ruler: barrel distortion means the ruler is bowing toward you, so you push it back. Pincushion means it’s bowing away, so you pull it forward. The direction of your correction is the opposite of the distortion.
Perspective Control: Fixing Converging Lines
When you tilt the camera upward to photograph a tall building, the vertical lines appear to converge toward the top of the frame the building looks like it’s leaning backward. This is perspective distortion (also called keystoning), and it’s an optical reality of how lenses project 3D space onto a flat sensor.
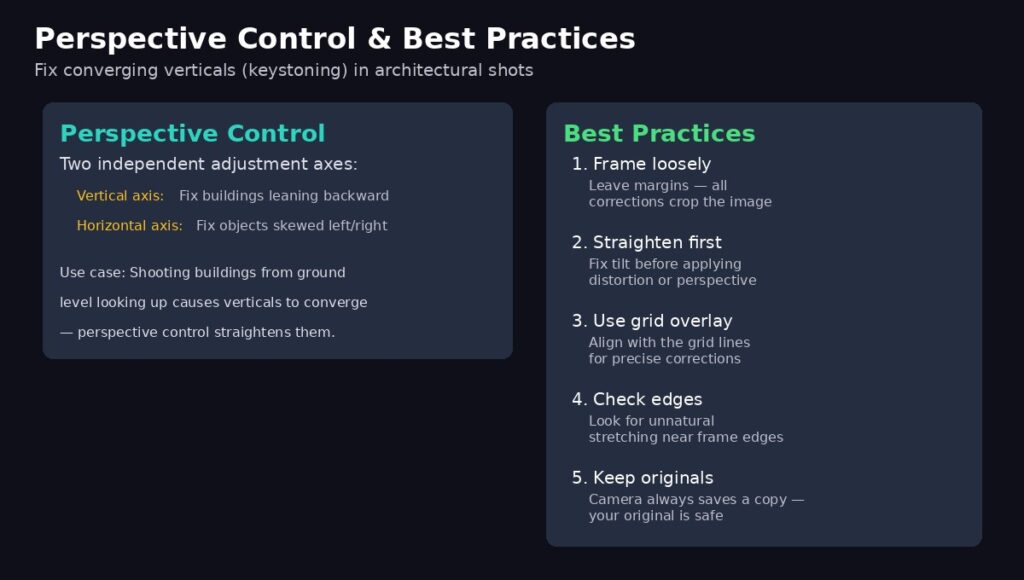
Perspective Control works on two axes independently fix vertical lean and horizontal skew separately
The Perspective Control tool provides two adjustment scales: one for vertical correction (fixing buildings that lean backward/forward) and one for horizontal correction (fixing objects that appear skewed left or right).
To use it: Open the Retouch Menu, select “Perspective Control,” choose your photo, then adjust each axis using the multi-selector. The preview updates in real time, so you can see the correction as you apply it.
When to use vertical correction: Architecture photography, where you tilt up to capture a building. The correction makes the vertical lines parallel again, as if you’d photographed the building from exactly halfway up its height.
When to use horizontal correction: Photos where you were slightly off-center from your subject and one side appears wider than the other. This is common in interior photography, where you couldn’t position yourself exactly centered in a room.
Best Practices for In-Camera Corrections
Frame with margins. All three correction tools crop the image. Straightening rotates and crops. Distortion control can push content outside the frame edges. Perspective control stretches one side while compressing another. If you know you’ll need corrections, compose your shot with extra space around the subject.
Apply corrections in order. If an image needs multiple corrections, apply Straighten first, then Distortion Control, then Perspective Control. Each correction creates a new file apply the next correction to that new file. This order matters because straightening an image that already has distortion correction applied can introduce artifacts.
Use the grid as your guide. In all three tools, the overlay grid is your reference for “straight.” Align architectural lines, horizons, or any element you know should be straight or level with the grid. Trust the grid over your eye our perception of “level” is easily fooled, especially on a small LCD screen.
Check edges for stretching. Perspective control, in particular, can produce unnatural stretching near the frame edges, especially at strong correction levels. After saving your correction, review the edges of the image at full zoom to ensure nothing looks distorted.
The original is always safe. Every correction saves a new JPEG file with a different file number. Your original (whether RAW or JPEG) is never modified. If you don’t like a correction, simply delete the corrected copy from playback mode.
This guide covers the Nikon D5600. The same Retouch Menu tools with identical controls are available on the Nikon D5500, D5300, D3500, D3400, and D7500. The D7200 and D500 have the same tools but with a slightly different menu layout. Nikon Z-series mirrorless cameras have similar correction tools in their Retouch Menus.
See Also