
How to Customize Filenames on Your Nikon D5600
Every photo your Nikon D5600 takes starts with the same three-letter prefix: DSC. If you want to learn how to customize filenames on Nikon D5600 to better organize your shots, the good news is it takes about 30 seconds. You can swap “DSC” for any three characters you like: your initials, a project code, or anything that helps you sort your files later.
The D5600 lets you replace that default prefix right in the camera menu. No computer needed, no software to install. Just a quick trip through the Shooting Menu and you’re done.
Why Custom Filenames Matter
Think of it like labeling folders before you stuff papers into them. If you shoot a wedding on Saturday and portraits on Sunday, changing the prefix to “WED” and “PRT” means you can instantly tell which files belong to which shoot, even months later when they’re all mixed together on a hard drive.
This is especially useful if you own more than one Nikon body. Set each camera to a different prefix and you’ll never wonder which camera took which shot.
A few practical prefix ideas: your initials (like UGR), the camera body (D56), a client code (SMT for Smith), or the shoot type (EVT for events, PRD for product shots).
What You Need Before Starting
You just need your Nikon D5600 with a charged battery. No computer, no software, no SD card required. This is all done through the camera’s built-in menu system.
One thing to know: you can only change the first three characters of the filename. The underscore and the four-digit sequence number (like _0001) are set by the camera and can’t be modified.
Step-by-Step: Changing Your Filename Prefix
Here’s the menu path at a glance:
The complete menu path: MENU Button > Shooting Menu > File Naming > Enter Text
Step 1: Press the MENU Button
Find the MENU button on the back of your D5600. It’s on the upper-left side of the camera back, just to the left of the LCD screen. Press it once to open the menu system.
The MENU button (#26) is on the upper-left side of the camera back
You’ll see a row of icons along the top of the screen. Each icon represents a different menu tab. Use the Multi Selector (the circular pad on the back of the camera) to move left or right through the tabs until you reach the camera icon. That’s the Shooting Menu.
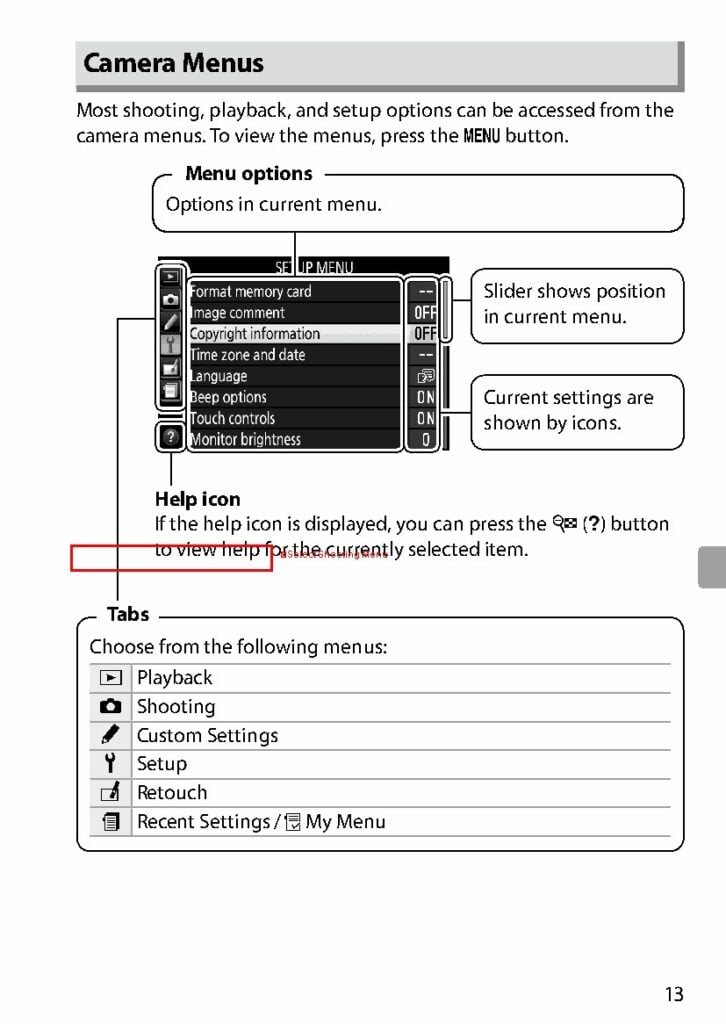
The camera menus are organized into tabs: Playback, Shooting, Custom Settings, Setup, Retouch, and My Menu
Press the right arrow on the Multi Selector to enter the Shooting Menu.
Step 3: Select “File Naming”
Scroll down through the Shooting Menu options until you find “File naming.” It won’t be at the very top. You’ll need to scroll past items like Image quality, Image size, and White balance.
Once you’ve highlighted “File naming,” press OK or the right arrow to select it.
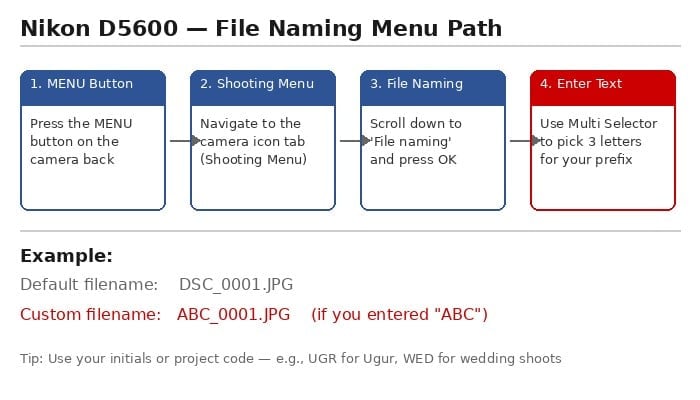
Step 4: Enter Your Three-Character Prefix
This is where you pick the three letters (or numbers) that will replace “DSC” in your filenames.
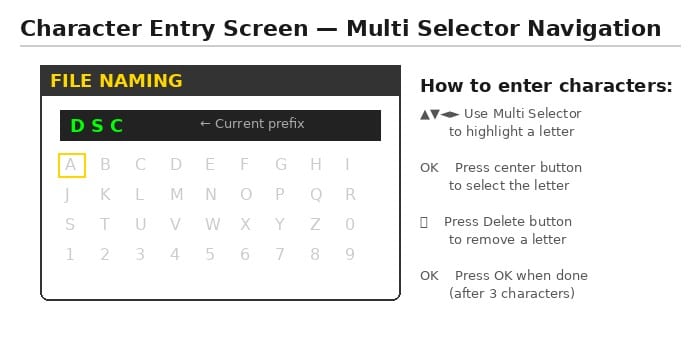
The character entry screen lets you pick from A-Z and 0-9 using the Multi Selector
Here’s how the character entry screen works:
Use the Multi Selector to move the yellow highlight box to the letter or number you want. Press the center OK button to select that character. The cursor moves to the next position automatically.
You need to enter exactly three characters. If you make a mistake, press the Delete (trash can) button to remove the last character and try again.
Step 5: Confirm and Start Shooting
After entering all three characters, press OK to confirm. The menu closes and your new prefix is active right away. Every photo you take from this point forward will use your custom prefix instead of DSC.
For example, if you entered “UGR,” your next photo will be saved as UGR_0001.JPG instead of DSC_0001.JPG.
A Few Things Worth Knowing
The sequence number (the four digits after the underscore) doesn’t reset when you change the prefix. If your last photo was DSC_0847.JPG and you change to UGR, the next shot will be UGR_0848.JPG, not UGR_0001. If you want to reset the numbering, that’s a separate setting under the Shooting Menu called “File number sequence.”
Your custom prefix sticks around until you change it again. It survives power cycles, battery swaps, and SD card changes. So set it once and forget it, unless you want different prefixes for different projects.
If you ever want to go back to the default, just repeat these steps and enter DSC.
When to Change Your Filename Prefix
The best time to set this up is right when you unbox the camera, before your first shoot. But it’s also worth changing the prefix at the start of any new project if you want clean file organization. Some photographers change it for every client shoot. Others set it once and rely on folder structure for organization. There’s no wrong approach. It depends on how many files you’re managing and how you prefer to sort them.
This guide covers the Nikon D5600. The same steps also work on most other Nikon DSLRs including the D5500, D3400, and D3500. The menu layout is nearly identical across these models.