When you purchase through links on our site, we may earn an affiliate commission. Here’s how it works.
How to Use Scene Modes on the Canon EOS Rebel T7/2000D
The Canon EOS Rebel T7 (2000D) has six dedicated scene modes that optimize the camera’s settings for specific shooting situations. Think of scene modes as pre-built recipes: instead of manually adjusting aperture, shutter speed, ISO, flash, and autofocus for every situation, you turn the dial to an icon that matches what you’re photographing, and the camera configures everything for you.
Scene modes sit on the mode dial between the fully automatic modes (green square, Flash Off) and the creative modes (P, Tv, Av, M). They’re designed for photographers who want better results than full Auto provides but aren’t ready to manage every setting individually. Each mode prioritizes the settings that matter most for its intended subject fast shutter for sports, wide aperture for portraits, deep focus for landscapes.
The Six Scene Modes
The T7 offers six scene modes, each identified by an icon on the mode dial. Understanding what each mode actually changes inside the camera helps you choose the right one and know when a scene mode won’t give you the result you want.
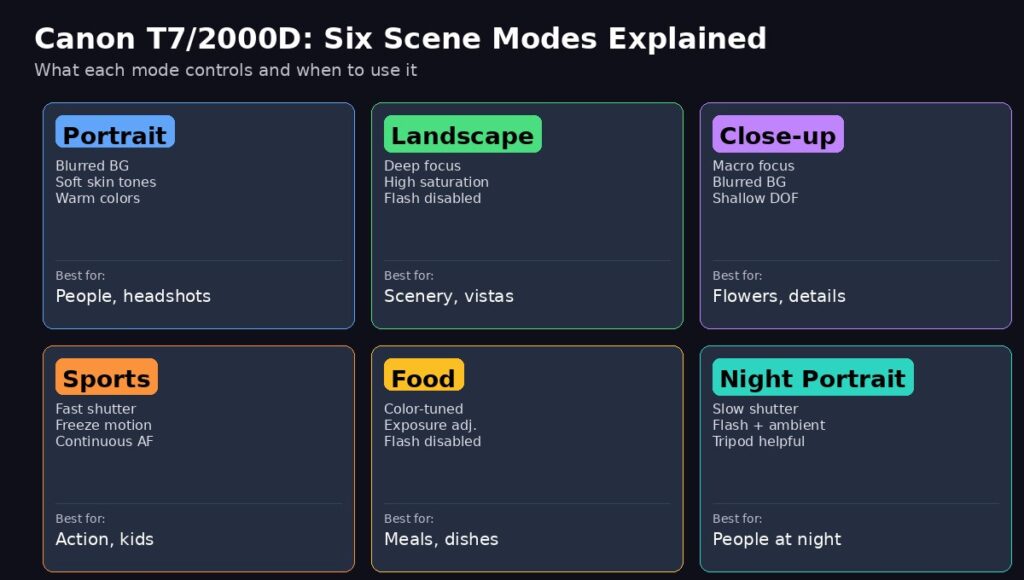
Image Six modes for six shooting scenarios each one adjusts multiple settings simultaneously to suit the subject
Portrait Mode (head icon): Opens the aperture as wide as your lens allows to create a shallow depth of field blurring the background while keeping the subject’s face sharp. The camera also applies a warm color tone and slightly softens skin texture in its JPEG processing. Flash fires automatically if the scene is dark. Autofocus uses One-Shot AF (single focus confirmation).
Landscape Mode (mountain icon): Does the opposite of Portrait it closes the aperture to a narrow setting (high f-number) so everything from foreground to background stays sharp. Color saturation and contrast are boosted to make skies bluer and foliage greener. The flash is completely disabled (it would be useless for distant scenery), and the camera uses One-Shot AF.
Close-up Mode (flower icon): Optimized for macro-style photography of small objects. The camera opens the aperture wide for background blur (similar to Portrait mode) and focuses at close range. Flash fires automatically when needed to illuminate small nearby subjects. The critical factor in Close-up mode is your lens’s minimum focusing distance; the camera can’t focus closer than your lens physically allows.
Sports Mode (running figure icon): Prioritizes a fast shutter speed to freeze action. The camera raises ISO aggressively to maintain fast shutter speeds even in moderate light, and switches to AI Servo autofocus (continuous focus tracking) so it follows moving subjects. The flash is disabled because recycling time would prevent continuous shooting. The camera also enables high-speed continuous drive; hold the shutter and it fires approximately 3 frames per second.
Food Mode (plate icon): Adjusts color balance and exposure specifically for photographing meals. It boosts warm tones (reds and yellows that make food look appetizing) while slightly increasing exposure to make dishes look bright and inviting. Flash is disabled by default to avoid harsh reflections on plates and glassware, though you can override this via the Quick Control screen.
Night Portrait Mode (person + star icon): Combines flash with a slow shutter speed. The flash illuminates your subject (the person), while the slow shutter speed allows ambient background light (city lights, sunset glow) to register in the exposure. This prevents the common problem of flash portraits at night where the person is lit but the background is pure black. A tripod is strongly recommended because the slow shutter speed makes handheld shooting prone to motion blur.
How to Select a Scene Mode
The process is simple, but getting it right matters because each mode locks you into specific settings with limited override options.
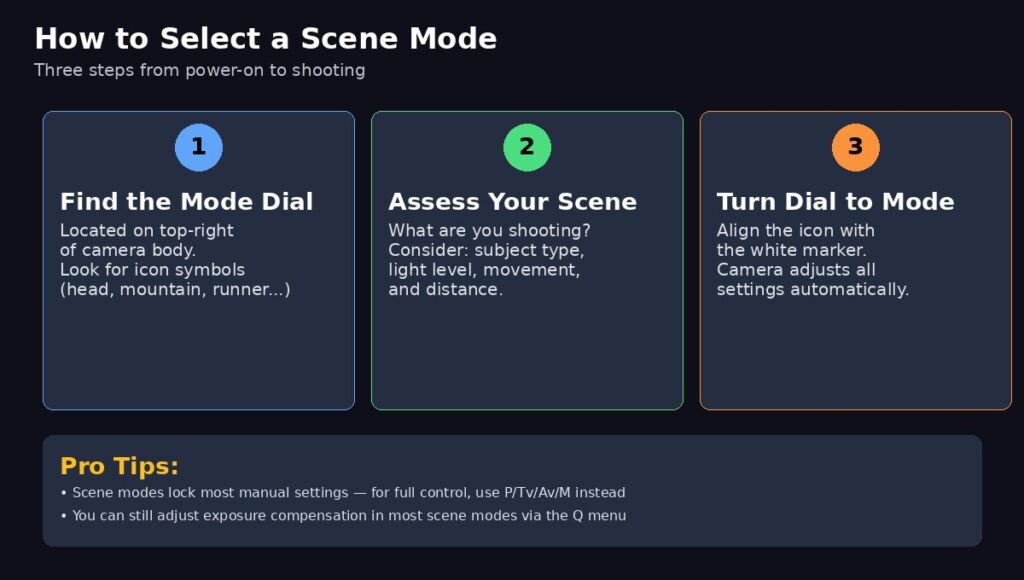
Image Three steps to shooting the camera handles everything else once you’ve selected the right mode
Step 1: Locate the mode dial. It’s the large dial on the top-right of the camera body. Each mode is represented by an icon etched into the dial.
Step 2: Assess your subject and environment. Ask yourself: Am I shooting a person (Portrait)? A wide outdoor scene (Landscape)? Something small and close (Close-up)? Fast movement (Sports)? Food on a plate (Food)? A person at night with a visible background (Night Portrait)?
Step 3: Turn the dial to align the appropriate icon with the white index mark. The camera immediately configures all relevant settings. There’s no confirmation needed; just frame your shot and press the shutter.
What Each Mode Actually Controls
Understanding the specific settings each mode adjusts helps you decide when to use a scene mode versus when you’ve outgrown it and need manual control.

Image Each mode adjusts five key settings knowing this helps you understand why your photos look the way they do
The table above shows that scene modes make interconnected decisions. Sports mode doesn’t just use a fast shutter it also enables AI Servo AF for continuous focus tracking and disables flash for uninterrupted burst shooting. Night Portrait doesn’t just turn on flash it deliberately uses a slow shutter to capture ambient light behind the subject.
This is why scene modes can produce significantly better results than full Auto for their intended subjects. Auto mode uses a one-size-fits-all approach, while scene modes are tailored to specific photographic situations.
Tips for Better Scene Mode Results
Each mode has techniques that improve your results beyond just pointing and shooting.
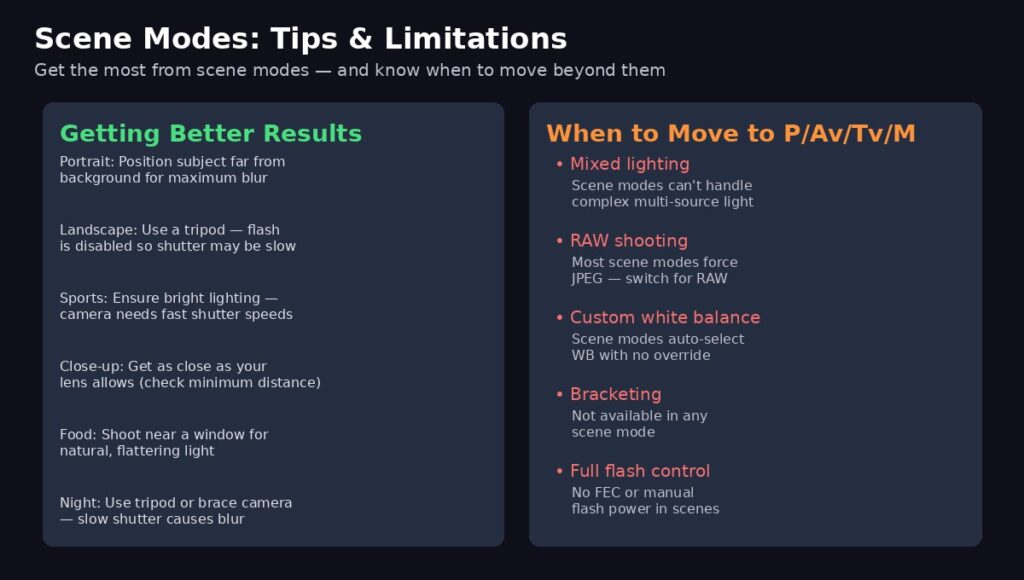
Image A few adjustments to your technique make scene modes work dramatically better
Portrait: Position your subject far from the background. Aperture blur (bokeh) increases with distance between subject and background. A person standing against a wall gets minimal blur; a person standing 10 feet in front of a hedge gets beautiful background separation. Also, use the longest focal length your lens offers (55mm on the kit lens) longer focal lengths increase background blur.
Landscape: Use a tripod. Because Landscape mode uses narrow apertures and disables flash, the camera may select slower shutter speeds in dim conditions (early morning, overcast days, golden hour). A tripod prevents blur from camera shake during these slower exposures.
Sports: Ensure plenty of light. The camera needs fast shutter speeds (1/500 or faster) to freeze motion, which means it needs abundant light or will push ISO very high, introducing visible grain. Outdoor daytime sports work well; indoor gyms may produce noisy images.
Close-up: Check your lens’s minimum focus distance (usually printed on the lens barrel). The camera can’t focus closer than this limit regardless of the mode selected. With the 18-55mm kit lens, minimum focus distance is about 25cm (10 inches). For true macro photography, you’ll need a dedicated macro lens.
Food: Shoot near a window. Natural side-lighting produces the most flattering food photography. The disabled flash prevents harsh overhead lighting that creates unflattering shadows on plates. Position the plate near a large window and shoot from a 45-degree angle or directly overhead.
Night Portrait: Brace the camera. Even with flash, the slow shutter captures ambient light during the full exposure time. Hand-holding almost always produces some blur. Use a tripod, lean against a wall, or rest the camera on a solid surface. Tell your subject to stay still for a second after the flash fires; they need to remain frozen during the full exposure.
When to Move Beyond Scene Modes
Scene modes are a starting point, not a ceiling. They lock out most manual adjustments; you can’t change aperture, shutter speed, ISO, white balance, metering mode, or flash power independently. Once you find yourself frustrated by these limitations, it’s time to explore the creative modes.
Move to P (Program) mode when: You want auto exposure but with the ability to override individual settings like ISO, white balance, and flash mode.
Move to Av (Aperture Priority) when: You understand depth of field and want to control background blur directly.
Move to Tv (Shutter Priority) when: You want to freeze motion or create motion blur intentionally.
Move to M (Manual) when: You want complete creative control over every exposure variable.
Scene modes also force JPEG shooting on many cameras and don’t support RAW capture, exposure bracketing, or custom white balance features that become important as your photography skills develop.
This guide covers the Canon EOS Rebel T7 (2000D). The same six scene modes with identical behavior are available on the Canon T6 (1300D) and T100 (4000D). The T7i (800D), T8i (850D), and SL3 (250D) have these same modes plus additional scene options and the ability to shoot RAW in scene modes.
See Also