When you purchase through links on our site, we may earn an affiliate commission. Here’s how it works.
The Canon EOS Rebel T6 (sold as the 1300D outside North America) has a set of built-in creative filters that let you apply effects to photos you’ve already taken – directly on the camera, without a computer or any editing software. It’s essentially a mini photo editor built into the camera’s playback system.
The key thing to understand upfront: these filters never touch your original photo. When you apply a creative filter, the camera creates a brand new copy with the effect applied and saves it as a separate JPEG file. Your original stays exactly as it was. This means you can experiment freely – try every filter on the same photo if you want, and you’ll end up with multiple filtered copies alongside your untouched original.
The Six Creative Filters
The Rebel T6/1300D includes six creative filters, each producing a distinctly different look. Not every filter works equally well on every photo – the subject, lighting, and composition all affect how convincing the result looks.
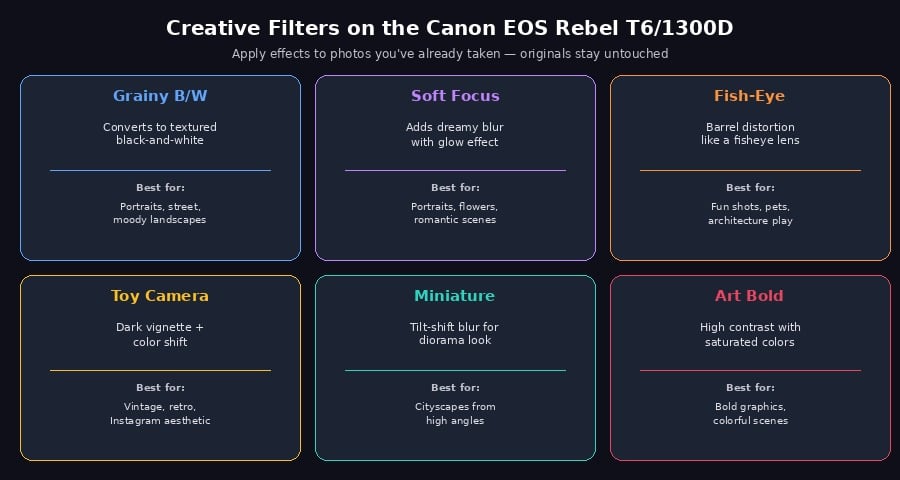
Six built-in filters – each saves as a separate copy, so experiment without risk
Grainy B/W converts the photo to black and white with added film grain, simulating the look of high-ISO analog photography. This works best on photos with strong contrast and defined shapes – portraits with dramatic lighting, architectural details, or street photography. Photos with subtle color differences (like a sunset) lose their appeal when converted to B/W because the color was the whole point.
Soft Focus adds a dreamy, slightly blurred glow to the entire image while keeping the general shapes recognizable. Think of it like smearing a thin layer of petroleum jelly on a lens – an old portrait photographer’s trick that the T6 replicates digitally. It flatters skin in portraits and adds atmosphere to flower close-ups, but it makes landscape photos look out of focus rather than dreamy.
Fish-Eye applies barrel distortion that mimics the extreme wide-angle look of a fisheye lens. The center of the image stays relatively normal while the edges curve dramatically. This is a novelty effect – fun for pets, group selfies, and architectural experiments, but not one you’ll use on serious work.
Toy Camera darkens the corners of the image (vignetting) and shifts the colors slightly – usually toward warmer or more saturated tones – simulating the imperfect optics of cheap plastic cameras. This creates an instant vintage/retro look that works surprisingly well on casual snapshots, street scenes, and everyday objects.
Miniature blurs the top and bottom portions of the image while keeping a horizontal strip in the middle sharp, simulating the tilt-shift effect that makes real-world scenes look like miniature models. This effect is most convincing when applied to photos shot from a high angle looking down – cityscapes from a rooftop, parking lots, or aerial-style views. Applied to a normal eye-level photo, it just looks like selective blur.
Art Bold increases contrast and color saturation dramatically, producing vivid, graphic-style images. It works well on already-colorful subjects – murals, neon signs, flower gardens – but can make skin tones look unnatural in portraits.
How to Apply Creative Filters
You have two ways to access creative filters on the T6. Both produce the same result – it’s just a matter of which path you prefer.
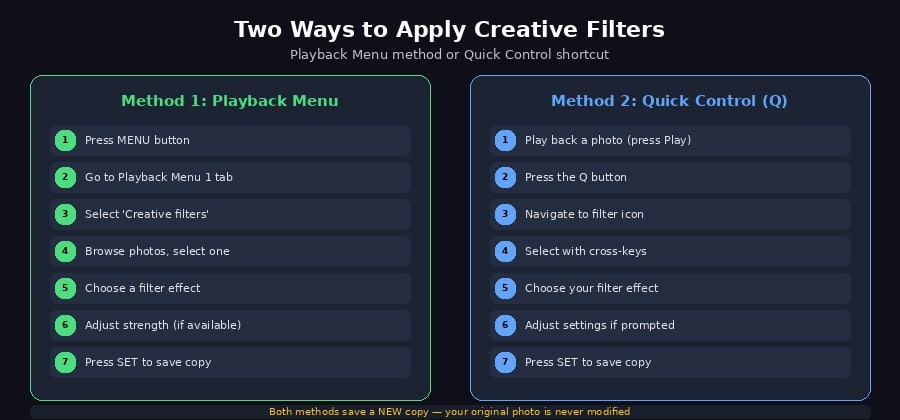
Two paths to the same result – the Q button method is faster once you know the steps
Method 1: Through the Playback Menu
Press the MENU button. Navigate to the Playback Menu 1 tab (the blue triangle icon with a single dot). Select “Creative filters” using the cross-keys and press SET. The camera shows your photos – scroll to find the one you want to apply a filter to, then press SET. You’ll see all six filter options displayed as icons. Highlight the one you want with the cross-keys, and the screen shows a live preview of the effect applied to your photo. When you’re happy with the look, press SET to save the filtered copy.
Method 2: Using the Quick Control Screen
This is faster if you’re already browsing your photos. Press the Playback button to view your photos. Navigate to the photo you want to filter. Press the Q button (Quick Control). Use the cross-keys to highlight the creative filter icon (it looks like a paintbrush or palette), then press SET. Browse and select your filter the same way as Method 1.
Both methods save the filtered version as a new JPEG file with a new file number. Your original photo keeps its original file number and is never modified.
RAW vs. JPEG: How Creative Filters Handle Each
This is worth understanding because it affects your workflow depending on which image quality setting you use.
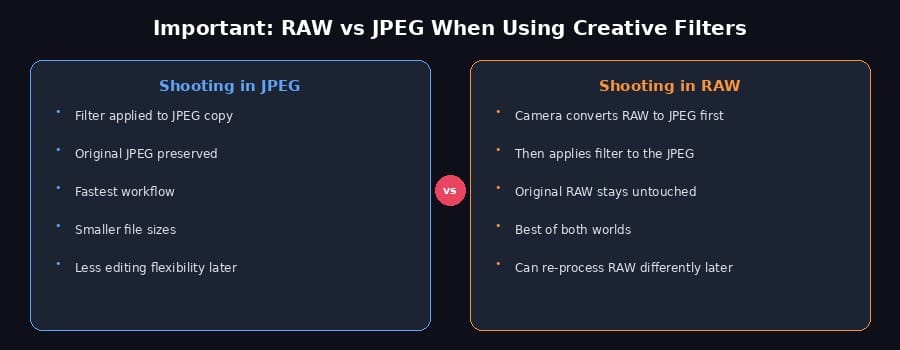
Shooting RAW gives you the most flexibility – the original RAW stays untouched while the filter creates a JPEG copyIf you shoot JPEG: The camera applies the filter to a copy of your JPEG. Both the original JPEG and the filtered JPEG are saved on your memory card. Simple and straightforward.
If you shoot RAW: The camera first converts your RAW file to a JPEG (using the camera’s current Picture Style and processing settings), then applies the creative filter to that JPEG. The result is a filtered JPEG file alongside your original RAW. Your RAW file is completely untouched – you can still process it in software like Canon’s Digital Photo Professional, Lightroom, or any RAW editor with full control over exposure, white balance, and everything else.
This means shooting RAW gives you the best of both worlds: quick in-camera creative filters when you want them, plus the full unprocessed RAW file for serious editing later.
Tips for Better Results
A few habits that make the creative filter experience more useful
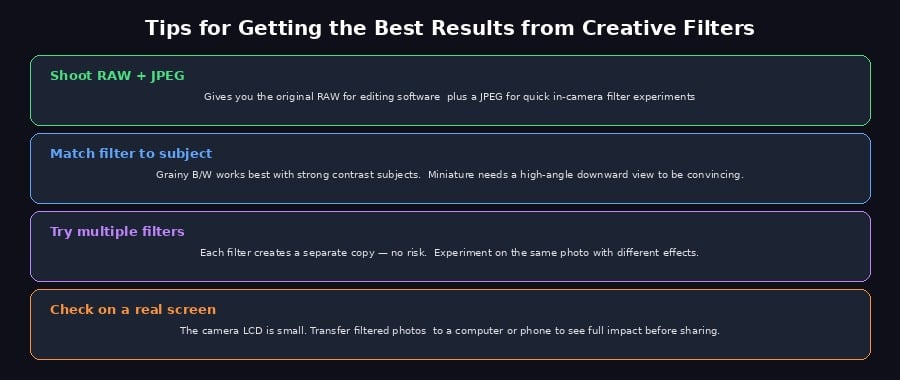
Shoot RAW+JPEG as your default quality setting. This way every photo you take generates both a RAW file and a JPEG. You can apply creative filters to the JPEG for quick sharing while keeping the RAW for more serious post-processing. The trade-off is larger file sizes and fewer photos per memory card, but with modern SD cards this is rarely a problem.
Match the filter to the subject. Grainy B/W works best on photos with strong contrast – think dark shadows against bright highlights. Miniature only looks convincing from a high downward angle. Toy Camera looks best on casual, everyday subjects. Forcing a filter onto an incompatible subject usually looks worse than no filter at all.
Experiment on the same photo. Since each filter creates a separate copy, you can apply all six filters to a single photo and compare the results. This is especially useful when you’re learning what each filter does – seeing all six versions side by side teaches you more than any description can.
Review on a larger screen. The T6’s 3-inch LCD is too small to judge subtle effects like the grain pattern in Grainy B/W or the blur falloff in Miniature. Transfer the filtered photos to a phone, tablet, or computer before deciding which ones to share.
This guide covers the Canon EOS Rebel T6 (sold as the EOS 1300D outside North America). The same creative filters and steps apply to the Canon EOS Rebel T7/2000D, which shares the same menu system. Other Canon DSLR models like the T7i, T6i, and SL2 have the same creative filter feature but may include additional filters not available on the T6.
See Also