When you purchase through links on our site, we may earn an affiliate commission. Here’s how it works.
So, you have just bought the all-new Nikon Z6 but are facing issues regarding ‘ how to connect Nikon z6 to Mac’?
The Nikon z6 is one of the best cameras, with a 24.5MP full-frame back-illuminated CMOS sensor.
Furthermore, its 3.2-inch tilt-angle touchscreens can help you capture fantastic pictures and videos from any angle.
Let’s complete the detailed steps to help you connect the Nikon z6 to your Mac.
Connecting Nikon Z6 to Mac via USB
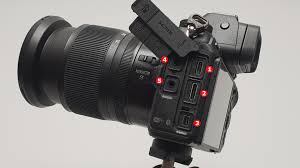
You must first arrange a high-quality USB cable to connect both devices to get along with the same step.
We recommend you check the quality of the USB cable as that would play a significant role in the quality of images and videos transferred between both devices.
Step 1.
Check the battery status of your camera
connect Nikon z6 to mac
You first need to check the battery status of your camera. If it is low, plug it into a charging port to avoid issues while connecting with the Mac.
Step 2.
Turn on the Mac
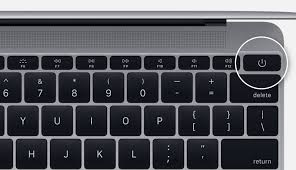
connect Nikon z6 to Mac – Powering on the Mac
You now need to turn on your Mac and allow it to finish its startup process.
Step 3.
Turn off the camera and establish a connection with USB
You need to turn off the camera while inserting the smaller two USB cable plugs into the camera’s USB port. Again, gently plug the other part of the USB cable into the Mac’s USB port.
Step 4.
Turn on the camera
You can now turn on your Nikon Z6 and start along with any image or video transfer.
Recommended steps to connect Nikon z6 to Mac via wifi
Step 1.
Open the setup menu on your camera and select wifi
Once you have turned on your Nikon Z6, open its setup menu and select the WIFI option.
Step 2.
Select network connection
Once you have checked the WIFI option, select the network connection. You must return to the wifi setup screen to get the same done.
The Wi-Fi symbol blinks on the screen, confirming that the camera sends a Wi-Fi signal.
The same Wi-Fi symbol blinks in the information display and the live view display of your Nikon Z6.
Step 3.
Select the correct network settings.
Under the Wi-Fi option, you need to check the network settings option. You will find specific options there, such as push-button WPS, PIN entry WPS, View SSID, and Reset network settings.
Step 4.
Select the required connection option
When establishing connections with iOS devices, you must select the view SSID option, the only applicable option.
Once you have selected the same option, the SSID of your camera will appear on your Mac.
Select that SSID on your Mac and choose the ‘ Connect’ option.
Once the connection has been established between both devices, you will see a confirmation message on your devices, and the Wifi symbol will stop blinking.
Step 5.
Install the Nikon Wireless Mobile Utility app on your Mac
You need to install the Nikon Wireless Mobile Utility app on your Mac, which will help you transfer all the images or videos between both devices.
Please note that you must download the same software from the authorized Nikon website to avoid malware or viruses entering your device.
Summing it up
We just detailed the steps for connecting the Nikon Z6 to a Mac via Wi-Fi or USB. Stay tuned for the latest news and updates on your favorite gadgets and devices.
See Also