When you purchase through links on our site, we may earn an affiliate commission. Here’s how it works.
How to Connect External Monitor to MacBook Pro? – Getting Started
Whether you’re a design expert, a computer whiz, someone who’s looking to enhance the productivity of their MacBook Pro, or you just want to have a cool-looking setup, having an external monitor is absolutely worthwhile and aesthetically pleasing.
A couple of years back, connecting an external monitor to Apple devices was a major pain. However, Apple has now made changes, and it’s relatively easy to connect an external display to your MacBook Pro.
The process is pretty straightforward when using an Apple monitor, thanks to the Mini DisplayPort, which was standard on Mac laptops for some years. Newer Mac laptops have Thunderbolt ports which come as standard.
Suppose you want to hook up your MacBook Pro to a display from another brand? In that case, you only need to follow a couple of steps. Here’s how you can do it.
How Do You Know Which Monitor Your MacBook Pro Supports?
Before buying a new monitor to connect to your MacBook Pro, ensure that it can handle the resolution. Most MacBooks can exceed Full HD or 1080p on an external display; however, your Mac might not support a 4K external display.
To find out the exact resolution your Mac can handle, you’ll need to check on its tech specs on the Apple website. So how do you do this?
- Start by opening the Apple website.
- Next, enter the year and model of your Mac in the search box.
- Click on support.
- From the search results, find your MacBook and click on it.
- Next, scroll down to the ‘Video Support’ section and navigate to the dual display and video mirroring option; there, you’ll see the resolution that your MacBook supports.
Finding The Right Adapters for Your External Monitor
The simplest way to connect a non-Apple display to your MacBook Pro is using an HDMI cable because most Macs and non-Apple displays have HDMI ports. However, if your MacBook Air is one of the newer models (M1), it won’t have an HDMI port.
If you want to connect the newer Macs to an external display with HDMI ports, you’ll need to buy an adapter that converts HDMI to Thunderbolt or Mini DisplayPort, depending on your PC.
If the display you want to connect to your Mac is older and it doesn’t have an HDMI port, you’ll need to buy an adapter that converts VGA/DVI to HDMI or VGA/DVI to Thunderbolt.
Adapters and cables turn into a nightmare, so if you have the newer Macs, keep in mind that you have several other options available, which depend on the USB-C ports. Buying a simple USB-C multiport adapter might be the best solution for you to connect to a display with HDMI. Also, you can find adapters with both HDMI and VGA ports.
The Process of Adding an External Monitor to Your MacBook Pro Is as Follows:
Once you’ve bought an external monitor to connect to your MacBook Pro, you’ve confirmed that your Mac can handle the monitor, and you have the necessary adapters or cables; you’re now ready to connect the display to your MacBook.
- Start by connecting the monitor to your Mac using the appropriate adapters or cables.
- Position your Mac and the external monitor on a desk or tabletop.
- Turn on your MacBook. Your MacBook should detect and activate the display even though the settings won’t be that good.
- Next, click on the Apple Menu icon.

How to Connect External Monitor to MacBook Pro
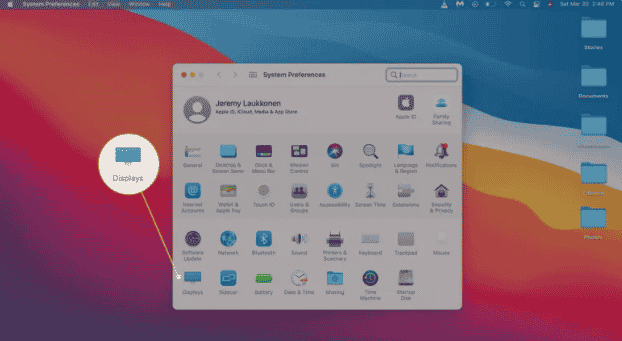
- Then click on ‘System Preferences.’

- Then click on ‘Displays.’
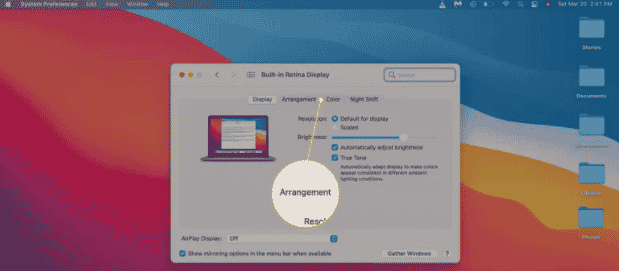
- Next click on ‘Arrangement.’
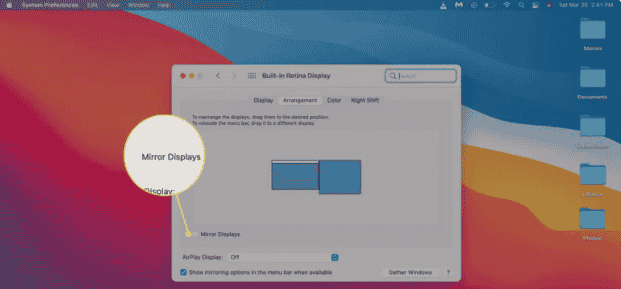
- Ensure the mirroring option is unchecked. If the mirroring option is checked, both your laptop and monitor will show the same content at all times.
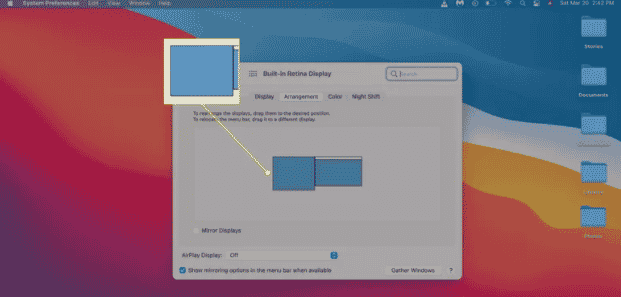
- On your screen, you’ll see an image showing the positions of your Mac and external display. If they aren’t positioned correctly, find the secondary display icon.
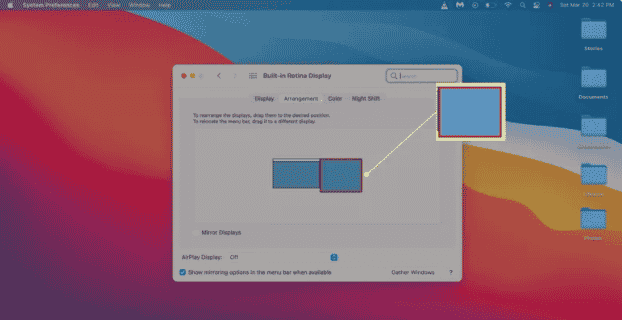
- Next, click and drag the secondary display to the correct position.

- Release your trackpad or mouse, and then the secondary display will drop into the position you’ve chosen.
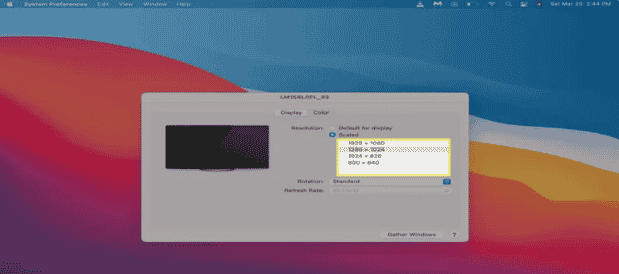
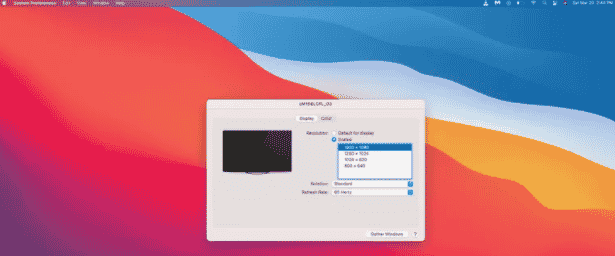
- Click on the correct resolution for your monitor. To get the best results, choose your monitor’s native resolution. The resolution you pick should be equal to or lower than what your MacBook is capable of handling.
- If the displays look right, you can exit the display settings and begin using the setup.
Tip: You can boost your chances of succeeding to connect an external monitor to MacBook pro by not connecting using multiple adapters and cables. MacBooks work well with external monitors when you use Apple cables and adapters or those from supported brands.
Final Thought
To sum it all up, now you know how to connect your MacBook Pro to an external monitor. However, you need to be very careful when buying adapters to bring this connection to life. This is because older MacBooks have different ports than newer MacBooks.